
Workflow templates
Workflow Templates
The Workflow Templates screen is your central library for every automated compliance workflow in Priverion. This is where you come to see all the workflows your team has built, check which ones are currently running, create new ones, and jump straight into the visual editor to make changes. Whether you are a DPO wanting to confirm which automations are live before an audit, an IT admin setting up a new reminder process, or a compliance officer who needs to pause a workflow temporarily, this screen is your starting point for everything workflow-related.
How to open it
In the main Priverion sidebar, click the Workflow section. The workflow area opens and a navigation bar appears across the top of the screen. Click the Templates button in that navigation bar. The screen is available to everyone who has access to the workflow module; the Create button is only visible to users who also have permission to create workflows.
What you see
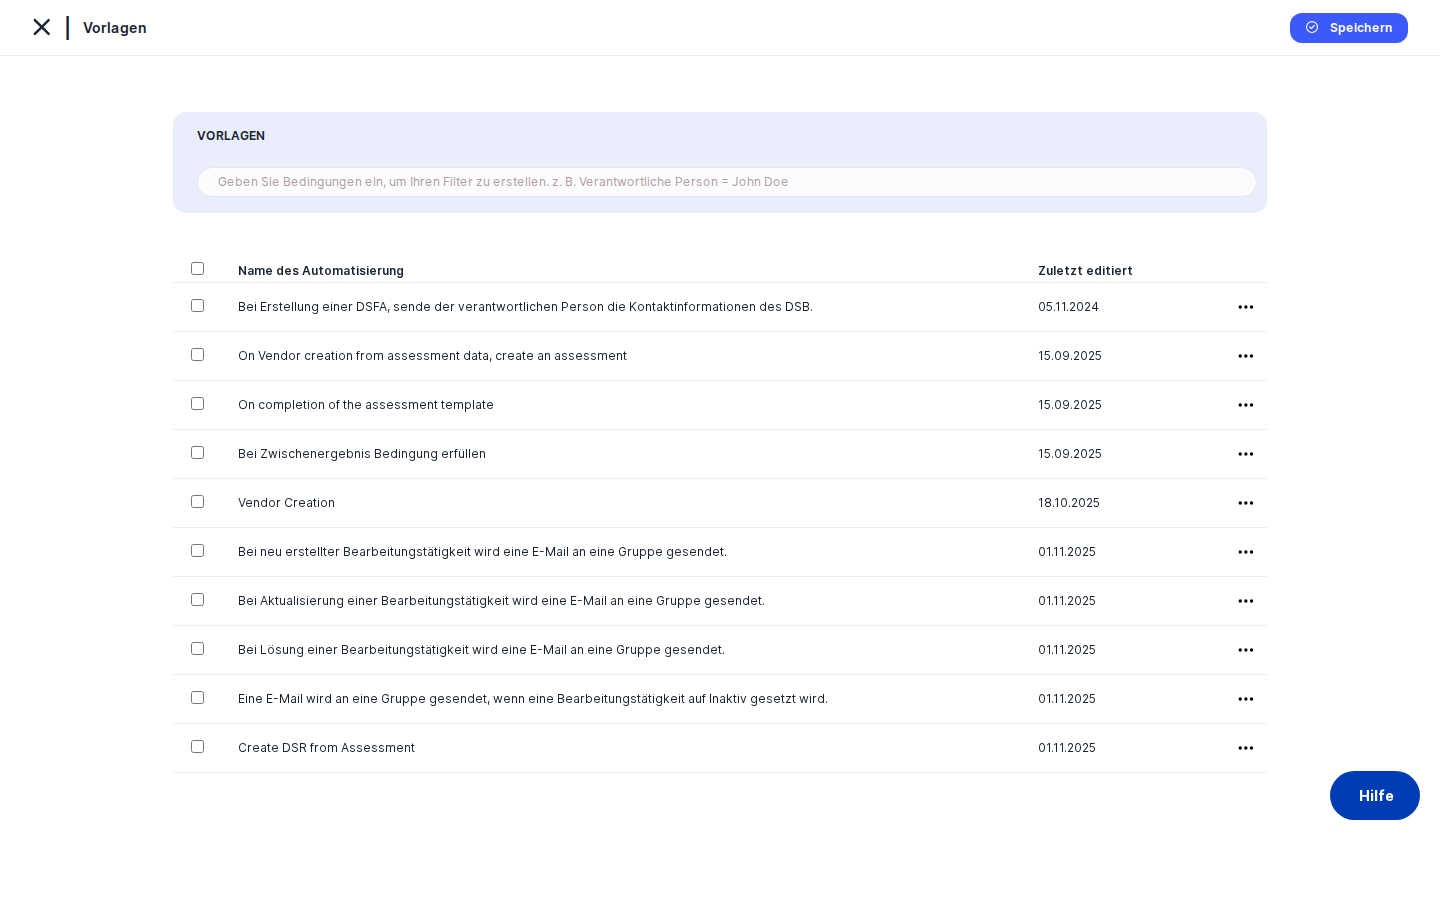
The screen is divided into two clear zones. Across the very top runs a dark navigation bar shared by every screen in the workflow module. It contains small pill-shaped buttons — Templates, Queue, Constants, Email Templates, and others — each linking to a different part of the workflow area. The button for the section you are currently viewing is highlighted so you always know where you are.
Below the navigation bar is the main content area. A page title reads Workflows, followed by a search bar and, in the top-right corner, an animated Create button (visible only if you have permission to create workflows). The bulk of the page is a clean, scrollable table listing every workflow in your company's DPMS instance. Each row represents one workflow definition and shows its name and current status at a glance. As you scroll down, more rows load automatically — there are no page numbers to click.
Working with this screen
Reviewing which workflows are active
When you want a quick overview — for example, before a compliance audit — you can sort the list by status to group all running workflows together. Click the Status column header once to sort; click it again to reverse the order. All workflows showing the active badge are currently live and will process data when their trigger conditions are met. Workflows showing draft are still being built and will not run. Workflows showing inactive have been deliberately paused.
You can also sort by name by clicking the Name column header. Only one column can be sorted at a time.
If your list has grown long, use the search bar at the top of the table. Start typing the workflow's name and the list filters in real time. Clearing the search restores the full list. This is especially useful when you manage dozens of workflows — for example, searching for "DSR" quickly narrows the list to any workflow whose name contains those letters.
Creating a new workflow
When you need to automate a new compliance process — say, sending a reminder when a data subject request deadline is approaching — this is where you start.
- Click the Create button in the top-right corner of the content area. A small dropdown appears with one option: Create Workflow.
- Click Create Workflow. The browser navigates to the Workflow Visual Editor, which opens with a blank canvas and a default name of "Blank Workflow".
- In the editor, click the workflow name at the top and type a meaningful name — for example, "DSR Deadline Reminder". Press Enter to confirm.
- Build your workflow logic by dragging trigger, action, and condition nodes onto the canvas and connecting them. When you are done, change the status selector from
drafttoactive(this is a required step — a newly saved workflow will not run until you explicitly set it to active). - Click Save. The system validates the graph and saves it.
Once saved, the new workflow appears in the Templates list with the status you chose. If you set it to active, it is now live and will execute whenever its trigger conditions are met.
Heads up: A newly saved workflow is always indraftstatus by default. It will not run automatically until you open it in the editor, change the status toactive, and save. Back on the Templates list, adraftbadge means the workflow is not yet doing anything.
Opening and editing an existing workflow
To view or change a workflow's logic, find it in the list — use the search bar if needed — and click its name. The name is a clickable link (you will notice a small external-link icon next to it) that opens the Workflow Visual Editor directly for that workflow. Alternatively, you can click the edit icon in the row's trailing action area on the right-hand side; both take you to the same place.
Inside the editor you can rearrange nodes, change trigger settings, update the workflow name, or change the status. When you navigate back to the Templates list (using the browser back button or the Templates navigation button at the top), the list reflects any changes you made.
Pausing or deactivating a workflow
If a process is under review or a workflow is no longer needed temporarily, you can pause it without deleting it.
- Find the workflow in the list using the search bar or by scrolling.
- Click its name to open it in the Workflow Visual Editor.
- In the editor, locate the status selector and change it from
activetoinactive. - Click Save.
- Navigate back to the Templates list. The workflow's row now shows an
inactivebadge. It will no longer run until you re-open it, set the status back toactive, and save again.
This is the recommended approach whenever a workflow needs to be temporarily stopped. Pausing rather than deleting preserves all the node logic so you can reactivate it later without rebuilding from scratch.
Deleting an obsolete workflow
When a workflow is no longer needed at all, you can remove it permanently.
- Find the workflow in the list. If it is buried in a long list, use the search bar.
- Click the delete icon (trash icon) in the row's trailing actions on the right.
- A confirmation dialog appears asking you to confirm the deletion.
- Confirm the deletion. The workflow is removed and the list refreshes automatically.
Heads up: Deleting a workflow from this list does not automatically cancel any running executions that are already in the Queue. If the workflow is active and has ongoing executions, use the Stop action on the Queue screen first, then return here to delete.Field reference
The Templates list itself does not have form fields to fill in — all field-level editing happens in the Workflow Visual Editor. However, each row surfaces one important piece of information worth understanding:
- Name — The workflow's name as it was entered in the editor. If a workflow was saved before its name was changed, it may appear as "Blank Workflow". Clicking the name opens the editor.
- Status — Displays one of three values:
draft— The workflow has been created but is not yet live. It will not run until its status is changed toactivein the editor.active— The workflow is live. It will execute automatically when its trigger conditions are met (for example, when a DSR record is updated, or on a weekly schedule).inactive— The workflow has been manually paused. It will not run until re-activated.
How this connects to the rest of DPMS
The Workflow Templates screen sits at the top of the workflow module hierarchy. Think of it as the master catalogue: everything else in the workflow area flows from here.
- Workflow Visual Editor — Every workflow in the list was built in the editor and must be edited there. The Templates list is the gateway; you open the editor by clicking a workflow name or the edit icon.
- Workflow Queue — The Queue screen shows every execution of your workflows: each time an
activeworkflow's trigger fires, a new entry appears in the Queue showing progress, inputs, outputs, and whether it completed successfully. A workflow must exist in the Templates list withactivestatus before it will ever appear in the Queue. - Workflow Constants — The Constants screen (accessible via the navigation bar) manages reusable typed values that workflow nodes can reference. If your team edits or deletes a constant that is used by an active workflow, DPMS will show a warning listing the affected workflows. The connection runs in both directions: constants must be created on the Constants screen before they appear as selectable options when you are editing a workflow in the editor.
- Workflow Email Templates — The Email Templates screen manages the HTML email messages that notification nodes can send. Like constants, email templates must exist before they can be chosen inside a workflow node.
- DPMS objects (ROPA, vendors, tasks, assessments, etc.) — Any DPMS record that has a workflow assigned to it depends on the workflow definition stored here. If a workflow is set to
inactive, the associated objects stop receiving automated updates from that workflow. If the workflow is deleted, the automation is gone entirely.
After setting up a new workflow here and in the editor, verify that it appears in the list with active status, then monitor its early executions on the Queue screen to confirm it is behaving as expected.
Tips & common pitfalls
Heads up: A workflow indraftstatus will never run, no matter how complete its logic looks. Always remember to change the status toactiveinside the editor and save before expecting the workflow to do anything.
- Deleting a workflow does not stop running queue entries. Set the workflow to
inactivefirst to prevent new executions, then stop any in-progress runs on the Queue screen, and only then delete the template.
Tip: If you are testing a time-based workflow (such as a weekly scheduler), you must save it as active to see the Trigger button in the editor, which lets you fire the check manually without waiting for the scheduled time.- Workflow names are stored per language. If a workflow was created in English and a colleague views the list in German, the name may fall back to the English version or show as "Blank Workflow" if a German translation was never added. Open the workflow in the editor to add the missing translation.
- Editing a constant or email template used by a workflow triggers a warning. When you (or a colleague) edit a constant on the Constants screen that is referenced by an active workflow, DPMS shows a warning listing the affected workflows before saving. This is DPMS's way of helping you avoid accidentally breaking a running automation — pay attention to those warnings.
- The search bar filters by workflow name only. You cannot currently filter by status or creation date directly from the search bar. To see all active workflows, use the Status column sort as a workaround.
- The most-used node order in the editor is stored per browser. The left-side node menu in the editor sorts by how often you have used each node type — but this preference is saved in your browser's local storage, not in your DPMS user account. It will not carry over to a different browser or device.