
SAML2 with SCIM2 Integration GUIDE
CONFIGURING SAML2
PREREQUISITES
- A user with access to the Priverion Platform
- Your user must at least have IT Administrator role, or a Custom Role with IT Settings access
SUPPORTED FEATURES
- SP-initiated SSO
- The sign-in process is initiated from your organization’s Priverion login page
- Enter your email and press the Next button
- If your organization have a "multi-tenant" configuration, select on the dropdown the corresponding Company
- If your company has SSO enabled, Priverion automatically redirects you to your organization’s Identity Provider (IdP)
- If you aren’t already signed in, enter your IdP credentials and complete any MFA prompts if needed
- After successful authentication, you are redirected back to Priverion and signed in
CONFIGURATION STEPS
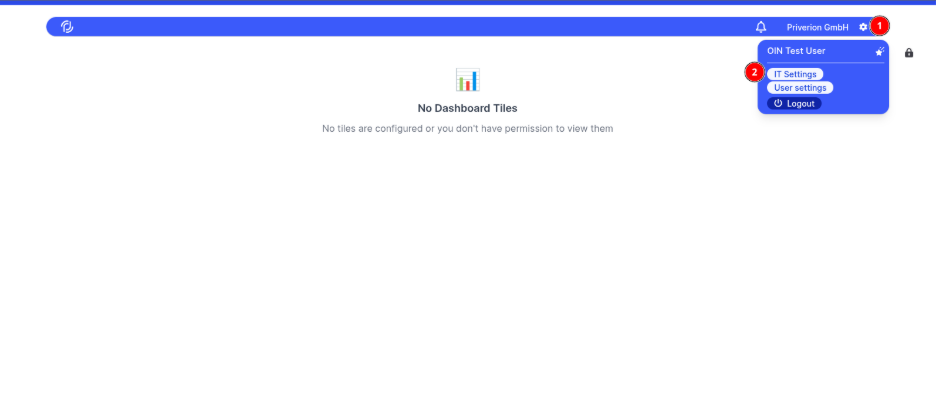
- From the upper bar menu, click on the Settings icon button
- On the opened menu, select IT Settings
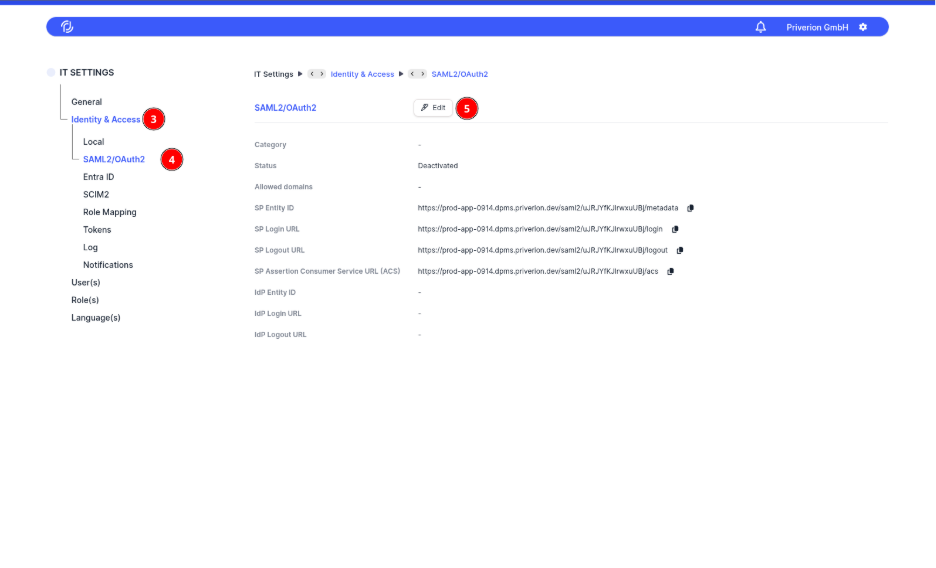
- Open the Identity & Access menu
- Select the SAML2/OAuth2 suboption
- Click on the Edit button in order to open the Authentication Configuration screen
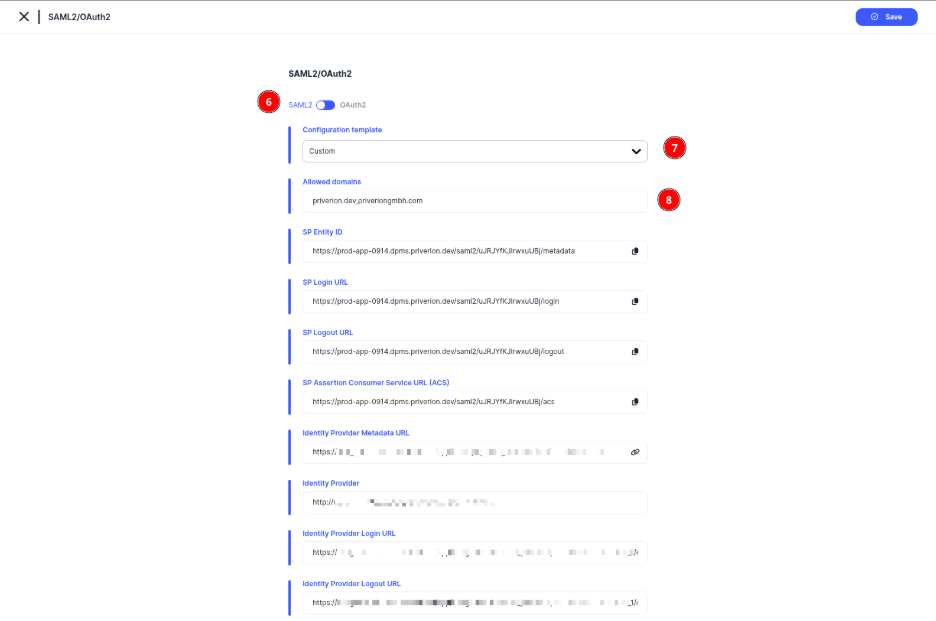
- Make sure the SAML option is selected
- Select Custom or one of the prefilled options for Microsoft or Google
- Make sure to configure with a comma separated list the Allowed domains for your case
- Use any of the options provided by the platform to configure the necessary credentials, you can either:
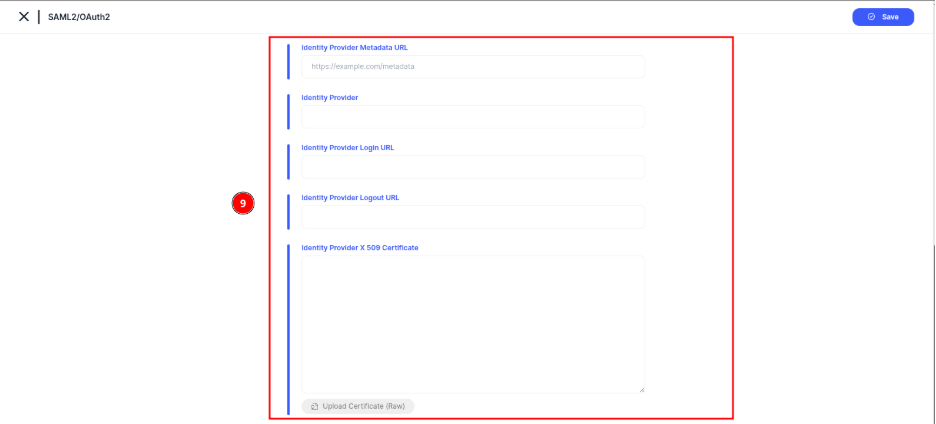
- Provide a metadata link on the Identity Provider Metadata URL and load the information automatically
- Manually write the Identity Provider Login URL & Identity Provider Logout URL and upload a valid Certificate file on the Identity Provider X 509 Certificate section
- Just write everything manually

- Define the Name ID format from the list according to your provider
- Configure the Group-Claims mapping according to your provider. Full Name, E-mail and Groups are mandatory
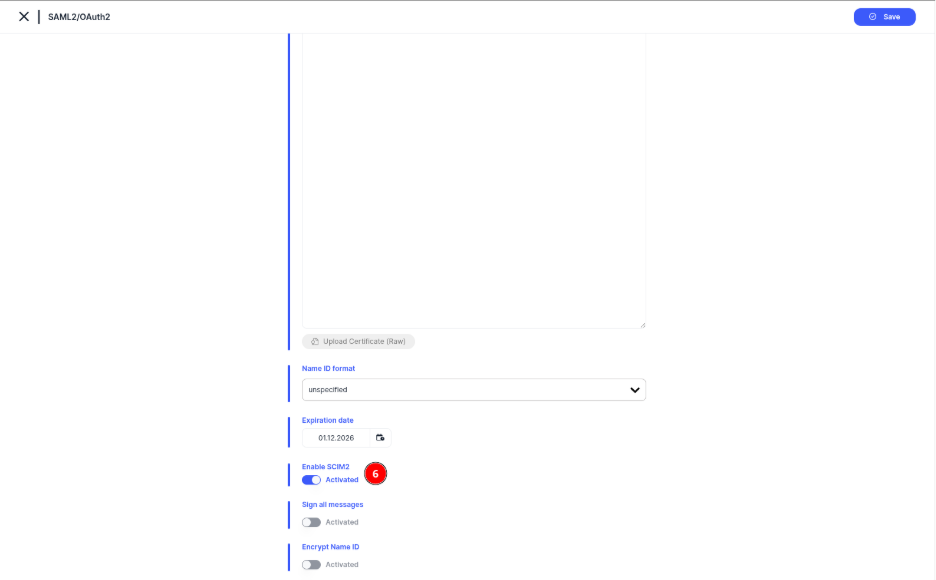
- OPTIONAL. Configure the options for Sign all messages & Encrypt Name ID if your provider supports it
- OPTION 1 (SCIM2 Activated). Activate SCIM2 support for Users & Groups provisioning if necessary, via the Enable SCIM2 option. See the CONFIGURING SCIM2 section below for further details
- OPTION 2 (SCIM2 Not Activated). If SCIM2 is not activated, the groups are expected to come on the configued Groups claim, See the MANUAL MAPPING OF GROUPS subsection below
MANUAL MAPPING OF GROUPS
This section is only mandatory if SCIM2 was not enabled when setting up SAML2.
Make sure to have properly defined the Groups claim.
Make sure to know the unique identifier/name of each group that you need to map to one or many Priverion Platform role
- From the upper bar menu, click on the Settings icon button
- On the opened menu, select IT Settings
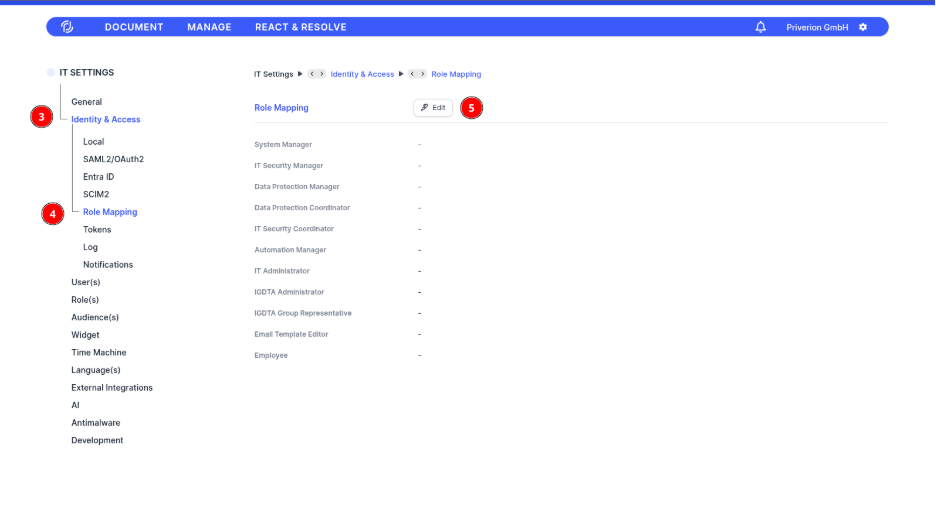
Open the Identity & Access menu
- Select the Role Mapping suboption
- Click on the Edit button in order to open the Role Mapping Configuration screen
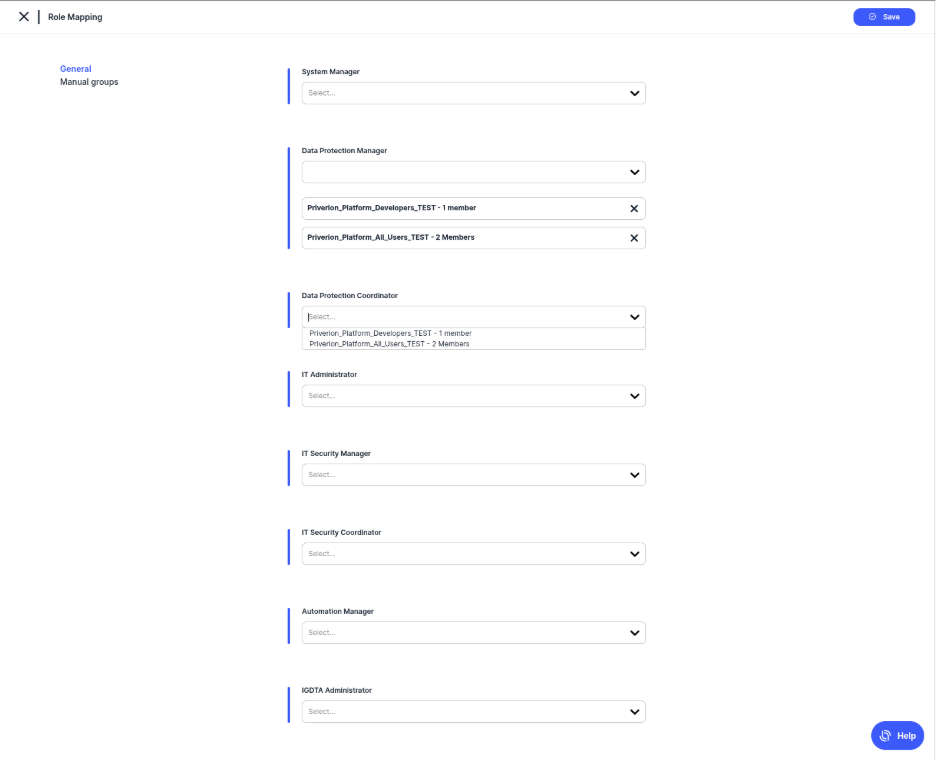
Select the Manual groups option, then click on the Create button and the Create Group option
Add a Name for the group and on the Unique Identifier field make sure to add the group with the proper value that is going to be provisioned on the Group claim configured.
- Press the Save button in order to save the new group.
Once the group is defined, it is possible to map it to any of the Priverion Platform groups via the dropdowns available for each role.
- Press the Save button in order to save the configuration.
CONFIGURING SCIM2
PREREQUISITES
- A user with access to the Priverion Platform
- Your user must at least have IT Administrator role, or a Custom Role with IT Settings access
- Authentication configuration set with SAML2
SUPPORTED FEATURES
- User operations
- Create
- Read
- Update
- Deactivate
- Group operations
- Create
- Read
- Update
- Delete
NOTE: Priverion Platform does not support Okta's "Push Now" functionality for group membership synchronization. Group updates are processed via standard SCIM PATCH/PUT events. Membership changes for non-Okta users (users created manually within the platform) will not be affected by group push operations from the Identity Provider.
CONFIGURATION STEPS
- From the upper bar menu, click on the Settings icon button
- On the opened menu, select IT Settings
- Open the Identity & Access menu
- Select the SAML2/OAuth2 suboption
- Click on the Edit button in order to open the Authentication Configuration screen
- Activate the SCIM2 integration by enabling the option Enable SCIM2
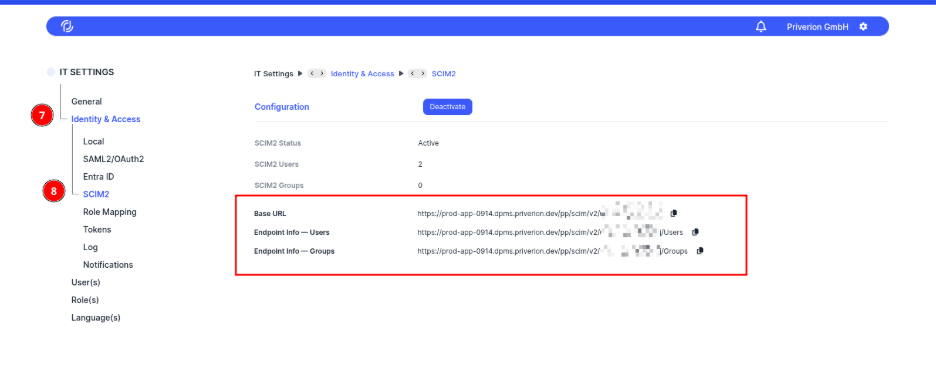
- Navigate back to the Identity & Access
- Select the SCIM2 suboption menu. There you should find the necessary SCIM2 endpoints provided by the platform according to your Instance and Company
SCIM TOKEN FOR API ACCESS
- From the upper bar menu, click on the Settings icon button
- On the opened menu, select IT Settings
Open the Identity & Access menu
- Select the Tokens suboption
- Select the Create Token button
Make sure to define the Type as SCIM and set a proper validation
- Press the Save button
- And confirm the action
You will be redirected to a one time screen where you can copy the token. Make sure to save guard this token as it will not ve available anymore
SCIM ATTRIBUTES TABLE
SCIM attributes table with syntax definition for User available values. Can also be found under /Schemas/urn:ietf:params:scim:schemas:core:2.0:User if needed.
| Attribute (SCIM path) | Type | Multi-valued | Required | Mutability | Value syntax / example JSON | Notes |
|---|---|---|---|---|---|---|
userName |
string |
No | Yes | readWrite |
"userName": "bjensen" |
Unique across all users (uniqueness: server); must be non-empty. |
name |
complex |
No | No | readWrite |
"name": { "givenName": "Barbara", "familyName": "Jensen" } |
Complex object with sub-attributes below. |
name.formatted |
string |
No | No | readWrite |
"name": { "formatted": "Ms. Barbara J Jensen, III" } |
Full formatted name. |
name.familyName |
string |
No | No | readWrite |
"name": { "familyName": "Jensen" } |
Family / last name (Western languages). |
name.givenName |
string |
No | No | readWrite |
"name": { "givenName": "Barbara" } |
Given / first name (Western languages). |
name.middleName |
string |
No | No | readWrite |
"name": { "middleName": "Jane" } |
Middle name(s). |
name.honorificPrefix |
string |
No | No | readWrite |
"name": { "honorificPrefix": "Ms." } |
Title / prefix. |
name.honorificSuffix |
string |
No | No | readWrite |
"name": { "honorificSuffix": "III" } |
Suffix. |
displayName |
string |
No | No | readWrite |
"displayName": "Barbara Jensen" |
Human-friendly display label. |
emails |
complex |
Yes | No | readWrite |
"emails": [{ "value": "bjensen@example.com", "type": "work", "primary": true }]
|
Multi-valued complex array; this implementation maintains the primary email per user. |
emails.value |
string |
— | No | readWrite |
{ "value": "bjensen@example.com" } |
Email value; typically canonicalized. |
emails.type |
string |
— | No | readWrite |
{ "type": "work" } |
Canonical values: work, home, other. |
emails.primary |
boolean |
— | No | readWrite |
{ "primary": true } |
true must appear no more than once in the array. |
active |
boolean |
No | No | readWrite |
"active": true |
User administrative status. |
entitlements |
complex |
Yes | No | readWrite |
"entitlements": [{ "value": "pro", "display": "Pro plan", "type": "plan", "primary": true }]
|
List of entitlements (things the user has). |
entitlements.value |
string |
— | No | readWrite |
{ "value": "pro" } |
Entitlement identifier/value. |
entitlements.display |
string |
— | No | readWrite |
{ "display": "Pro plan" } |
Human-readable label. |
entitlements.type |
string |
— | No | readWrite |
{ "type": "plan" } |
Label indicating function. |
entitlements.primary |
boolean |
— | No | readWrite |
{ "primary": true } |
true must appear no more than once in the array. |
roles |
complex |
Yes | No | readOnly |
"roles": [{ "value": "student", "display": "Student", "type": "org", "primary": true }]
|
Read-only (clients should not set via SCIM). |
roles.value |
string |
— | No | readOnly |
{ "value": "student" } |
Role identifier/value. |
roles.display |
string |
— | No | readOnly |
{ "display": "Student" } |
Human-readable label. |
roles.type |
string |
— | No | readOnly |
{ "type": "org" } |
Label indicating function. |
roles.primary |
boolean |
— | No | readOnly |
{ "primary": true } |
true must appear no more than once in the array. |
SCIM attributes table with syntax definition for Group available values. Can also be found under /Schemas/urn:ietf:params:scim:schemas:core:2.0:Group if needed.
| Attribute (SCIM path) | Type | Multi-valued | Required | Mutability | Value syntax / example JSON | Notes |
|---|---|---|---|---|---|---|
displayName |
string |
No | Yes | readWrite |
"displayName": "Engineering" |
Human-friendly group name. |
members |
complex |
Yes | No | readWrite |
"members": [{ "value": "USER_ID", "display": "Barbara Jensen" }] |
Multi-valued complex array; your schema snippet does not list sub-attributes here. |
CONFIGURING AUTHORIZATION
PREREQUISITES
- A user with access to the Priverion Platform
- Your user must at least have IT Administrator role, or a Custom Role with IT Settings access
- Already configured Groups provisioning through SCIM2
- Synced Groups from your Identity Provider
CONFIGURATION STEPS
- From the upper bar menu, click on the Settings icon button
- On the opened menu, select IT Settings
- Open the Identity & Access menu
- Select the Role Mapping suboption
- Click on the Edit button
- Map provided Groups to any of the Priverion Platform Roles according to your requirements
SETUP IN OKTA
- Navigate to your Okta Admin Console
- On the left side menu navigate to Applications > Applications
- Select the “Browse App Catalog” button
Search for “Priverion Platform SSO with SCIM 2.0”
- And select the corresponding APP
Select "Add Integration" to start the configuration
Define the fields for
- "Application label"
- SP Assertion Consumer Service URL (ACS)
- SP Entity ID
- SCIM2 Base url
Refer to the previous sections of CONFIGURATION STEPS for SAML2 and SCIM2 to obtain this values properly
On the "Sign On" section, make sure to define propery the attribues as well as the Groups if required
On the "Provisioning" section, click on "Configure API Integration"
Make sure to test the credentials provided, and finally press the Save button. Refer to the previous sections of SCIM TOKEN FOR API ACCESS to obtain the necessary token for this action
Once the API Integration is configured you should be able to see the settings for the "To App" section, make sure to have selected
- Create users
- Update user attributes
- Deactivate usres
From there you should be able to provision the User or Groups as needed from the Assignments section
