
Create an asset group
Create an Asset Group
Asset groups are the foundation of risk management in DPMS. Before you can run risk evaluations, set risk thresholds, link security controls, or build a treatment plan for a collection of related systems, you need an asset group to hold them together. This screen is where you create that container — giving it a name, a type, a location, a risk owner, and the lifecycle status that tells the rest of the platform how to treat it. DPOs, information security managers, risk managers, and compliance coordinators all use this screen as their first step whenever a new set of assets needs its own risk picture.
How to open it
In the left-hand navigation, expand Assets and click Asset Groups. On the Asset Groups index page, click the Create button. The screen opens at the address /asset/group/create.
To edit an existing group later, click its name in the index and then click the pencil (Edit) icon on the detail page, or choose the edit option from the three-dot menu in the group's header.
Heads up: You need permission to create or edit asset groups to access this screen. If you land on a "403 Forbidden" page instead of the form, ask your administrator to grant you the appropriate access rights.
What you see
The page is divided into two areas. On the far left is a narrow vertical navigation column — a stack of circular icons, one for each section of the asset group record (General, Risk Scenarios, Standards, Threshold, Tasks, and many more). A small toggle at the very left edge collapses or expands this menu; DPMS remembers your preference. The currently selected section is highlighted in blue.
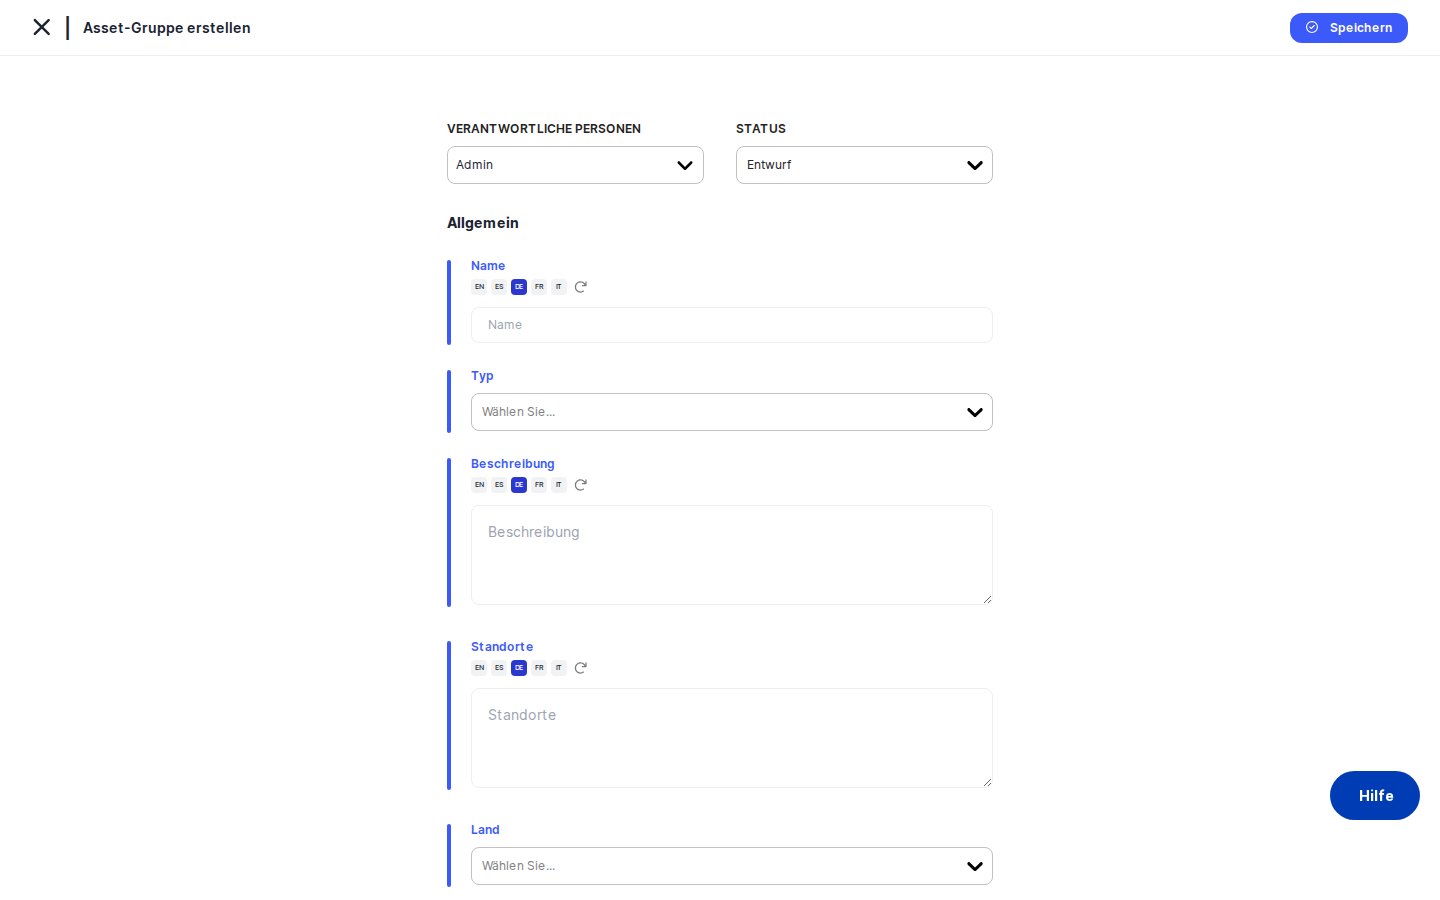
The main content area fills the rest of the page. When you arrive for the first time, the General tab is active and shows a blank form ready to fill in. A thin blue line runs across the top of the content area — this is a visual indicator that you are in creation mode. The Save button sits in the top-right corner of the content area and is always visible except on the read-only "View Treatment Plan" section.
At the very top of the General form, a header bar holds two special controls — the Status selector and the Responsible Persons picker — alongside the section title. Below that header, the form fields stack vertically.
Note: When you first create a group, the left-hand section menu is hidden. All the additional sections (Risk Scenarios, Standards, Threshold, etc.) become accessible once you save the group for the first time and are redirected to the edit view.
Working with this screen
Setting up your asset group for the first time
Start by giving the group a clear, meaningful Name. The name field supports multiple languages — if your organisation operates in more than one language, you can click the translation controls next to the field to add versions in German, French, or any other active language. A name like "HR Systems Group" or "ERP Production Assets" will make the group easy to find in lists and reports.
Next, open the Type dropdown and select one or more tags that classify what kind of assets this group contains — for example, "Software", "Hardware", or "Cloud Service". These tags are set up by an administrator in the Compliance Settings. If the dropdown is empty, you will need to ask an administrator to add the relevant asset type tags before you can classify your group.
In the Description field, write a brief explanation of the group's scope and purpose. This is free text and expands automatically as you type. Like the name, it supports multiple languages.
Use the Locations field to record where the assets in this group are physically or logically situated — for example, "EU Data Centre – Frankfurt" or "Multi-cloud / Azure West Europe". This information is displayed alongside the country in list views and feeds into cross-border transfer assessments.
Select the Country most closely associated with the group's legal or physical presence. This is a single-select dropdown. Choosing the right country here matters for geographic compliance mapping and for identifying which national laws apply.
Once you have filled in the basic details, scroll down to the Risk Owner section. This section has a warning-triangle icon in blue, which signals that it is important for your risk governance trail.
In the first Risk Owner picker, search for and select the person who is formally accountable for the residual risk associated with this group's assets. This is not the same as a "responsible person" — it is a specific compliance role that appears in risk reports and treatment plan escalations.
If the risk owner is acting as a delegate for someone else — for example, an IT manager holds formal risk ownership but the underlying business owner is the Head of Finance — use the second picker labelled On behalf of to record that relationship. The audit trail will then show "IT Manager (on behalf of Head of Finance)". You cannot select the same person in both pickers; if you try, the second selection will be silently ignored.
Back at the top of the form header, set the Status (for example, "Draft" while you are still configuring the group, or "Active" once it is ready for risk evaluation) and assign one or more Responsible Persons who manage the group day to day.
When everything looks right, click Save. DPMS sends the form to the backend, shows a green success notification, and immediately redirects you to the new group's detail page. The left-hand section menu is now fully visible, and you can continue configuring the group.
Linking a risk standard and setting a threshold
After saving the General tab, click the Standards item in the left-hand section menu. Select the risk framework your organisation uses — for example, ISO 27001 or a GDPR-based model — and click Save. This is a critical step: without at least one linked standard, the Risk tab will not appear on the detail view, and the entire risk evaluation workflow for this group will be unavailable.
Once the standard is saved, click Threshold in the section menu. The blue bar at the top of the content area now displays the standard name and the group name, confirming your context. Configure the maximum acceptable risk score for this group under that standard, then click Save. Risk scenarios whose calculated score exceeds this threshold will be flagged automatically for treatment action.
Linking tasks and assessments to an existing group
Open the group from the index and click the edit icon to enter edit mode. Click Tasks in the section menu. The tasks tab shows a table of already-linked tasks (if any). Use the Add control to search for and attach an existing task — for example, "Complete DPIA for HR systems". Click Save to persist the link.
Switch to Assessments to attach a questionnaire-based assessment. After saving the assessment link, DPMS may ask whether you want to update the group's risk score based on the assessment responses. Confirm to trigger a recalculation. When you return to the detail view, the risk score will reflect the new data.
Restricting who can see or edit the group
Some asset groups contain sensitive information — payroll systems, executive data, or classified projects — and should only be visible to specific people or teams. Open the group in edit mode and click Manage Access in the section menu. Select the audience (a pre-configured group of users) and the level of access (Read or Write), add any individual users who need explicit access, and click Save. From that point, the group will only appear in the lists of users who are members of the permitted audience or who have been granted access directly.
Field reference
- Name — The primary label for this asset group. Enter a meaningful name in your organisation's primary language. Use the translation controls to add versions in other active languages. Without a name, the group will be difficult to identify in lists and reports.
- Type — One or more classification tags from the ASSET_TYPE category in Compliance Settings. Used for filtering and reporting. If the dropdown is empty, an administrator must first add tags in Compliance Settings.
- Description — A free-text explanation of the group's scope and purpose. Expands automatically. Supports multiple languages. Displayed in the detail view with rich text rendering.
- Locations — A free-text description of where the assets in this group are physically or logically located. Displayed alongside Country in list views.
- Country — A single-select dropdown of country codes. Choose the country most relevant to the group's legal jurisdiction or physical presence. Displayed as the full country name in detail views.
- Risk Owner — The person formally accountable for the residual risk of the assets in this group. Appears in risk reports and treatment plan escalations. Cannot be the same person as the "On behalf of" selection.
- On behalf of — Optional. The underlying business owner if the risk owner is acting as a delegate. Cannot be the same person as the Risk Owner. Cleared automatically if the Risk Owner is changed to the same person.
- Status — The lifecycle state of the group. Choose from standard options (Draft, Active, Inactive, Review) or any custom statuses configured in your Compliance Settings for asset groups. Defaults to the model's default status if nothing is selected.
- Responsible Persons — One or more platform users who are accountable for managing this asset group record day to day. Separate from the Risk Owner role.
How this connects to the rest of DPMS
Creating an asset group is the prerequisite for virtually everything else in the asset risk workflow. Once the group exists:
- Standards tab — Linking a risk standard here is what makes the Risk tab appear on the detail view. Without it, risk evaluation, threshold management, TOMs, and treatment plans are all hidden.
- Risk Scenarios and Determine Current Risk tabs — These tabs use the standard and scenario selections you configure here. The blue header bar on those tabs always shows the currently active standard and group name for clarity.
- Suggested and Implemented TOMs tabs — TOMs are suggested automatically based on the risk scenarios linked to this group. The connections you set up here determine which controls are surfaced.
- Treatment Plan tab — The full risk treatment plan — responsible persons, deadlines, implemented controls, and treatment status — is built on top of the standards and thresholds configured here.
- ROPA and other records — When you link or unlink individual assets through the Assets tab, DPMS immediately refreshes the asset selector dropdowns used throughout the platform, including in ROPA records and vendor forms. A brief loading spinner elsewhere in the application is normal after saving.
- Assessments — Assessments linked here can trigger automatic risk score recalculations when their responses are updated.
After finishing the General tab, your typical next steps are: link a standard (Standards tab), set a threshold (Threshold tab), add the individual assets that belong to this group (Assets tab), and then begin the risk scenario evaluation (Risk Scenarios tab → Determine Current Risk tab).
Tips & common pitfalls
Heads up: Navigating away without clicking Save will silently discard all unsaved changes. There is no warning dialog. Always save before switching tabs or leaving the page.Tip: Create the group and save it immediately — even with just the name — before filling in every field. This unlocks the full section menu so you can move between tabs without losing context.
- Risk Owner ≠ Responsible Persons. The Responsible Persons selector at the top of the header assigns people who manage the record. The Risk Owner in the dedicated section is the person formally accountable for the group's residual risk in audit reports and escalations. Both can coexist and serve different purposes.
- "On behalf of" silently ignores duplicates. If you select the same person in both the Risk Owner and the On behalf of pickers, the second selection resets without showing an error. Check both fields after making a change.
- If the Risk tab is missing from the detail view, go to the Standards tab and link at least one risk standard. The Risk tab is hidden until a standard is linked to the group.
- Type tags must exist before they appear. The Type dropdown is populated from your Compliance Settings. If no asset type tags have been configured, the dropdown will be empty. Ask a Compliance Settings administrator to add the tags your organisation needs.
- Saving triggers a platform-wide asset list refresh. On large installations, this can cause other selector dropdowns elsewhere in DPMS to briefly show a loading spinner. This is expected behaviour — the refresh ensures that any newly linked assets appear immediately wherever assets are referenced.