
Create a new assessment
Setting up a new assessment is the moment a question template stops being a static library and becomes a real, deadline-driven campaign that lands on real people's desks. This screen walks you through the basics — what to call the assessment, which template to use, when it has to be done, and how reviewers will see the answers — and then automatically takes you through the rest of the configuration (recipients, workflows, reviewers and access) on the following tabs. It is typically used by Data Protection Officers (DPOs), information security managers, compliance coordinators and risk managers who need to launch a Data Protection Impact Assessment (DPIA), an ISO 27001 control review, a vendor risk questionnaire, an internal information-security maturity check, or any similar structured data-collection campaign.
In Priverion's DPMS, an assessment is the central instrument for collecting structured information from people across — and outside — your organisation. Assessment Templates are where the questions live; the Create screen turns one of those templates into a real assignable assessment with recipients, deadlines, reviewers and notifications; the Responses, Answers and Results tabs are where the collected data eventually shows up. Without going through this screen, a template is just a question library — it never reaches anyone, never collects answers, and never feeds into reporting.
How to open it
From the main sidebar, click Assessments to open the Assessments overview. In the top-right of that list, click the Create button. You'll land directly on the Create Assessment screen at the General tab.
This screen is available to users who hold the create permission for assessments — the same permission family that lets you see the Assessments module in the sidebar. To continue past the General tab into Maturity Goals or Recipients & Notifications after the first save, you also need the edit permission for assessments. Without it, the system will save what you've entered and quietly send you back to the Assessments list. If you don't see the Assessments menu item at all, you don't have access — ask your administrator.
What you see
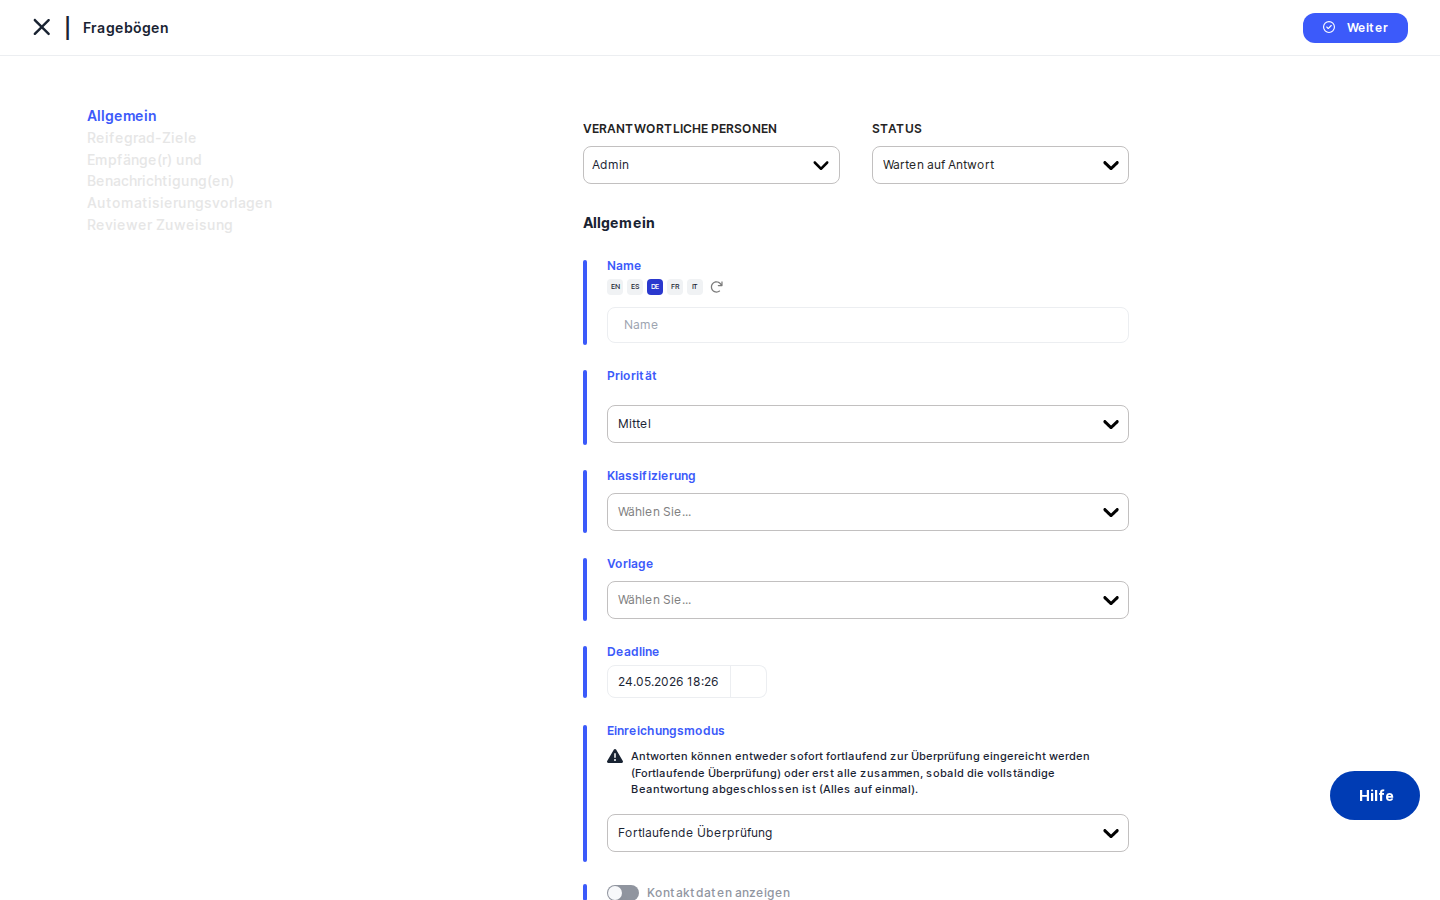
The page uses Priverion's standard detail-style layout: the global top header, the left sidebar with Assessments highlighted, and a breadcrumb that reads Assessments › General. The middle of the page shows a single white content card.
At the very top of that card, on the right-hand side, is a small strip of action controls: a Responsible Persons picker, a Status dropdown, and — if your tenant has AI configured — an AI helper icon and a help icon. Below that strip, the form is laid out as a vertical list of input groups, each with a small blue accent bar on the left. From top to bottom you'll see fields for Name, Priority, Classification, Template, the assessment Deadline, the Submission Mode, and one or two switches (Show Contact Details, plus Active once the assessment exists). The bottom of the page has the standard Save and Cancel buttons.
If you expand the in-page tree menu on the left, you'll see the full sequence of tabs that make up an assessment: General, Maturity Goals (only if applicable), Recipients & Notifications, Workflows, Reviewer Assignment, Manage Access, Audiences, Notifications, Responses, Sending Status, and Answers and Results. On a brand-new assessment most of those tabs are disabled until you save the General tab at least once.
Working with this screen
Setting up a new assessment from scratch
Start at the top of the form. In the action strip, the Responsible Persons picker defaults to you — leave it as is, or pick the DPO or security officer who actually owns this campaign. The Status dropdown is pre-set to your tenant's default starting status (typically "Draft"); you'll change it to "Active" later, when you're ready to send.
Next, give the assessment a clear Name — the recipients will see this name in their email and in the Assessments list, so something like "2025 Q2 Vendor DPIA — Newsletter Provider" or "ISO 27001 SoA Review – Marketing" works much better than just "Vendor review". The little translation indicator next to the name field lets you enter the name in your other active languages, which matters if your recipients work in different languages.
Pick a Priority — Low, Medium or High — to flag urgent campaigns. Add one or more Classification tags (for example "Annual Review", "Regulatory", "Vendor onboarding") to make this assessment easy to find and report on later. If the dropdown is empty, your administrator hasn't created any classification tags yet.
Now the most important step: pick at least one Template. The dropdown lists every active assessment template you're allowed to use — DPIA templates, ISO 27001 SoA, vendor questionnaires, and so on. The template is what defines the actual questions the recipients will see. If the template you pick is configured to automatically pull in other templates ("pre-loaded templates"), a small grey panel will appear right below the field listing every additional template that will come along for the ride. Read it — those linked templates will reach the recipient too.
Set the Assessment Deadline. This is the date by which recipients are expected to have submitted their answers, and it's what drives overdue indicators and escalation workflows. The picker won't let you choose a date in the past.
Choose a Submission Mode. Progressive Rolling Review means reviewers can start looking at answers section by section as the recipient fills them in — best for long, complex assessments. All at Once means the assessment can only be reviewed after the recipient has submitted everything — better for short, simple questionnaires. The yellow warning icon next to this field is a reminder that this choice is hard to change once recipients have started answering, so pick deliberately.
Decide whether to turn on Show Contact Details. If on, recipients will see who to contact with questions inside the questionnaire UI — useful for external recipients like vendors, often unnecessary for internal-only campaigns.
Click Save. The system creates the assessment and automatically takes you to the next tab:
- If the template uses CMMI maturity scoring, you go to Maturity Goals, where you set the target maturity per section.
- Otherwise, you go straight to Recipients & Notifications to add the people who will answer.
If you only have view permission and not edit, you'll be sent back to the Assessments list instead.
Switching to a different template after you've started
If you've already saved the General tab and realise you picked the wrong template, come back here, open the Template dropdown and adjust the selection. Then click Save again. Be careful: changing the template after recipients have started answering will reshape the questionnaire and may invalidate existing answers, so it's safest to do this only on assessments that haven't been activated yet.
Preparing an assessment quietly without it going live
New assessments are saved as active by default — meaning that as soon as you finish configuring the rest of the flow, recipients can be notified. If you want to set everything up without it going live, save the General tab first, then come back to it in edit mode. You'll now see an Active switch (it's hidden during initial creation). Toggle it off, and the assessment will not send any emails until you turn it back on. Alternatively, leave the Status set to "Draft" using the action strip at the top.
Pausing a running campaign
If a campaign is mid-flight and you need to stop it temporarily — for example, because the questions need to be corrected — open the assessment and toggle Active off on the General tab. Recipients will no longer be able to open the questionnaire and reminder emails will stop firing. Toggle Active back on when you're ready to resume.
Field reference
- Name — The display name of the assessment as recipients will see it in emails and as you'll see it in the list. Enter it in your primary language; use the translation indicator to add other languages. Not strictly required to save, but assessments without a name are very hard to find afterwards.
- Priority — Low, Medium, or High. Drives the priority icon shown on the Assessments list and in dashboards. Defaults to Medium.
- Classification — One or more tags from your tenant's
assessment_classificationslist. Used for filtering, reporting and analytics. Tags are managed by an administrator under Compliance Settings → Attributes → Assessment Classifications. - Template — One or more active assessment templates whose questions will be used. The most important field on this screen — without a template, the assessment has no content. Inactive templates are not shown.
- Assessment Deadline — The date by which recipients should submit their answers. Cannot be in the past. Required for overdue indicators and escalation workflows.
- Submission Mode — How reviewers see incoming answers. Progressive Rolling Review lets reviewers work section by section as answers come in; All at Once holds review until full submission. Defaults to Progressive Rolling Review.
- Show Contact Details — When on, recipients see the assessment owner's contact information inside the questionnaire UI. Useful for external recipients.
- Active (only visible after the first save) — Switch that turns the campaign on or off. When off, no emails are sent and recipients cannot open the questionnaire. New assessments are saved as active by default.
- Responsible Persons (in the action strip) — The user or users accountable for running the assessment. Surfaces on dashboards and is used as the default contact in recipient-facing screens when "Show Contact Details" is on. Defaults to you, the creator.
- Status (in the action strip) — The lifecycle status of the assessment (e.g. Draft, Active). Pre-fills with your tenant's default and can be customised under Compliance Settings → Statuses → Assessments.
How this connects to the rest of DPMS
This screen is the bridge between three other parts of the platform:
- Assessment Templates is where the questions, sections and scoring rules live. The Create screen reuses those templates without copying them — when a template is updated, future assessments built from it pick up the changes.
- Recipients & Notifications, Workflows, Reviewer Assignment and Manage Access are the tabs that come right after this one. The Create flow walks you through them in order. Workflows you set up later only fire if the assessment is
Activeand has a future deadline. - Responses, Sending Status, and Answers and Results are where the collected data eventually appears, once recipients start answering.
You can also reach this screen indirectly: anywhere in DPMS that offers "Send as assessment" — for example from a vendor detail page or a ROPA detail page — drops you onto the Create screen with the relevant context already attached.
After saving the General tab, the most important things to do next are:
- Configure Maturity Goals (if your template uses CMMI scoring) — set the target maturity per section.
- Add Recipients & Notifications — the people who will receive and answer the questionnaire.
- Set up Workflows — automatic reminders, escalations, and approvals.
- Configure Reviewer Assignment — make sure each section ends up with the right subject-matter expert.
Tips & common pitfalls
Tip: Always pick a template before clicking Save. The system technically lets you save without one, but every following tab — Maturity Goals, Reviewer Assignment, Answers and Results — depends on a template being selected.Heads up: Submission Mode is hard to change once recipients have started answering. Switching from Progressive Rolling Review to All at Once mid-campaign can leave answers in inconsistent states and confuse reviewers. Choose deliberately at creation time.
- Pre-loaded templates can surprise you. When you pick a template that auto-loads other templates, the grey info panel shows what's coming with it. To change which sub-templates are pulled in, you have to edit the parent template under Assessment Templates — not here.
- The Active toggle is hidden during creation. New assessments are saved as active by default. If you want to prepare quietly first, save the General tab, then come back in edit mode and toggle
Activeoff, or setStatusto "Draft". - The deadline cannot be in the past. If you're trying to log a historical assessment, pick today's date and document the actual completion date elsewhere.
- Where you land after Save depends on your permissions. Without the assessment edit permission, you'll be sent back to the list and won't see the next tab. Ask your administrator if you need to configure the rest of the flow.
- Inactive templates are filtered out. If a template you expected isn't in the dropdown, it's probably been deactivated. An administrator can reactivate it under Assessment Templates.
- Give the assessment a meaningful name. The list view shows hundreds of assessments over time. "2025 Q2 Vendor DPIA — Newsletter Provider" is much more useful than "Vendor review".