
Edit an asset group
Edit an Asset Group
The Edit Asset Group screen is the central workspace for keeping your asset group records accurate and complete. Data Protection Officers, IT Security Managers, Risk Managers, and Compliance Coordinators all use it — typically when a system landscape changes, a new risk standard needs to be rolled out, or an audit is approaching and records need to be tightened up. Everything that defines an asset group lives here: its name, type, ownership, linked individual assets, associated processing activities, external recipients, security measures, and the full risk lifecycle from scenario mapping through to treatment plan and deadline tracking.
How to open it
- In the left-hand navigation sidebar, click Assets, then choose Asset Groups.
- Find the asset group you want to update in the list and click on its row to open the read-only detail view.
- Click the Edit (pencil) icon on any panel in the detail view. DPMS will open the edit screen and take you straight to the relevant tab — for example, clicking Edit on the General panel opens the
Generaltab directly.
You can also open the edit screen by navigating directly to the asset group's URL: /asset/group/edit/<id>.
Heads up: You need one of the following permissions to access this screen: Edit Asset Groups (full access to all groups), Edit Only Assigned Asset Groups (access limited to groups where you are a responsible person or risk owner), or Create Asset Groups (required when creating a brand-new group). If none of these apply to your account, DPMS will show a "Forbidden" page instead of the form.
What you see
When the edit screen opens, the layout has two main sections. On the left is a vertical tab menu listing every section of the asset group. This menu stays visible no matter which tab you are on, so you can jump between sections at any time. On the right is the content area, which changes entirely depending on which tab is selected.
At the very top of the content area, a left-pointing back arrow lets you abandon the current edit and return to the detail view (or, if you arrived here from a TOM detail page, back to that TOM).
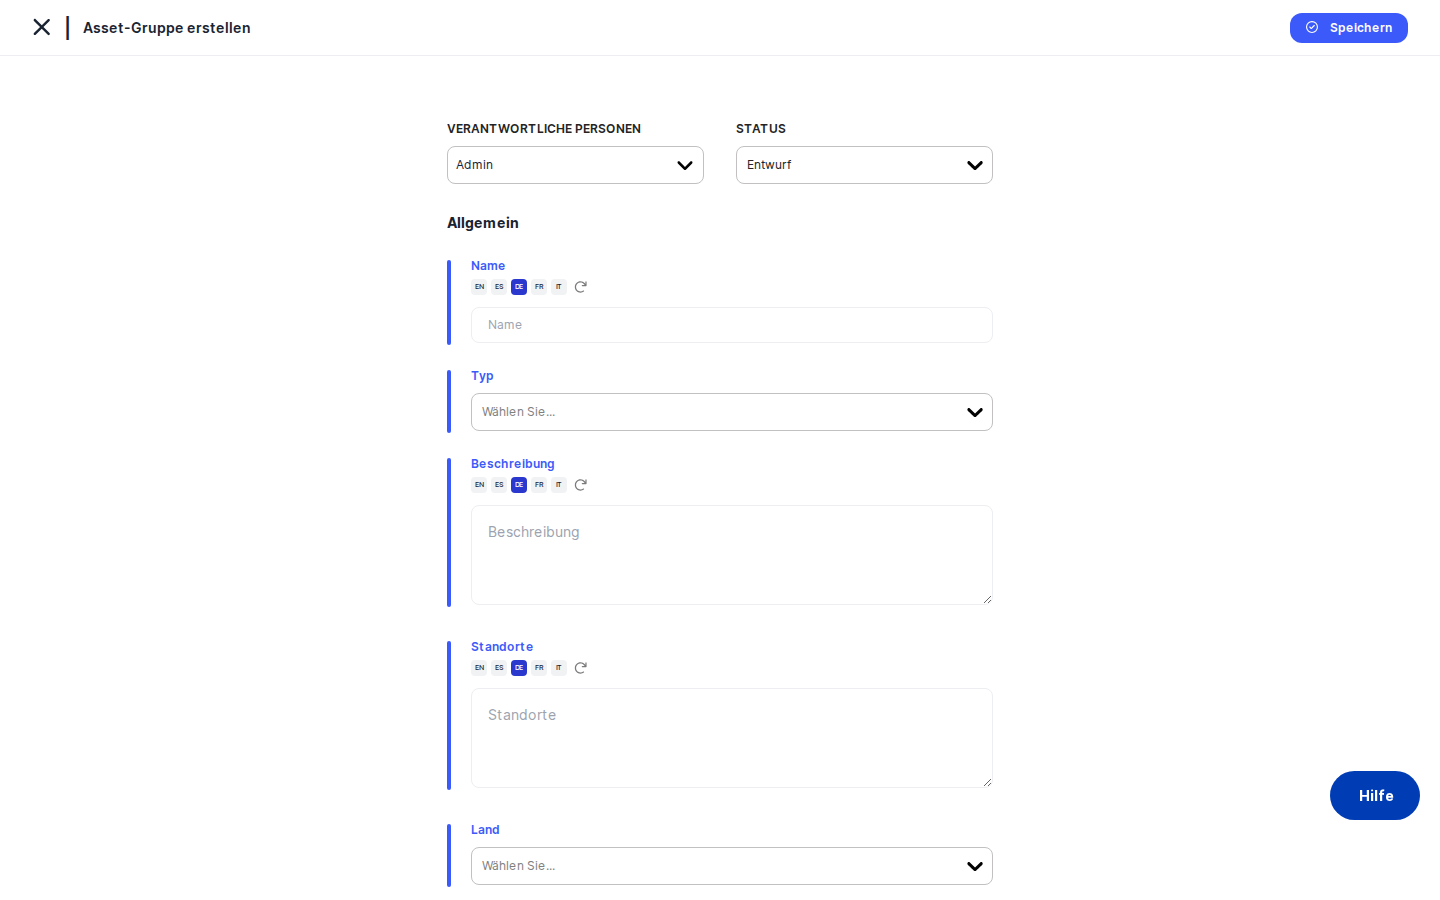
The General tab — the default landing point — shows a form card with a blue accent line at the top. Directly below that is an action bar with a status dropdown and a responsible persons selector. The rest of the form displays fields for Name, Type, Description, Locations, Country, and a Risk Owner section at the bottom.
For risk-related tabs such as Risk Scenario, Threshold, Determine Current Risk, Suggested TOMs, and Treatment Plan, a coloured information bar runs across the top of the content area showing which risk standard you are currently working within. This is especially useful when an asset group is linked to more than one standard.
At the bottom of each tab (except View Treatment Plan, which is read-only) is a Save button. Each tab saves independently — there is no global "save all" action.
Working with this screen
Updating the core description of a group
The most common reason to come here is to correct or enrich the group's basic information. On the General tab, you can update all of the following:
- Name — Click the Name field and type the revised name. Because DPMS supports multiple languages, a small translation button appears next to the field. Clicking it triggers automatic AI-assisted translation into all configured company languages, saving you from having to switch language views manually. The same translation button is available on the Description and Locations fields.
- Type — Click the type tag picker to assign one or more asset-type tags (for example, "Cloud Service" or "Third Party"). These tags must be pre-configured under Compliance Settings → Tags before they appear here.
- Description — Click the text area and type a plain-language explanation of what this group covers and what personal data it processes. The text area grows automatically as you type.
- Locations — Describe the physical or logical locations of the group (data centres, cloud regions, offices). This is important for cross-border transfer documentation.
- Country — Use the dropdown to associate the group with a single country. This field was added to align with a corresponding field on individual assets.
At the top of the form, the Status dropdown lets you change the group's lifecycle stage — for example, from Draft to Active once the record is complete, or to Inactive when a system is decommissioned. The Responsible Persons selector (also in the action bar) allows you to assign one or more people as accountable for the group. You can add multiple names.
Once you have made your changes, click Save at the bottom of the tab. DPMS sends the update to the database and shows a success notification. You stay on the edit screen — click the back arrow when you are ready to return to the detail view.
Assigning or changing risk ownership
The Risk Owner section at the bottom of the General tab holds two related fields.
The Risk Owner selector is where you formally assign the person who is accountable for managing the risk level of this group. Click the selector, search for a name, and choose the person. Only one risk owner can be set at a time.
Directly below the risk owner is the On Behalf Of selector. In organisations with layered governance, the person day-to-day managing the risk may be acting as a deputy for someone else — a department head, for example. Setting the "On Behalf Of" field makes that delegation explicit and visible in reports, where it appears as "John Smith (on behalf of Jane Doe)".
There is one important rule: the Risk Owner and the "On Behalf Of" person cannot be the same individual. If you select the same person in both fields, DPMS quietly ignores the second selection and keeps the previous value. If you later change the Risk Owner to someone who is already set as the "On Behalf Of" person, DPMS automatically clears the "On Behalf Of" field. Always check both fields after changing the Risk Owner to make sure the delegation still reflects your intent.
Click Save to persist the changes.
Setting up the risk framework (first-time configuration)
If you are configuring a newly created asset group for risk management, the order in which you complete the risk-related tabs matters. Working in the wrong order can leave the tabs empty or disconnected.
Start with Group Standards. Click the Group Standards tab in the left menu. This is where you link the asset group to one or more risk management frameworks — for example, ISO 27001 or a company-specific standard. Saving here triggers the standards data to be stored. Without at least one standard, the risk heat map cannot calculate a score for this group, and the Risk tab will be hidden entirely from the detail view.
Then set the Risk Threshold. Click the Threshold tab. You will see the standard name in the coloured bar at the top. Set the threshold value — the score above which a risk is considered unacceptable. Click Save.
Map risk scenarios. Click the Risk Scenario tab. The standard name is shown in the coloured bar. Review the risk scenarios from your catalogue that are already linked and add any missing ones by using the controls on this tab. Risk scenarios describe specific threat situations relevant to this group.
Determine current risk. Click the Determine Current Risk tab. For each linked risk scenario, enter likelihood and impact values to produce a calculated risk score. The current risk score is shown visually in a bar at the top of the tab.
Review and select suggested TOMs. Click Suggested TOMs. DPMS lists the technical and organisational measures that the risk system recommends for treating the identified risks. Select the TOMs you intend to implement.
Build the treatment plan. Click Treatment Plan. Assign deadlines and responsible persons to each planned measure. This is the bridge between identifying a risk and actually reducing it.
Check the timeline. Click View Deadline to confirm that the deadlines assigned in the treatment plan are realistic and visible as a timeline.
At each tab, remember to click Save before moving to the next one.
Managing the assets, assessments, tasks, and vendors linked to a group
An asset group is only as meaningful as the objects linked to it. The tabs in the middle of the left-hand menu handle all of these relationships.
Assets tab — Click Assets to see which individual systems and applications are members of this group. Use the action bar on this tab to add new assets to the group or remove ones that no longer belong. Clicking on an asset row navigates to that asset's detail view so you can inspect it. The group's aggregated risk score draws on the member assets, so keeping this list accurate is important.
Assessments tab — Click Assessments to link data protection impact assessments (DPIAs) or other evaluations to this group. After you add an assessment, DPMS may prompt you with a popup: "Would you like to recalculate the risk based on the questionnaire responses?" If the assessment includes questionnaire data relevant to risk, click Yes — DPMS will automatically update the group's risk scores and refresh the standards data. Click Save to persist the linked assessments.
Tasks tab — Click Tasks to create or link action items for this group. Tasks appear in the global Tasks overview and can be filtered and tracked from there. You can bulk-link tasks using filter-based selection if you have many items to connect at once.
External Recipients (Vendors) tab — Click this tab to record which external service providers receive data from this group. This is required for GDPR Article 28 compliance. Linked vendors also appear in vendor relationship reports and ROPA transfer mapping.
For all of these relationship tabs, click Save after making changes.
Restricting who can see or edit a group
To limit access to a sensitive asset group — for example, an "Executive Payroll Systems" group that only the HR compliance team should be able to read — click the Manage Access tab.
The manage access form shows audience selectors. Audiences are groups of users configured under Compliance Settings → Group Management. Click the dropdown to search for and add an audience. Each audience can be granted read access or write access. Once you click Save, DPMS updates the access control list and redirects you back to the asset group detail view. You can verify the restriction is working by asking a colleague outside the permitted audience to navigate to the group URL.
Configuring data deletion and coordinators
Two tabs handle the data deletion lifecycle. The Data Deletion tab lets you configure the retention period and deletion procedure for data processed by this group — a key requirement under most data protection regulations. The Coordinators tab lets you assign the specific people responsible for executing those deletion activities. Both tabs have their own Save buttons.
Field reference
The following fields on the General tab have specific behaviours worth knowing:
- Name — Free text, supports multiple languages. Use the translation button to auto-translate. There is no hard character limit in the UI, though the backend may apply one.
- Type — Multi-select tag picker. Only tags pre-configured under Compliance Settings → Tags → Asset Type will appear. If the list is empty, ask your administrator to create asset type tags first.
- Description — Multi-line text area that grows with your input. Supports auto-translation.
- Locations — Multi-line text area. Supports auto-translation. In the read-only detail view, this field is combined with Country into a single "Location" display cell.
- Country — Single-select dropdown. Only one country can be chosen. If left blank, the detail view shows a dash.
- Status — Dropdown. Default statuses (Draft, Active, Inactive, Review) are always available. Custom statuses can be added under Compliance Settings → Statuses.
- Responsible Persons — Multi-person selector. Supports multiple assignees.
- Risk Owner — Single-person selector. Required for risk accountability. Cannot be the same person as "On Behalf Of".
- On Behalf Of — Optional single-person selector. Cannot be the same person as Risk Owner. Automatically cleared if the Risk Owner is subsequently set to the same person.
How this connects to the rest of DPMS
The Edit Asset Group screen is a hub that feeds into many other parts of the platform.
Risk heat map and dashboards — Risk scores displayed across DPMS are calculated from the likelihood and impact values entered on the Determine Current Risk tab, applied within the context of the standards linked on the Group Standards tab. If no standard is linked, the group does not appear on the risk heat map at all.
ROPA module — Assessments linked on the Assessments tab feed into the ROPA module. The applicable regulations shown on the asset group's detail view are derived from the ROPA records connected through those assessments.
TOM coverage metrics — TOMs marked as implemented on the Implemented TOMs tab contribute to your organisation's overall TOM coverage statistics.
Global Tasks overview — Tasks linked on the Tasks tab appear in the global task list at /tasks and in task dashboard widgets. This means a task created or linked here is immediately visible to anyone managing the task queue.
Vendor relationship reports — External recipients linked on the Vendors tab appear in vendor relationship reports and in ROPA data transfer mapping.
What to do after this screen — After completing the risk workflow tabs (Risk Scenario → Determine Current Risk → Suggested TOMs → Treatment Plan), navigate to the detail view and check that the risk score shown on the overview card reflects your inputs. If you have just linked a new standard, verify that the risk tab is now visible. If you have created a treatment plan with deadlines, consider creating linked tasks on the Tasks tab so that responsible persons receive reminders.
Tips & common pitfalls
Heads up: Each tab saves separately. If you edit the General tab and then click a different tab without saving, your changes are lost. There is no auto-save and no warning. Always click Save before switching tabs.
Heads up: Group Standards must come first. For a brand-new group, start with the Group Standards tab. Without at least one standard linked, the risk-related tabs have no context to work with, and the Risk tab will be hidden from the detail view entirely. You cannot evaluate risk scenarios or build a treatment plan without this step.
- The Risk Owner and On Behalf Of cannot be the same person. If you accidentally set them to the same individual, the system silently ignores the second selection. There is no error message — the field simply does not update. Choose two different people, or leave On Behalf Of blank.
- The View Treatment Plan tab hides the Save button. This is by design — that tab is a read-only visualisation. If you need to make changes to the treatment plan, use the
Treatment Plantab (notView Treatment Plan). - Changing the Risk Owner may clear the On Behalf Of field. If the person currently set as "On Behalf Of" is the same person you are setting as the new Risk Owner, DPMS automatically clears the delegation. Check both fields after any Risk Owner change.
- The auto-translation feature requires AI provider credentials. The translate button on Name, Description, and Locations fields depends on an AI provider being configured under IT Settings → AI Configuration. If that provider is not set up, the translation button will not function.
- Asset type tags must exist before you can assign them. If the Type selector appears empty, no asset type tags have been created yet. Ask your system administrator to add them under Compliance Settings → Tags → Asset Type.