
Create a custom role
Create a Custom Role
Access control in DPMS is built around roles. Every user account gets at least one role, and that role determines exactly what they can see, create, edit, export, and delete across all modules. The Create a Custom Role screen is where IT administrators and Data Protection Officers design a brand-new role from scratch — choosing a name and then selecting the precise combination of permissions it should carry. Without well-configured roles, users either cannot access the modules their job requires, or they have more access than your organisation's principle of least privilege allows.
How to open it
In the main sidebar, navigate to IT Settings, then select Roles from the sub-navigation. At the top of the roles list, click the Create button and choose Create Roles from the dropdown menu.
Full path: IT Settings → Roles → Create → Create Roles
This screen is available to users who hold the Create IT Settings Roles or Edit IT Settings Roles permission. If you hold neither, the menu item is hidden and you will see an access-denied page instead of the form.
What you see
The page has a clean, single-column layout with no side tabs. At the top-left, a back arrow lets you return to the roles list at any time. At the top-right, a Save button waits to persist your work — it stays inactive in appearance until you have enabled at least one permission.
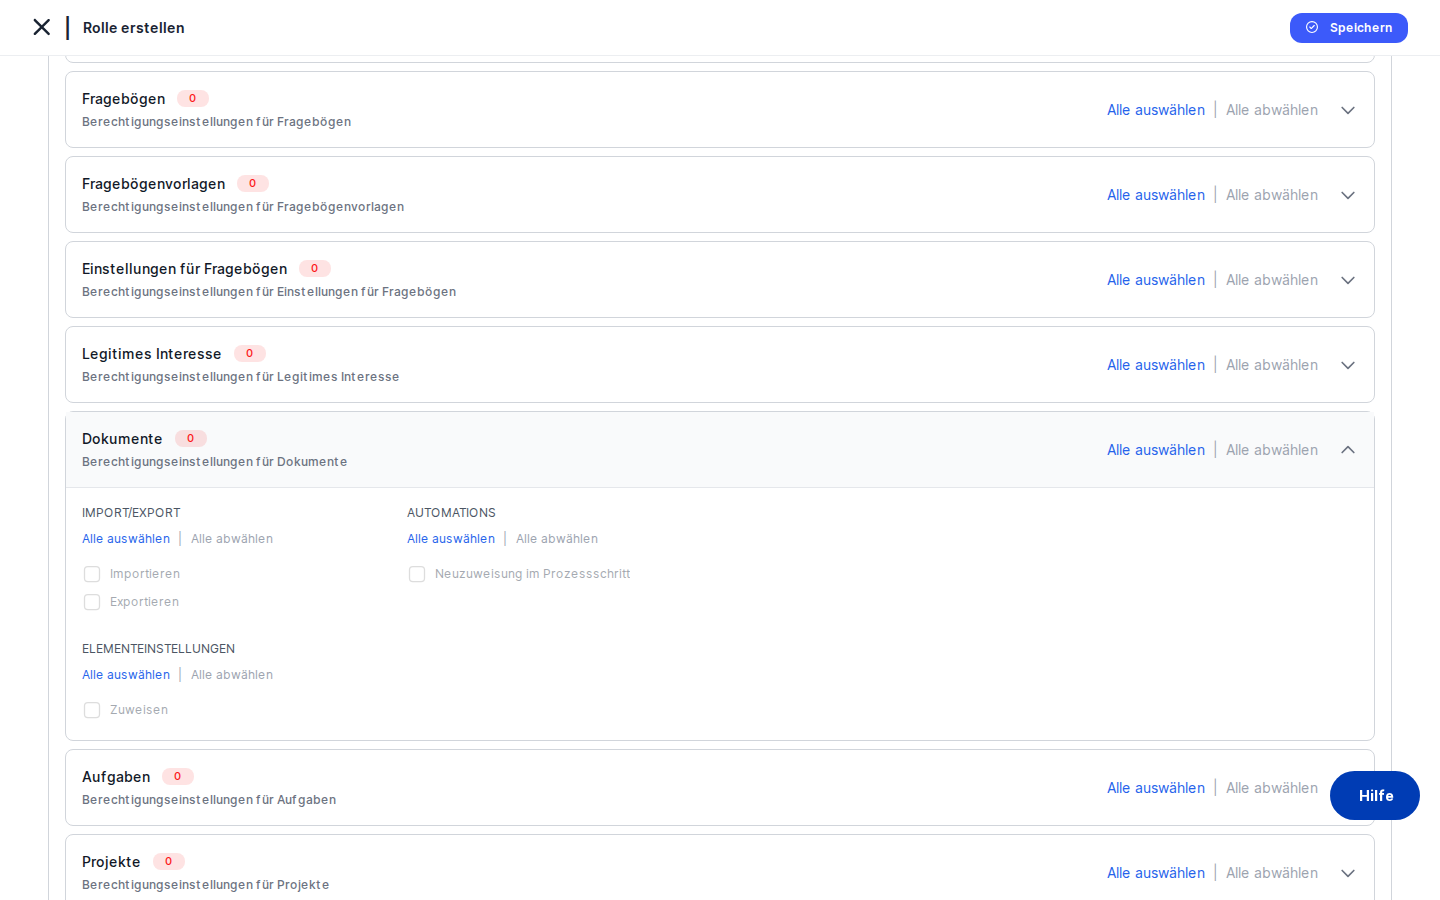
Below the header, two sections stack vertically. First comes the Role Name field, a short text box where you type the name that will appear throughout DPMS — in the roles list, in user-assignment dropdowns, and anywhere a role is referenced. Second, and taking up most of the page, is the Permissions Assignment panel: a white card containing a search bar and a long scrollable list of accordion rows, one for each entity or module in the system (roughly 50 in total). Each row shows the entity name, a coloured badge counting selected permissions, and quick-action buttons. The badge is red when no permissions are selected for that entity, and turns blue the moment you enable even one — giving you an at-a-glance status of your work as you scroll down the list.
Working with this screen
Setting up a role for the first time
Start by clicking the Role Name field at the top of the form and typing a clear, descriptive name — for example, "Read-Only Auditor" or "ROPA Editor". This name is what your colleagues will see when assigning roles to users, so choose something self-explanatory.
If your organisation runs DPMS in more than one language, click the small translation trigger next to the name field. A popover opens where you can enter or auto-generate the role name in every language your instance supports. DPMS stores all language variants and displays the appropriate one to each user based on their interface language. If you only run one language, you can skip this step.
Once the name is set, scroll down to the Permissions Assignment panel and start configuring access. Use the accordion rows to expand each module you care about. When you are finished, click Save in the top-right corner. DPMS checks that at least one permission is enabled somewhere — if none are, you will see a toast notification asking you to select at least one. Once saved, the role immediately appears in the Roles list and becomes available for assignment in User Management.
Configuring permissions efficiently
The Permissions Assignment panel can feel large at first — approximately 50 entities are listed. Two techniques make it manageable.
Searching: Type any word in the search bar at the top of the panel. The list instantly narrows to only the entities where that term appears in the entity name, group titles, or individual permission labels. For example, typing vendor collapses the list to the Vendors panel alone. Typing export surfaces every entity that has an Export permission. Note that the search narrows which panels are visible but does not expand them — you still need to click a panel header to open it.
Bulk selection: Every accordion panel header contains two buttons: Select All and Deselect All. Clicking Select All enables every available permission for that entity in one click — useful when you want to give a role full access to a particular module. Inside an expanded panel, the same Select All and Deselect All buttons appear under each permission group (Main Actions, Sharing, Import/Export, Element Settings, Automations, Risk Management), so you can bulk-enable just the Sharing permissions, for instance, while configuring Main Actions individually.
When you expand a panel, you see a grid of checkboxes organised into up to six groups. The groups shown depend on the entity — not every entity supports every group. Check or uncheck individual permissions by clicking the checkbox or its label.
Granting broad access to a specific module
Suppose you need a "ROPA Power User" role that can do everything with ROPA records but has no access to other modules. Open the Permissions Assignment panel, type ropa in the search bar, and click Select All in the ROPA panel header. Every available ROPA permission — Create, Read, Edit, Delete, Duplicate, Export, Publish, Push Changes, AI Functionality, and more — is enabled in one click. The badge on the ROPA panel turns blue and shows the total count. Every other panel remains at zero (red badges). Click Save and the role is ready.
Understanding permission dependencies
DPMS enforces rules about which permissions require others to be active first. These rules work in both directions, silently.
When you enable a permission that has a prerequisite, DPMS automatically enables the prerequisite for you. For example, if you try to check Export, Read is automatically checked as well — you do not need to do it manually.
When you disable a foundational permission, DPMS automatically disables every permission that depends on it. If you uncheck Read on an entity where you had already enabled Create, Edit, and Export, all three are removed at the same time. This can be surprising, so always scan the full state of an entity's permissions after toggling Read or Edit.
Visually, a permission checkbox that cannot yet be activated appears greyed out and cannot be clicked. The moment its prerequisites are met, it becomes clickable. For example:
- The Export checkbox is greyed out until Read is enabled.
- The Push Changes checkbox is greyed out until both Read and Edit are enabled.
- The ROC (Record of Compliance) Read permission is greyed out until Read is also enabled for TOMs, Assets, and Risk Scenarios — the only cross-entity dependency in the system.
If you notice that a particular checkbox is always grey no matter what you do, check those related entities first.
Correcting a server-side validation error
Occasionally, after you click Save, the server rejects a specific permission combination. When this happens, a toast notification describes the issue, and the problematic checkboxes are highlighted with a red background and red border. Expand the relevant entity panel to find the highlighted checkbox. Click it once to deselect the conflicting permission — clicking also clears the red highlight. Resolve all highlighted conflicts and click Save again.
Field reference
- Role Name — The human-readable name for the role. Required. This is what appears in the Roles list and in every user-assignment dropdown across DPMS. There is no visible character limit in the form, but leaving it blank or using a name that already exists will result in a server-side validation error shown as a toast notification.
- Translation trigger (next to Role Name) — Optional. Opens a popover to enter or auto-generate the role name in additional languages configured for your DPMS instance. Useful when colleagues use different interface languages. If DPMS is configured for only one language, this control is still present but adds no practical value.
- Search bar (inside Permissions Assignment) — Optional. Case-insensitive. Filters the accordion list in real time. Clearing the search restores the full list. If no entity matches your query, a "No results found" message appears.
- Permission checkboxes — One per permission per entity. Unchecked by default. Greyed out when prerequisites are not met. A role must have at least one checkbox enabled anywhere in the panel before it can be saved.
How this connects to the rest of DPMS
Once you save a custom role, it becomes immediately available across the platform without any further steps.
User Management (IT Settings → Users) is the most direct downstream screen. When an administrator opens a user's profile and assigns a role, every custom role you have created here appears in the selection dropdown. The permissions you configured determine exactly what that user can do from the moment the role is assigned.
AI assistant buttons on individual records (for example, the AI autofill helper on a ROPA form) are only active for a user if their assigned role has the AI Functionality permission enabled for that entity. If your users report missing AI buttons, check whether their role has this permission.
Sharing workflows — the Push Changes and Pull Changes features for sharing records between organisational units — only work for users whose role has those permissions configured for the relevant entity.
Workflow assignment features (Assign Workflow, Reassign in Step) across all modules depend on those permissions being present in the user's role.
Audience Management and Organisational Unit restrictions both use the role as a ceiling: even if an audience rule grants access to a specific record, the user's role determines the maximum level of access they can actually exercise.
After creating a role here, your next step is typically to navigate to IT Settings → User Management to assign the role to the appropriate users.
Tips & common pitfalls
Heads up: You must enable at least one permission before saving. Clicking Save with an entirely unconfigured permission panel will be rejected immediately with a toast notification — no data is sent to the server. Enabling a single Read checkbox anywhere is enough to satisfy this requirement.Heads up: Disabling Read on an entity removes all dependent permissions at the same time. If you had carefully configured Create, Edit, Export, and Duplicate for an entity and then uncheck Read, all of those are silently removed. Always verify the full state of an entity's permissions after toggling a foundational one.
- ROC has a three-way cross-entity dependency. The Read permission for ROC (Record of Compliance) is greyed out unless the role also has Read enabled for TOMs, Assets, and Risk Scenarios. This is the only permission in the system with a cross-entity dependency, and there is no visual banner explaining it. If ROC is always grey, check those three panels first.
- Not every permission exists for every entity. The AI Functionality permission does not appear on TOMs, Assets, DPIA, or any settings-level entity. The Duplicate permission only appears on ROPA. If a permission seems missing, it is intentionally absent because it does not apply to that module — it has not been forgotten.
- Searching narrows the list but does not expand panels. After typing in the search bar, matching panels remain collapsed. You still need to click each panel header to open it and interact with the checkboxes. Use the search to identify which entities support a particular permission type, then expand each one to configure it.
- System roles look the same as this form but are fully locked. If you open a built-in system role (such as "Employee") via the edit route, the same interface appears but all checkboxes are disabled and the Save button is hidden. There is no visual banner telling you the role is read-only — the only signal is that nothing is clickable. If you want a role similar to a system role, create a new custom role here and manually replicate the permissions you want.
- Duplicate role names are rejected by the server. If you use a name already taken by another role, a toast notification appears after you click Save. Choose a unique name and try again.