
Create a DPIA
Creating a Data Protection Impact Assessment (DPIA) is one of the most important pieces of evidence your organisation can produce when a new project, tool or process is likely to put people's personal data at high risk. This screen is the entry point where Data Protection Officers, privacy program managers and compliance officers open a brand-new DPIA, give it an identity, and start documenting why the assessment is needed and what the processing actually does. From this single starting point, the DPIA can later be expanded into a full picture of risks, mitigations, consultations, treatment plans and review workflows.
In the bigger DPMS picture, a DPIA almost never lives on its own. It typically sits at the crossroads of a Record of Processing Activities (ROPA), the assets and vendors involved, stakeholder questionnaires, internal consultations, and — when residual risk demands it — communication with the supervisory authority. This screen is where that documentation trail begins.
How to open it
You reach this screen from the main DPIA module:
- Open DPIA in the left sidebar — the DPIA overview opens.
- Click the
Createbutton in the top-right action bar of the overview. - From the small dropdown that appears, choose
Create DPIA.
This screen is available to anyone who can create or edit DPIAs in your company. If you do not have those rights, the page will show a "Forbidden" message instead, and the Create button on the overview will be hidden in the first place.
What you see
The screen uses the standard DPMS creation layout. At the very top is the page title (it reads Create DPIA for a brand-new record, and changes to Edit General once you start editing an existing one). To the left of the title is a back arrow that takes you to wherever you came from — usually the DPIA overview.
Down the left side runs a tab strip which is the spine of the whole DPIA experience: General, Balancing of Interests, Tasks, Assessments, Assets, Standards, Threshold, Risk Scenarios, Implemented TOMs, Determine Current Risk, Suggested TOMs, Copy Element, Manage Access, Trigger Workflow Overview, Treatment Plan, View Treatment Plan, View Deadline and Add Scenario Below Threshold. For a brand-new DPIA only the General tab is unlocked — every other tab is greyed out until you save the General tab once and the DPIA gets its own database record.
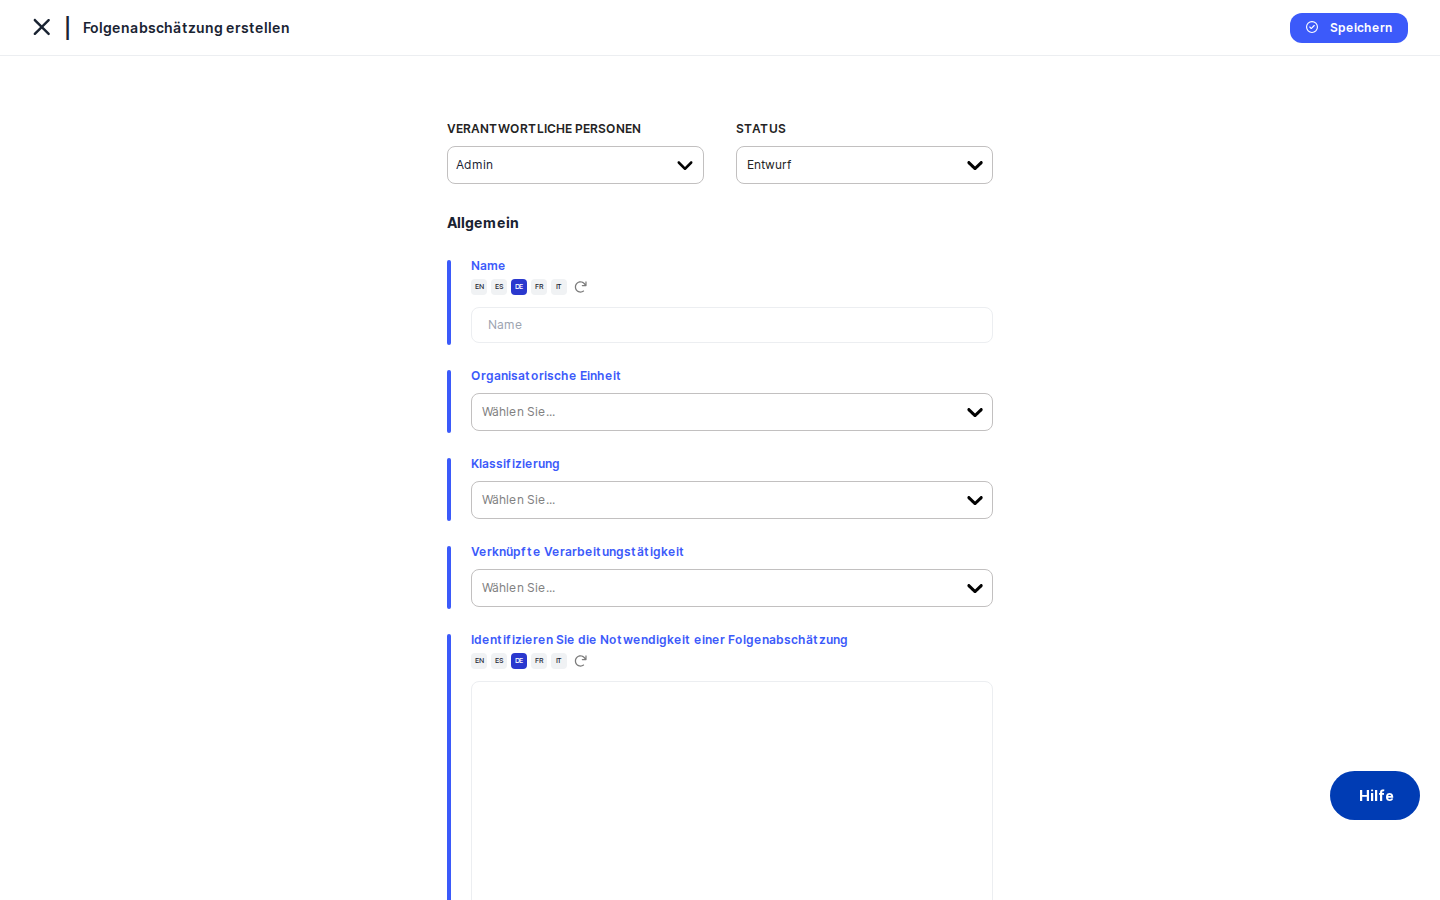
The main area on the right is where the active tab's form lives. On the General tab you'll see a status pill and the responsible-persons selector at the top, then the Name field, the Organizational Unit selector, a Classification multi-select, a Linked ROPA search, and finally two large rich-text areas for the Identify the need for a DPIA and Description of processing narratives. Many of the multilingual fields show a small AI assist button and a translation indicator next to them.
A Save button at the bottom commits your work. After your first successful save, the platform redirects you to the DPIA detail page so you can see the new record in context — and the rest of the tabs become available.
Working with this screen
Starting a brand-new DPIA from scratch
This is the most common scenario: a project just landed on your desk that triggers your organisation's "DPIA needed" criteria, and you need to open the file.
- Set the status. At the top of the General tab is a coloured status pill. New records default to
Draft, which is almost always the right starting point — leave it on Draft until the assessment is genuinely complete. Click the pill if you want to pick another status (for example, custom statuses your compliance team has defined). Keep in mind that on this creation screen the status is only staged in the form; it's actually written to the database when you clickSave. (On the detail page later, status changes save immediately — the behaviour is different there.) - Assign responsible persons. Next to the status pill is the responsible-persons selector. Pick one or more colleagues from your company directory. This is what puts the DPIA on their dashboards and into their notifications. At least one responsible person is strongly recommended — without it, no one is officially carrying the file.
- Give the DPIA a meaningful name. In the
Namefield, type something descriptive likeDPIA – HR Analytics 2026orDPIA – Customer Loyalty App. This is the name that will show up in the overview list and in cross-references from ROPA, asset, vendor and other screens. The field is multilingual: the AI translate button next to it will, if you have AI configured, offer to render the name in all your company's other active languages. - Anchor it to an Organizational Unit. Pick the department or business unit that owns the processing — Human Resources, Marketing, IT, etc. This selector also lets you create a new unit on the fly if the right one doesn't exist yet. Most reports and dashboards filter by org unit, so a DPIA without one is harder to find later.
- Tag it with classifications. The
Classificationmulti-select pulls from the DPIA Classifications tag list maintained by your compliance team. Typical tags include "High Risk", "AI", "Cross-Border Transfer" or "Children's Data". Use as many as apply — they drive how the DPIA is grouped and filtered in the index. - Link the ROPA. Use the
Linked ROPAsearch to attach this DPIA to one or more processing activities from your ROPA module. A DPIA almost always describes the risks of a specific processing activity, and linking the ROPA here keeps the two records connected for audit and reporting. Several reports and the cross-reference badges on ROPA detail pages depend on this field. - Write down why a DPIA is needed. In the
Identify the need for a DPIArich-text area, explain why you opened this assessment. This is your pre-assessment narrative: which Article 35(3) GDPR criteria apply, which of the WP29 nine criteria are met, the project context, who asked for the DPIA. Auditors and regulators will read this first, so be clear and specific. - Describe the processing. In the
Description of processingrich-text area, fill in the systematic description required by Art. 35(7)(a) GDPR — what data is collected, from whom, by what means, for what purposes, who has access, retention periods, and any onward transfers. The AI assist button can draft a starting version for you if you have AI enabled. - Click
Save. The platform creates the record, and you are redirected to the DPIA's detail page at a new URL. From here on, the rest of the tabs are unlocked and you can continue building out the assessment.
Coming back later to add the Balancing of Interests narrative
Most teams write the proportionality analysis in a separate document first and paste it in once it's mature.
- From the DPIA overview, open the DPIA you want to update and click
Editin the detail header. You'll land back on this screen with the existing record loaded. - Switch to the Balancing of Interests tab on the left.
- Paste your proportionality analysis into the rich-text area. If your company runs multiple languages, use the AI translate button to render the German, French, etc. versions in one click.
- Click
Save. The page stays on the same tab, and the title now readsEdit Balancing of Interests.
Setting up the risk evaluation
The risk evaluation track (Threshold, Risk Scenarios, Implemented TOMs, Determine Current Risk, Suggested TOMs, Treatment Plan) only becomes meaningful once at least one Standard has been linked to the DPIA. If you skip the Standards step, those tabs will look empty or unhelpful.
- Open the Standards tab and pick one or more risk standards (for example, your company's privacy risk standard or an ISO 27005-based model). Save.
- Walk down the tabs in order:
- Threshold — set the cut-off above which a risk is considered unacceptable for this DPIA.
- Risk Scenarios — link the relevant scenarios from your scenario library (what could go wrong with the processing).
- Implemented TOMs — mark which technical and organisational measures are already in place.
- Determine Current Risk — rate likelihood and damage for each scenario; the platform shows the resulting current risk level via a coloured bar.
- Suggested TOMs — pick mitigations the system suggests for scenarios still above threshold.
- Treatment Plan — compose the formal plan, save it temporarily, then finalise it. View Treatment Plan lets you visualise the published plan, and View Deadline lets you set or update the completion deadline.
Linking tasks, assessments, assets and other context
Once the DPIA exists, the linked-objects tabs (Tasks, Assessments, Assets) let you connect the file to the rest of your DPMS:
- Use Tasks to delegate concrete to-dos that come out of the assessment ("draft updated privacy notice", "schedule consultation with works council", etc.).
- Use Assessments to attach stakeholder questionnaires you've sent or plan to send. After saving, DPMS may ask whether to recalculate the DPIA's risk based on the latest answers.
- Use Assets to link the IT systems, applications and databases involved in the processing.
In each of these tabs, click the header action to pick existing items from the relevant index, then save.
Triggering a review or revalidation workflow
When the DPIA is fully drafted and you want it formally reviewed or revalidated on a schedule:
- Open the Trigger Workflow Overview tab.
- Pick a workflow template (for example, DPIA Annual Review), configure the reviewers and the trigger, and save.
- After that, the Overview sub-tab shows the active workflow's current step. While a workflow is running, an extra
Cancel Workflowbutton appears next toSave— use it only if you genuinely need to abort the in-progress review. The DPIA itself stays put; only the workflow stops.
Restricting who can see this DPIA
If the DPIA covers sensitive matters (for example, an HR investigation), open the Manage Access tab. There you can pick which audiences and individual users may read or write this record. Saving here writes the access list and returns you to the DPIA detail page. Be careful: assigning specific audiences here will override the default access rules, so colleagues who used to see this DPIA may lose visibility.
Field reference
- Status — The lifecycle stage of the DPIA. New records default to
Draft. The dropdown lists all configured statuses, including any custom ones your company has defined. On this screen, status changes are committed only when you clickSave. - Responsible Persons — One or more user accounts who own this DPIA. Drives notifications, dashboards and the responsible role in RASCI thinking.
- Name (required) — The display name of the DPIA, multilingual. Keep it short and recognisable; it appears in lists and cross-references everywhere.
- Organizational Unit — The department or business unit that owns the processing. You can also create a new unit from this dropdown. Used heavily by reports and filters.
- Classification — A multi-select of tags from the DPIA Classifications tag list (e.g. "High Risk", "AI"). Used for grouping and filtering. The picker is empty if your compliance team hasn't defined any tags yet.
- Linked ROPA — The processing activity (or activities) this DPIA covers. Links here make the DPIA visible from ROPA detail pages and feed several reports.
- Identify the need for a DPIA — A multilingual rich-text narrative explaining why the DPIA was triggered (Art. 35(3) criteria, project context, who asked for it).
- Description of processing — The systematic description required by Art. 35(7)(a) GDPR — data, sources, purposes, recipients, retention, transfers.
How this connects to the rest of DPMS
This screen is the first step in a long workflow:
- Coming in: the
Createbutton on the DPIA overview brings you here for new records. TheEditbutton on any DPIA detail page (and the various "Edit Balancing", "Edit Risk Scenarios" shortcuts) brings you back here with the model pre-loaded and the relevant tab already selected. If you arrive from the Assessments → Data Mapping flow, the back button is smart enough to return you to that source screen rather than the DPIA list. - Going out: the moment you save a brand-new DPIA, you're redirected to its detail page (
/dpia/detail/...). From there you can drill into linked ROPAs, tasks, assets, vendors, treatment plans and workflow status. - Things this screen depends on: AI features (AI assist, auto-translation) only work if your administrator has configured AI credentials elsewhere. Organizational Units, Classification tags, Workflows and Audiences need to be maintained in their respective settings areas — otherwise the corresponding pickers on this screen will be empty.
After saving the General tab, your typical next steps are: link the ROPA and assets, attach any related assessments, write the Balancing of Interests narrative, link a Standard and complete the risk evaluation, build the treatment plan, and finally trigger a review workflow.
Tips & common pitfalls
Heads up: Tabs other than General are intentionally locked on a brand-new DPIA. The platform forces you to save the General tab first so the DPIA gets a database identifier — only then are Balancing, Tasks, Standards and the rest unlocked. If the rest of the screen looks "broken" or unclickable, fill in General and save.
Tip: Always link a Standard before doing risk work. The Threshold, Risk Scenarios, Implemented TOMs, Determine Current Risk, Suggested TOMs and Treatment Plan tabs all depend on a chosen standard. Without it, those tabs will look empty or default to nothing useful.
Linked ROPAis more than decoration. Several reports and the badges on ROPA detail pages depend on it. A DPIA without a linked ROPA won't appear under that ROPA's "DPIAs covering this activity" section.- Status changes here don't auto-save. On this creation screen, changing the status pill at the top of General is only staged in the form — it commits when you click
Save. (On the DPIA detail page the behaviour is different: status changes there auto-save immediately.) Don't navigate away assuming the change is stored. - Auto-translation runs in the background. When you save a multilingual field that you only edited in your default language, the translation indicator may show "translating" for a few seconds and the other-language versions update asynchronously. Don't be surprised if the translated text appears after you've already been redirected to the detail page.
Manage Accessoverrides defaults. Assigning specific audiences on the Manage Access tab can stop colleagues who used to see the DPIA from seeing it. Coordinate with the user's role before tightening access.- Cancelling a workflow is not the same as cancelling the DPIA. The
Cancel Workflowbutton only stops the active review or revalidation — the DPIA itself stays, and you can trigger a new workflow later from Trigger Workflow Overview.