
Create a new user
Creating a New User in DPMS
The Create a New User screen is where IT administrators and Super Administrators bring a new person into DPMS. Without an account, no one can log in, view compliance data, or take part in any workflow — whether that means approving a DPIA, being assigned a task, or appearing as a responsible person on a Record of Processing Activities. This screen is one of the most foundational in the entire platform: every other module depends on users existing here first.
How to open it
Navigate to IT Settings in the left-hand sidebar, then click User Management. On the User Management index page, click the Create button in the top-right area of the screen. This brings you directly to the creation form.
Heads up: You need the create permission for IT Settings User Management to reach this screen. If you only have read access, the Create button will not appear on the index page, and navigating directly to the URL will show a "Forbidden" page. If you cannot see the User Management item in the sidebar at all, your account does not yet have read access to this section — contact a Super Administrator.
Screenshot
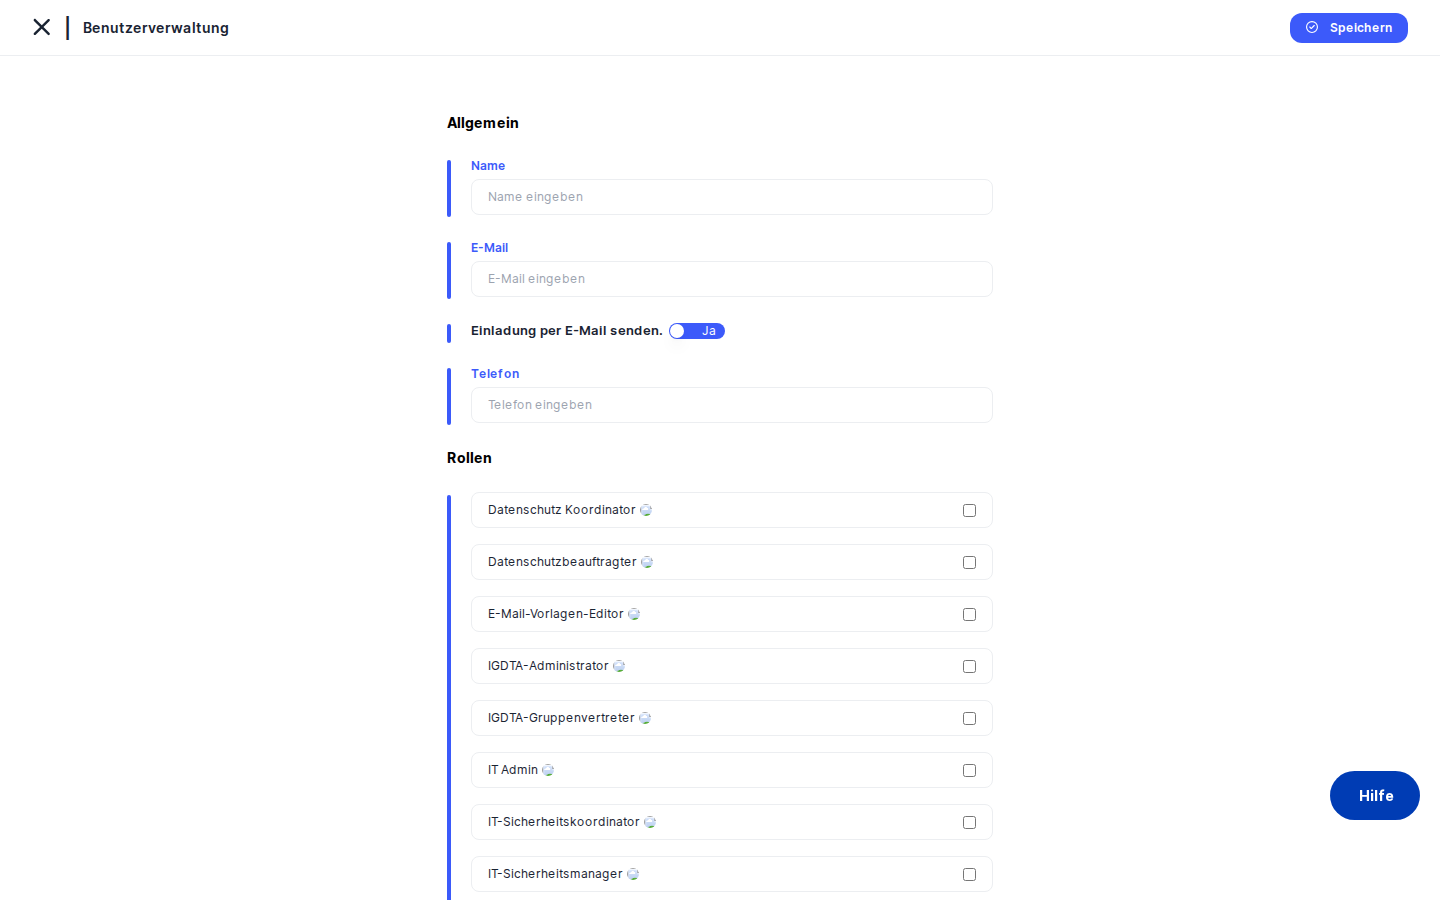
What you see
The screen uses the same clean creation shell that DPMS applies consistently across all "new record" forms throughout the platform. At the very top, a back arrow on the left lets you return to the User Management list at any time, and the page title confirms you are in User Management. A thin blue accent line sits just below the header, visually marking where the editable form begins.
The main area is a single, focused, vertical form. There are no tabs or side panels competing for attention — just a stacked list of clearly labelled fields that walk you through everything needed to create the account. The IT Settings left-hand menu remains visible on the left with User Management highlighted, so you always know where you are. A Save button sits in the top-right corner (or at the bottom of the form on smaller screens).
Working with this screen
Setting up a new employee account for the first time
The most common scenario is onboarding a new colleague. Start by entering the person's First Name and Last Name in the first two fields. These names will appear throughout DPMS wherever the user is assigned — in task lists, responsible-person dropdowns, audit trails, and RASCI frameworks — so use their full professional name as it should appear in the system.
Next, enter their Email address. This is the address DPMS uses for login and for every notification the platform sends — task assignments, deadline reminders, workflow actions. A misspelled email means the person will never receive notifications, so double-check it carefully. The email must also be unique: if another account already exists with the same address, the form will reject the submission with an inline error message.
Then set an initial Password in the password field. DPMS masks what you type. The password must meet your organisation's policy — minimum length, uppercase and lowercase letters, digits, special characters — as configured in IT Settings → General. If you are unsure of the current rules, check there before filling in this field. Enter the same password again in the Confirm Password field. The two must match exactly before the form will submit.
In the Role dropdown, select the role that matches the person's responsibilities. A user with no role has no permissions anywhere in the system — they could technically log in but would see an almost empty interface. Common choices include Data Protection Coordinator, Data Protection Manager, IT Administrator, and Employee. If you are not certain which role to assign, "Employee" is the most restricted built-in role and can always be updated later from the user's detail page.
Choose the person's preferred Language from the dropdown. This sets which translation of the DPMS interface and notifications they will see. They can change this themselves later from their profile.
If the person is in a different time zone from the server default, open the Timezone dropdown and select the correct zone. This ensures that task deadlines, audit log timestamps, and notification send times are displayed correctly in their local time. If you leave this blank, the system default timezone (from IT Settings → General) is used.
Finally, confirm that the Active toggle is switched on (shown in blue). This is usually the right choice — most accounts are created for someone who needs access immediately. Click Save to submit the form. If everything is valid, DPMS creates the account and redirects you back to the User Management list, where the new user appears. You can then share the login credentials with the person through a secure, out-of-band channel such as a password manager share.
Creating an account ahead of someone's start date
Sometimes you need to set up an account before a person joins — for example, to pre-assign them as a responsible person on records that will be active on their first day. In this case, fill in all the fields as normal, but click the Active toggle to turn it off (it will turn grey). An inactive account exists in the system but cannot be used to log in and will not appear in responsible-person dropdowns across the platform. When the person's start date arrives, open their account from the User Management list and flip the toggle back on.
Provisioning a Super Administrator during initial setup
Super Administrator accounts must be created by someone who already holds the Super Administrator role. Fill in the name, email, and a strong password as usual. In the Role dropdown, select Super Administrator. Confirm the Active toggle is on, then click Save. The new account will have unrestricted access to the entire platform, including areas accessible only to Super Administrators. Assign this role only when it is genuinely required.
Recovering from a validation error
If you click Save and something is wrong — for example, the email address already belongs to an existing account, or the password does not meet the organisation's policy — DPMS stays on the creation screen and shows inline error messages next to the relevant fields. Correct the highlighted fields and click Save again. No data is lost between attempts; you only need to fix what is flagged.
Field reference
- First Name — The user's given name as it should appear throughout DPMS. Required. Maximum 255 characters.
- Last Name — The user's family name. Required. Used together with First Name to form the display name shown in all dropdowns and audit records.
- Email — The login identifier and notification address. Required. Must be a valid email format and must be unique within your company's DPMS instance. If your organisation has an Allowed Domains restriction configured under IT Settings → IAM, the domain portion of the address must be on the approved list.
- Password — The initial password for the local DPMS account. Required. Must satisfy your organisation's password policy (minimum 8 characters; additional rules such as uppercase, lowercase, digits, and special characters depend on your IT Settings → General configuration).
- Confirm Password — A repeat of the password to guard against typing errors. Must match the Password field exactly, case-sensitively.
- Role — One or more system roles that control what the user can see and do across every module. Required in practice (a user with no role has no access). The dropdown shows all roles defined in IT Settings → Roles.
- Language — The user's preferred interface language. Optional; defaults to the system language if left blank. The user can change this in their own profile.
- Active — A toggle that controls whether the account is enabled for login. Defaults to on (active). Inactive users cannot log in, will not receive notifications, and will not appear in responsible-person selectors anywhere in the platform.
- Enforce Two-Factor Authentication — Where visible, this per-user override either requires 2FA at the user's next login or exempts them from an organisation-wide 2FA mandate. If your organisation has global 2FA enforcement enabled in IT Settings → General, this toggle may not appear or may be locked.
- Timezone — The user's local timezone. Optional; if left blank, the system default timezone (IT Settings → General) applies. Affects how timestamps are displayed to this user throughout DPMS.
How this connects to the rest of DPMS
Creating a user here is the necessary first step before that person can participate in any compliance workflow. Once the account exists and is active, the user becomes available across the entire platform:
- Responsible Person dropdowns — The user's name appears in every responsible-person selector: ROPA entries, assets, DPIAs, tasks, vendors, projects, incidents, and more. Without an account, a person simply cannot be assigned to any compliance record.
- Task and workflow notifications — All task assignments, deadline reminders, and workflow actions are sent to the email address you enter here. Getting this right at creation time saves significant troubleshooting later.
- RASCI frameworks — Compliance workflows built with Responsible, Accountable, Support, Consulted, and Informed structures draw their available persons from the user roster created on this screen.
- Role-based access control — The role you assign determines which modules, menu items, and actions are available to this user throughout the entire platform. The role can be changed later from the user's detail page.
- SSO and directory sync — If your organisation uses SAML or OAuth Single Sign-On, the email address in DPMS must exactly match what the identity provider sends in the authentication token. If Active Directory sync or SCIM provisioning is active, manually created accounts may be matched to directory-synced users by email address — check your IAM configuration before creating accounts manually in an environment with active directory sync.
After saving the new user, you may want to assign them to an organisational unit (if your DPMS instance uses departmental structures) and verify that their role grants access to the correct modules. If you assigned a temporary password, communicate it to the new user through a secure channel; there is no automatic welcome email unless your organisation has configured a workflow to send one.
Tips & common pitfalls
Tip: Always confirm the person's exact email address before saving. In SSO-integrated environments, a mismatch between the DPMS email and the identity provider's assertion will prevent the user from logging in even if the account exists. And because the email is also used for all system notifications, a typo means the user will silently never receive task or workflow alerts.
Heads up: The password policy is not displayed on the creation form itself — you will only discover a violation when you try to save. Before creating accounts for colleagues, visit IT Settings → General to confirm the current policy (minimum length, character requirements, etc.) so you can set a compliant password on the first attempt.
- An inactive user is invisible everywhere. If you create an account with the Active toggle off, that person will not appear in any responsible-person dropdown and cannot log in. This is intentional for staging accounts, but it is easy to forget — if someone reports that a new colleague "cannot be found" in selectors, the first thing to check is whether their account is active.
- Role assignment is not optional in practice. A user with no role has no meaningful access. Always assign at least one role before saving, even if it is the basic "Employee" role that can be updated later.
- DPMS does not send a welcome email automatically (unless your organisation has a workflow configured to do so). You are responsible for communicating the temporary password to the new user through a secure channel — do not send initial credentials over unencrypted email.
- If your organisation uses SCIM provisioning (automatic directory sync), creating users manually here may cause duplicate records if the directory later tries to sync the same person. In SCIM-active environments, prefer letting the directory create accounts automatically and use this screen only for accounts that must exist independently of the directory.
- Allowed Domains restrictions can block creation silently. If the email domain you enter is not on your organisation's approved list (configured under IT Settings → IAM), the save will fail with a validation error. If you see an unexpected email validation error for an address that looks syntactically correct, check the Allowed Domains configuration.