
Edit a DPIA
The Edit DPIA screen is your hands-on workspace for building out a Data Protection Impact Assessment from a stub into a complete, defensible record. This is where the assessment owner — typically a DPO, privacy manager, or a delegated coordinator — fills in the description of the processing being assessed, links the relevant ROPAs and supporting evidence, runs the balancing-of-interests test, evaluates risk against one or more standards, and ultimately produces a treatment plan with owners and deadlines. A DPIA in DPMS pulls together many other parts of the system (ROPAs, Assets, Tasks, Assessments, Meetings, Documents, Risk Scenarios, TOMs and Workflows), and this screen is the place where all those pieces are wired together for a single DPIA. Without time spent here, a DPIA stays an empty stub in the index and can never reach a completed status with a proper audit trail.
How to open it
You can reach this screen in two main ways:
- Open Data Protection Impact Assessment from the main left sidebar. The DPIA index lists all existing DPIAs.
- Click the row of the DPIA you want to work on — that opens the read-only Detail view.
- From the Detail view, click the pencil Edit icon on any tab, or pick Edit from the three-dots menu in the top-right. You will land on Edit DPIA on the matching tab.
You can also arrive here directly from the Risk Scenario detail screens, the consultation process editor, or an Assessment review portal — DPMS remembers where you came from and brings you back there when you save.
This screen is available to users with permission to create or edit DPIAs. If your role is "edit only assigned", you can edit a DPIA only if you are listed as one of its responsible persons. Users without any DPIA permission see a Forbidden page instead.
What you see
The screen uses the standard DPMS edit layout. At the top you find a breadcrumb that shows the DPIA module on the left, the name of the DPIA you are editing, and the active tab in blue. If a workflow is currently running against this DPIA — for example an approval workflow waiting on the legal lead — a small workflow indicator appears next to the title, so you always know whether someone else is reviewing or approving the record in parallel.
The left side of the screen is a vertical tab strip — this is the heart of the editor. The tabs are loosely grouped into three families. The first family covers the qualitative content of the DPIA: General, Balancing of Interests, Tasks, Assessments, Assets. The second family is the risk-evaluation pipeline, which becomes meaningful only once you pick a Standard: Standards, Threshold, Risk Scenario, Implemented TOMs, Determine Current Risk, Suggested TOMs, Copy Element, Treatment Plan, View Treatment Plan, View Deadline, and Add Scenario Below Threshold. The third family covers governance: Manage Access, Trigger Workflow Overview, and the workflow Overview sub-tab.
The main panel on the right shows whatever the active tab provides — a stacked form for General, a searchable linked-elements table for Tasks/Assessments/Assets, or a more specialised form for the risk tabs. In the bottom-right corner sits the sticky Save button. On most tabs Save commits your work and returns you to the DPIA detail view; on the read-only View Treatment Plan tab the button is hidden, and on a live workflow Overview tab it is joined by a Cancel Workflow button.
Working with this screen
Filling out a brand-new DPIA from scratch
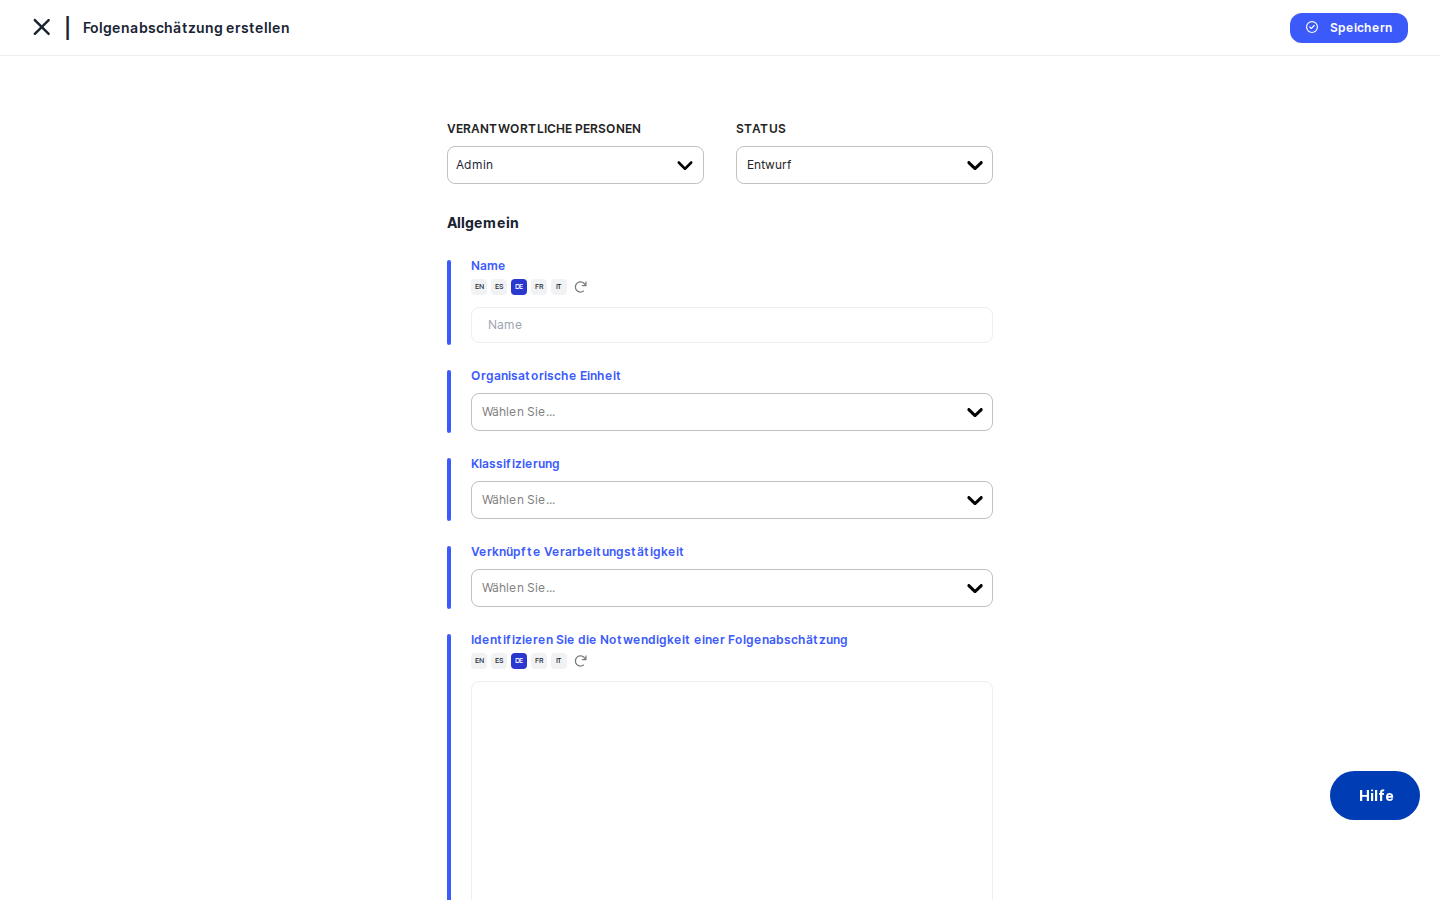
You typically come here right after creating an empty DPIA from the index. The General tab is your starting point.
- At the top of the form, use the responsible persons picker in the action header to assign one or several owners. From this point on, anyone listed here will be able to edit the DPIA even if their role only allows editing assigned records.
- Set the status dropdown to reflect the lifecycle stage — for example "Draft" while you are still building it out. Status options come from your DPIA status configuration, so the exact labels match what your organization uses elsewhere in DPMS.
- Fill in the
Namefield. Names are multi-language: click the small translation indicator next to the field to add or edit translations, and DPMS can auto-translate to all enabled languages. - Pick the responsible Organizational Unit — for example "EMEA Marketing". You can search for existing units or create one on the fly. This choice drives filtering, reporting and access rules elsewhere in DPMS.
- Add Classification tags to flag the DPIA as, for example, "Article 35 trigger" or "Children's data". These tags become facetable filters back on the DPIA index and help with reporting.
- Use the Linked ROPA picker to attach the Records of Processing Activities this DPIA actually covers. A single "Marketing automation" DPIA might link the Newsletter, Retargeting and Lead-scoring ROPAs together. This is the bridge between the DPIA register and the processing register.
- In the
Identify the need for a DPIArich-text editor, write up why the DPIA is required — Article 35(3) triggers, large-scale processing, special categories, etc. The editor supports formatting, lists, links and an inline AI helper if AI is configured. - In the
Description of Processingrich-text editor, capture what the processing actually does — scope, parties involved, retention, data flows. - Click
Save. DPMS persists the form and brings you back to the DPIA detail view.
From here you typically move through Tasks, Assessments and Assets to attach supporting evidence (see the next sections), then jump into the risk pipeline starting with Standards.
Attaching tasks, assessments and assets
The Tasks, Assessments and Assets tabs all follow the same pattern: they let you link existing items to this DPIA so that they appear together in workload planning, evidence trails and risk evaluation. They do not create or edit the underlying items — to change a task itself you click into it from the table.
- Open the relevant tab (
Tasks,AssessmentsorAssets). - Use the search box to filter the list, then click
+ Addto open the picker, tick the items you want to attach, and confirm. - The new links appear in the linked-items table, where you can sort by name, status, deadline, priority, and so on. The remove icon on each row unlinks the item from this DPIA without deleting it.
- Click
Saveto persist your changes.
There is one twist to be aware of on the Assessments tab. When you save linked assessments, DPMS may detect that the answers in those assessments could change the DPIA's risk picture. If so, a pop-up asks "Update risk based on the latest assessment answers?" Confirming it triggers a recalculation that re-derives the active standards and risk numbers from the assessments — and if exactly one standard is now active, that standard is auto-selected for you. Decline the pop-up if you want to keep the existing risk model unchanged.
Documenting the balancing of interests
The Balancing of Interests tab gives you a single large rich-text editor for the explicit weighing of the controller's legitimate interest against the data subjects' rights. This is typically where you document whether the processing is necessary, whether less intrusive alternatives exist, and on what footing the controller justifies proceeding. Write your analysis, then click Save. As with the General tab, the field is multi-language and auto-translatable.
Running the risk evaluation
Once the qualitative content is in place, you move through the risk pipeline. The contextual bar above each risk tab shows you which standard and DPIA you are working on — if the standard name is blank, it means you have not picked a standard yet and the risk forms will be empty.
- Open the
Standardstab and select one or more standards from your library — for example a "GDPR Privacy Risk Model" or "ISO 27005". Save. Activating a standard unlocks the rest of the risk pipeline for that standard. - On
Threshold, configure the cut-off above which a risk scenario is considered material. The exact controls depend on the standard's risk model. - On
Risk Scenario, either draft brand-new scenarios inline (such as "Unauthorised access to marketing database") or link existing ones from the central scenarios library. Open a scenario row to drill into its own edit screen. - On
Implemented TOMs, pick the Technical and Organizational Measures already in place against each scenario — encryption, access management, training, etc. These reduce the residual risk. - On
Determine Current Risk, dial likelihood and damage for each scenario. The Current Risk Bar above the form updates live to show how the residual risk compares with the threshold for the active standard. - Where residual risk is still above threshold, open
Suggested TOMs. DPMS proposes additional measures next to those already implemented. Toggle the ones you want to add to the Treatment Plan. - If you have a similar DPIA with the same standard already configured, the
Copy Elementtab lets you copy the standard and risk evaluation across, saving manual data entry. - The
Add Scenario Below Thresholdtab is a specialised form for deliberately recording a known low-risk pathway you still want on file — handy for completeness and audit.
Building and publishing the treatment plan
The Treatment Plan tab is where the residual-risk story turns into actions.
- Review the items DPMS has built up from your Implemented and Suggested TOMs. Each row pairs a TOM and a risk scenario.
- For each item, set an owner, a deadline, and any comments.
- Click the temporary
Saveto keep iterating with your team — the plan stays editable. - When the plan is final, click the Finalize/Publish save. From this moment the plan is locked: future visits land on the read-only
View Treatment Plantab, which is what auditors will see. UseView Deadlineto update per-item deadlines and treatment statuses (Open / In Progress / Done) over time, even after publication.
Heads up: Publishing the Treatment Plan is one-way. To make further changes after publishing, you typically need to start a new revision or trigger a revalidation workflow, depending on how your organization configures DPIA workflows.
Controlling who can see and edit the DPIA
The Manage Access tab controls audience-based access for this specific DPIA.
- Use the audience selector to add user groups configured under Compliance Settings → Group Management. Each group carries its own read or write flag.
- Use the single-user selector to grant specific DPMS users read or write access on top of the groups.
- Click
Save. You are returned to the DPIA detail view.
This works the same way as audience assignment elsewhere in DPMS — the groups themselves must already exist, you only assign them here.
Triggering and monitoring workflows
If your organisation uses workflow templates for DPIA review, approval or revalidation, you assign and trigger them on the Trigger Workflow Overview tab. Pick a workflow configuration from the dropdown — these come from the workflow templates configured in Compliance Settings — and Save to fire it off. The available templates and the right to trigger them require a specific permission, so this tab is only available to users who can assign workflows.
Once a workflow is live, the Overview sub-tab gives you a read-only display of its current state and history. While the workflow is still running, a Cancel Workflow button appears next to Save so you can stop it if needed. When the workflow is completed or cancelled, both buttons disappear and the tab simply shows the history.
Field reference
The General tab carries the only non-obvious form fields:
- Responsible persons — the day-to-day owners of this DPIA. Required at least for users who only have edit-only-assigned access; without anyone listed they cannot edit.
- Status — the lifecycle state (Draft, In Review, Active, etc.). Defaults to the first system status if you leave it blank. Drives dashboard tiles and index filtering.
- Name — the human label shown everywhere from the DPIA index to breadcrumbs and the published treatment plan. Multi-language; required to save meaningfully.
- Organizational Unit — which department or business unit owns the assessed activity. Used for filtering, reporting and access rules. You can create a new unit inline.
- Classification — multi-select tags managed in Compliance Settings → Tags under "DPIA Classifications". Use them as facetable filters back on the DPIA index.
- Linked ROPA — one or more Records of Processing Activities this DPIA covers. The bridge between DPIA and ROPA registers; a DPIA without linked ROPAs is rarely complete.
- Identify the need for a DPIA — rich-text rationale for performing the DPIA, e.g. Article 35(3) triggers. Multi-language with auto-translation and an AI helper.
- Description of Processing — rich-text description of what the processing actually does. Multi-language with auto-translation and an AI helper.
- Balancing of Interests (on its own tab) — the explicit weighing of legitimate interest against data subjects' rights. Multi-language rich-text.
How this connects to the rest of DPMS
Edit DPIA is the only place where the operational risk evaluation tabs of a DPIA can actually be edited. The detail view shows you what is there, but every "Edit" pencil on a detail tab brings you back here on the matching tab. The screen is therefore the single source of truth for the content and risk posture of a DPIA record.
A few cross-cutting connections are worth keeping in mind:
- The DPIA index's status filtering and risk badges read directly from the General header and the risk tabs you fill in here.
- Dashboard tiles on data protection compliance count DPIAs by status, driven by the status you set on General.
- The Manage Access groups follow the same pattern as other DPMS elements — the groups themselves are configured in Compliance Settings → Group Management.
- Workflow templates available on Trigger Workflow Overview are also configured elsewhere; this screen only assigns and triggers them on this specific DPIA.
- AI-assisted suggestions on the rich-text fields appear only if AI credentials are configured platform-wide; without them the AI helper buttons are simply disabled.
After finishing your work here, the natural next step is the consultation process — accessible from the Consultation tab on the DPIA detail view — where you record meetings with the DPO, link relevant documents, and capture a final decision (Approved, In Progress, or Not Approved) that gets folded back into the DPIA.
Tips & common pitfalls
Tip: Always pick a Standard before opening the risk tabs. New users often jump straight to Risk Scenario or Threshold and find the form empty. The contextual bar at the top of those tabs shows the active standard name; if it is blank, go back to Standards and add at least one.
Heads up: Confirming the "Update risk based on the latest assessment answers?" pop-up after saving Assessments will let DPMS rewrite your active standards and reset the risk evaluation. Only confirm if you really want assessment answers to drive the risk model.
- Linked tabs save links, not the items themselves. Adding a task on the Tasks tab links an existing task to this DPIA; it does not create or modify the task. To change the task, click into it.
- Some General fields are inline-editable from the DPIA detail view (Identify Need, Description of Processing) and persist immediately without a Save. Use Edit DPIA / General when you want to change Name, Org Unit, Linked ROPA or Classification — those are not inline-editable from the detail.
- Publishing the Treatment Plan is irreversible: once locked, only the View Treatment Plan tab can show it, and further changes require a new revision or revalidation workflow.
- If you arrived here from the data-mapping flow or an assessment review portal,
Savewill bring you back to that origin instead of the DPIA detail. This is intentional, but can surprise users who expect to "always end up on the detail page". - Edit-only-assigned users see the same screen but only for DPIAs in which they are listed as a responsible person; otherwise they hit the Forbidden page when trying to open the edit URL directly.