
Workflow email templates
Workflow Email Templates
The Workflow Email Templates screen is the central place where you define every automated email your compliance workflows can send. Whether a workflow needs to notify a data subject that their request has been received, remind a colleague of an upcoming deadline, or alert a responsible person that a ROPA record has changed status, it must reference a template created here. Without at least one template configured on this screen, any workflow node that sends an email will have nothing to work with. Think of this screen as your organisation's library of reusable email messages — and the Workflow Editor as the canvas where you decide when each one gets triggered.
How to open it
In the left sidebar, expand the Workflow section and click Email Templates. You can also reach this screen directly from the Workflow Editor: the narrow vertical strip of navigation buttons on the left side of the editor canvas includes an Email Templates link that brings you here without losing your place in the editor.
Permission note: You need the Workflow module's create/write permission to create or edit templates. If you only have read access, you can browse the list but the Create button will not appear, and navigating directly to the create or edit URL will redirect you away from the form.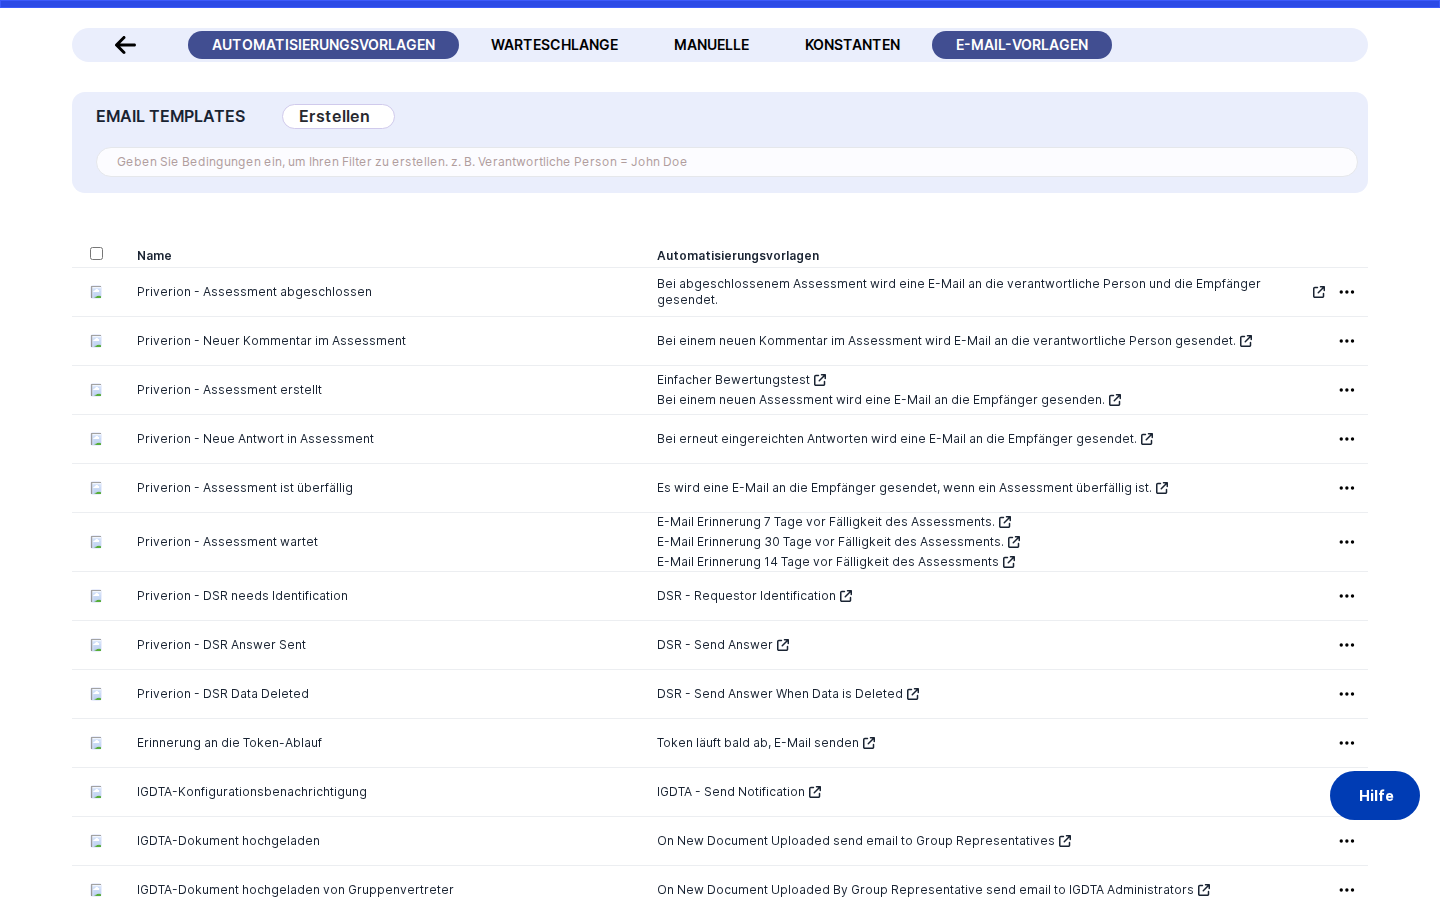
What you see
The screen opens inside the Workflow module's shared layout — the same header and sidebar you see in the Workflow Queue and Workflow Constants screens. The main content area is a list panel with the title Email Templates in the top-left and a blue Create button in the top-right.
Below the title and button sits a data table listing every email template currently saved in the system. Each row represents one template. Above the table there is a search and filter bar that lets you narrow the list by name or other criteria. As you scroll down, more templates load automatically — there are no numbered pages to click through.
One detail worth knowing before you dive in: templates that are designated as a global layout (the HTML wrapper that goes around all your emails) display a small Priverion logo badge right next to their name in the Name column. This makes them easy to spot at a glance among your regular notification templates. The Workflows column on the right of each row shows which workflows are currently using that template, with clickable links that open each workflow in the Workflow Editor in a new tab.
Working with this screen
Setting up a branded email wrapper for the first time
Most organisations want all automated workflow emails to share the same header, logo, and footer rather than being plain text. DPMS handles this through layout templates — a special template type whose content is a full HTML document with a placeholder called ${content} where individual notification text gets inserted at send time.
To create your first layout template, click Create in the top-right and choose Create Email Template from the small dropdown that appears. This takes you to the creation form.
On the form, the Responsible Persons field is pre-populated with your own name — you can add other colleagues who should share ownership of this template. Give the template a clear name in the Name field (for example, "Company Email Layout") so it is easy to identify later when building workflows.
Now enable the Layout toggle. As soon as you do this, two things happen: the form reveals an additional Apply All toggle, and the Variables section automatically adds a locked variable called content. This content variable is mandatory for all layout templates — it marks the spot in your HTML where each email's body text will be injected.
In the Template text area, paste or type your branded HTML. Make sure the HTML includes ${content} exactly where you want the notification body to appear. Because the field supports multiple languages, use the language tabs to add HTML for each of your organisation's active languages — the content must be valid HTML in every tab, not just English.
Before saving, enable the Show Preview toggle to see a live rendering of your HTML inside a sandboxed preview frame. This lets you catch layout problems — broken markup, misaligned elements, or a missing logo — before anyone receives an email. The preview automatically reflects whichever language tab you are currently viewing.
Finally, enable Apply All if you want this layout to wrap every workflow email company-wide automatically. Once enabled, no other template needs to explicitly reference this layout — the system applies it to all outgoing emails on its own.
Click Save. DPMS validates that each language tab contains valid HTML and that ${content} is present everywhere, then saves the template. You are returned to the list, where your new template appears with the Priverion logo badge next to its name.
Heads up: Only one template can hold the Apply All designation at a time. If another template already has it, the Apply All toggle on your new form will appear disabled with a warning link pointing to the existing layout. You must open that template first and turn off Apply All there before you can enable it here.Creating a notification template for a specific workflow step
Once you have a layout in place, you can create the content templates that deliver actual messages to people. A good example is an acknowledgement email sent to data subjects when their request arrives.
Click Create → Create Email Template. Fill in the Name — something descriptive like "DSR Received Acknowledgement" works well, because this name appears in the Workflow Editor's dropdown when configuring email-sending nodes. A vague name like "Template 3" will make life harder later.
Leave the Layout toggle off — this is a content template, not a wrapper. The form will show a Layout dropdown where you can optionally select one of your existing layout templates to wrap this email. If you already set up an Apply All layout, you will see a note explaining that the Apply All layout will be used regardless of what you choose here.
Next, define your Variables — the dynamic placeholders that the workflow engine will fill in at send time. For a DSR acknowledgement you might add subjectName and requestDate. Type each name into its own input field. A few rules to keep in mind: variable names cannot contain spaces, cannot start with a number, and cannot use reserved characters like $, {, or }. If you type an invalid name, a red error message appears inline beneath that field.
Once you have defined your variables, move to the Template text area. Write the email body in English first, using the ${variableName} syntax wherever you want dynamic content — for example: "Dear ${subjectName}, we have received your request on ${requestDate}." Then switch to the German language tab and write the German version, making sure both ${subjectName} and ${requestDate} appear there too.
Below the text area you will see variable status indicators — small coloured labels, one per variable. When a variable's placeholder is present in every active language tab, its label is green. If it is missing from any language, it turns red and shows the missing language codes (for example, ${subjectName} de). Check that all indicators are green before you click Save.
Click Save. The template is now available in the Workflow Editor whenever you configure an email-sending node.
Editing a template that is already used by active workflows
Workflows do not freeze their email content — they reference templates by ID and fetch the current content every time they run. This means editing a template immediately affects every workflow that uses it.
Find the template in the list and click its row to open the edit form. Make your changes to the wording or variables. When you click Save, a toast notification appears listing every workflow that references this template, with a clickable link to each one in the Workflow Editor. Read this list carefully. If the affected workflows are time-sensitive or business-critical, open each link in a new tab to review the impact before confirming. Once you confirm, the updated wording takes effect immediately for the next workflow execution.
Removing a template that is no longer needed
If a template is no longer referenced by any workflow, the Workflows column for its row will be empty. That is a safe sign you can delete it without breaking anything. Click the delete action at the end of the row to remove it.
If the Workflows column is not empty, think twice. DPMS will warn you before deleting, but it will not block you — deleting a template that is still referenced by active workflow nodes will cause those nodes to fail at execution time. Always remove or reassign the template from any active workflows before deleting it.
Field reference
Responsible Persons — The colleagues accountable for keeping this template accurate. DPMS pre-populates your own name. This does not affect who receives emails; it is purely for governance tracking. Not required to save, but strongly recommended.
Name — A short, descriptive label for the template. Required in at least your current language. This name appears in the Workflow Editor's email-node dropdown, so make it clear enough to identify the template's purpose at a glance (e.g. "DSR Acknowledgement EN/DE" rather than "New Template").
Layout toggle — Marks this template as an HTML wrapper rather than a notification body. Enabling this automatically adds the locked content variable and reveals the Apply All option. Disabling it again will clear any custom variables you had already defined, so settle on the template type before adding variables.
Apply All toggle — Visible only when Layout is on. Designates this layout as the company-wide email wrapper applied to every outgoing workflow email. Only one template may hold this at a time. Disabling it from an existing Apply All template does not automatically reapply another layout — outgoing emails will simply be sent without a wrapper until you designate a new one.
Layout dropdown — Visible only on non-layout templates. Lets you assign a specific layout wrapper to this content template. If an Apply All layout exists, it overrides this choice and a note says so.
Variables — One text field per placeholder name. Each variable you add here creates an obligation to include ${variableName} in the Template text for every active language. Rules: no spaces, no starting with a number, no $/{/} characters, no duplicates within the same template, no reserved platform keywords. The + button (circle plus) adds another variable field; the × button (circle X) removes one. On layout templates, the content variable is automatic and cannot be removed.
Template — The email body (or full HTML for layout templates), with language tabs for each of your organisation's active languages. Use ${variableName} for placeholders. Required in at least one language. For layout templates, every language tab must contain valid HTML — mixing HTML in English and plain text in German will block the save.
Show Preview — Available on layout templates only. Toggles a live HTML preview panel below the Template field. Useful for catching rendering problems before anyone sees the email. Requires at least some HTML content in the currently active language tab; toggling it on with an empty tab produces an error toast instead of a blank preview.
Variable status indicators — Read-only coloured labels below the Template field. Green means the placeholder is present in every active language. Red with a language code (e.g. de) means it is missing from that language's tab. Use these as your pre-save checklist.
How this connects to the rest of DPMS
Email templates are a foundational dependency for the entire workflow automation system. Every email-sending node in the Workflow Editor (/workflow/editor) pulls its list of available templates from what you configure here. As soon as you save a template on this screen, it becomes selectable in the editor without needing to reload the page.
The Workflow Queue — the engine that actually runs your automations — resolves each template by its ID at the moment an email needs to be sent, substituting variable placeholders with real data values provided by the workflow node configuration. If a template has been deleted since the workflow was last edited, that execution step will fail. This makes it important to check the Workflows column before deleting any template.
The number of language tabs that appear in the Template field is determined by the languages your organisation has activated in the IT Settings → Language configuration. If your IT administrator adds a new language company-wide, that language will start appearing as a new tab on all your templates, and you will need to add content for it to keep validation passing.
After finishing this screen, your next step is usually to open the Workflow Editor and either create a new workflow or update an existing one to reference the template you just built.
Tips & common pitfalls
Heads up: The most common save failure is forgetting to add variable placeholders to every language tab. Adding${recipientName}to the English tab but not the German tab will block the save. Watch the variable status indicators — if anything is red, fix it before clickingSave.
Heads up: Layout templates require valid HTML in every active language tab, not just English. If you paste plain text into a non-English tab, DPMS will block the save and identify the offending language. The safest approach is to copy the HTML from your English tab into all other language tabs as a starting point, then translate the visible text strings within the HTML.
- Only one Apply All layout at a time. If you need to switch your global layout to a new template, first open the current Apply All template, turn off its
Apply Alltoggle, save it, and then enable Apply All on the new one. The warning banner on the create form links directly to the existing Apply All template to save you time finding it. - The Layout toggle clears your variable list if you toggle it on and off. Build your variable list only after you have decided whether the template is a layout or a content template. Switching from Layout back to content (or vice versa) after you have started adding variables will wipe the list.
- Editing a widely-used template prompts a confirmation toast — read it carefully. The toast lists every affected workflow with a clickable link to each one in the Workflow Editor. For business-critical workflows, take a moment to check the links before confirming the save.
- Partially filled forms persist during your browser session. If you start creating a template, navigate away to check something else, and return to the creation form, your previous entries may still be there. This is helpful if you were interrupted mid-task, but start with a fresh page load if you want a clean slate.
- Deleting a referenced template breaks workflow nodes silently. DPMS warns you but does not prevent the deletion. Always verify the Workflows column is empty — or update those workflows first — before removing any template.