
Create an audience
Create an Audience
Audiences are the foundation of access control in DPMS. Whenever you need to share a record — a processing activity, a DPIA, a vendor entry, an incident — with a specific group of people without opening it to everyone in the system, you do it through an audience. This screen is where you build those groups: you give the audience a name, assign users to it, optionally link external (consulted) companies, and then define exactly which modules each company may read or write. Once an audience is saved, it immediately becomes available in the Manage Access dropdown on every record across DPMS.
How to open it
Navigate here via Compliance Settings → Audience Management. On the Audiences list page, click the Create button near the top of the content card, then choose Create audience from the small dropdown that appears. DPMS takes you directly to the creation form.
You need the create audience permission to access this screen. If you hold only the view permission, the Create audience option will not appear in the dropdown.
What you see
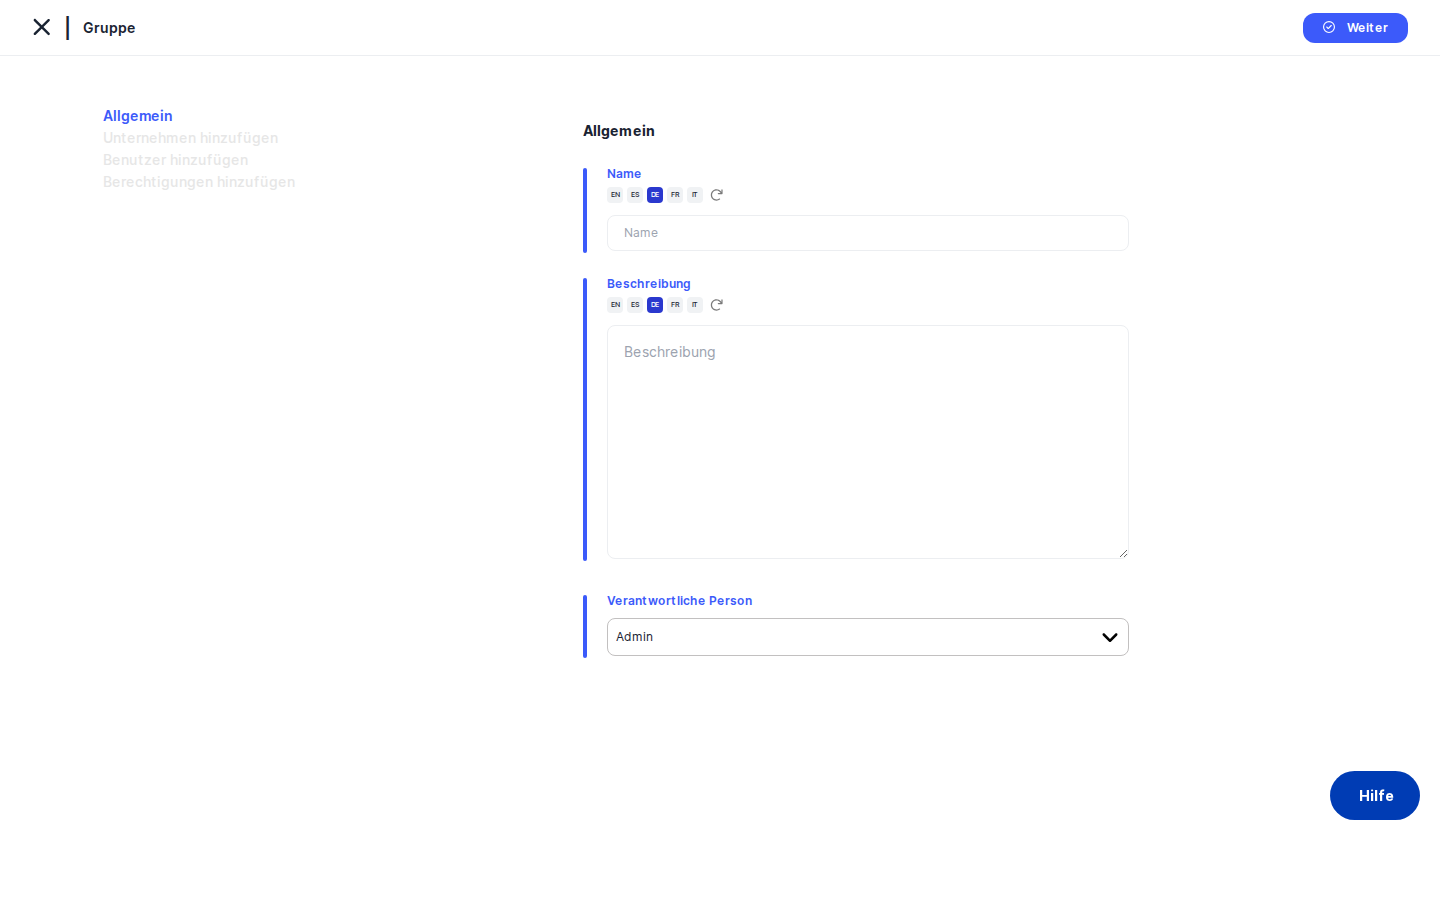
The screen is split into two panels. On the left is a narrow vertical tab menu with four steps: General, Add Companies, Add Users, and Add Permissions. On a brand-new form, only General is active — the other three tabs are greyed out and cannot be clicked yet. This is intentional: DPMS cannot attach companies, users, or permissions to an audience that does not yet exist in the database. Once you save the General tab for the first time, a record is created and all remaining tabs unlock automatically.
The right panel is the working area. It shows the content for whichever tab is active. In the top-right corner of that content area sits the blue Save button, which you use at the end of each tab. A thin blue vertical bar runs along the left edge of the form — a consistent DPMS visual cue that this area is editable.
Working with this screen
Setting up your audience for the first time
Start on the General tab, which is the only one available when you first open the form.
- Type a name in the
Namefield. This is what colleagues will see when they open the Manage Access dropdown on a record, so choose something descriptive — for example, "Finance Department Readers" or "External Auditors Q4 2024". If your DPMS instance has automatic translation enabled, the platform can fill in translations for other configured languages automatically. The name field is required; saving without it will produce an error. - Add a description (optional but recommended). Use the
Descriptionfield to explain who belongs to this audience and why it was created. Future colleagues — or an auditor — will thank you for the context. - Check the Responsible Person. This field is pre-filled with your own account, which is usually correct. If someone else owns this audience, search for and select them here. You can assign more than one responsible person. If you clear this field entirely, the save will still succeed, but no one will be formally accountable for the audience — which is generally not best practice.
- Click
Save. DPMS creates the audience record, assigns it an internal ID, and automatically advances you to the Add Companies tab. You do not need to click that tab yourself.
Heads up: If you only have permission to create audiences but not to edit them, DPMS will return you to the Audiences list after saving the General tab. You will not be able to proceed to the remaining tabs. A colleague with the edit audience permission will need to complete the configuration.
Adding external companies
The Add Companies tab connects your audience to consulted (external) companies — typically data protection consultancies, auditors, or other legal entities in your corporate group that have been given access to your DPMS instance.
When the tab loads, DPMS fetches the list of available consulted companies from the backend. You may see a brief spinner while this happens. If the list is empty, it means no consulted companies have been configured in your DPMS yet — you can still proceed and save an empty list.
- Click the
Assigned Companiesdropdown. It is a searchable, multi-select field. Type part of a company name to filter, then click each company you want to include. - Click
Save. DPMS records the assignment and advances you to the Add Users tab.
Tip: Only companies you select here will appear in the permissions configuration later. If you forget to add a company now and want to grant it permissions later, you will need to come back to this tab first.
Selecting audience members
The Add Users tab is where you choose the DPMS user accounts that belong to this audience. This is the table of people who will actually gain the access rights you configure.
- Use the search bar at the top of the user table to find people by name. The table supports infinite scrolling — if your organisation has many users, search is the fastest way to find the right people.
- Tick the checkbox next to each user you want to add. You can tick multiple users across different searches; DPMS remembers your selections even as you scroll or re-search.
- Click
Save. DPMS records the selected users and advances you to the Add Permissions tab.
A few things to know about this table:
- Super Administrators are filtered out automatically — they have system-wide access and cannot be placed in audiences.
- External users (accounts flagged as external in DPMS) are also excluded from the list.
- If you cannot find a specific person, check whether their account has one of these designations.
Defining read and write permissions
The Add Permissions tab is the final and most important configuration step. This is where you control what audience members can actually do in DPMS.
Permissions in DPMS are configured per company, not for the whole audience at once. If you have three companies assigned to this audience, you need to configure permissions for each one separately.
- Use the Assigned Companies dropdown at the top of the tab to select the company you want to configure. The dropdown is pre-filled with the first company from your Add Companies list. If you did not add any companies, this dropdown will be empty and you can skip to saving.
- In the permissions table, you will see a row for each DPMS module:
- ROPA (Records of Processing Activities)
- TOMs (Technical and Organisational Measures)
- Assets
- DPIA (Data Protection Impact Assessments)
- Assessments
- Legitimate Interest
- Documents
- Projects
- Incidents
- Data Subject Requests
Each module has two checkboxes: Read Access (view records) and Write Access (create, edit, or delete records). Tick the checkboxes that match the level of access you want to grant. You can also use the select-all checkbox in each column header to grant or revoke all read or all write permissions in a single click.
- Click
Saveto record the permissions for the selected company. - If you have more companies in the list, select the next one from the dropdown and repeat the process.
Heads up: When you click Save on the Add Permissions tab, DPMS considers the audience creation workflow complete and returns you to the Audiences list (or to whatever page you came from). If you still need to configure permissions for additional companies, go back to the audience from the list and return to the Add Permissions tab.Tip: Granting write access without read access is technically possible but unusual. In most cases, users need to be able to view records before they can meaningfully edit them.
Field reference
Name— Required. The human-readable label for the audience. Appears in Manage Access dropdowns across DPMS. Supports automatic translation if enabled. Cannot be blank.Description— Optional. Free-text explanation of the audience's purpose and membership. Supports automatic translation.Responsible Person— Optional (but recommended). One or more DPMS users who are accountable for managing this audience. Pre-filled with the currently logged-in user. Can be cleared, but leaving it empty means no one is formally responsible.Assigned Companies(Add Companies tab) — Optional. The external (consulted) companies linked to this audience. Only companies already configured as consulted companies in DPMS appear as options. A company must be added here before you can configure its permissions.Assigned Companies(Add Permissions tab) — Single-select. Determines which company's permissions you are currently editing. Switches the checkbox table to show that company's current settings.Read Accesscheckboxes — One per DPMS module. Tick to allow audience members to view records of that module type for the selected company.Write Accesscheckboxes — One per DPMS module. Tick to allow audience members to create, edit, and delete records of that module type for the selected company.
How this connects to the rest of DPMS
The audience you create here immediately feeds into the Manage Access feature, which is available from the options menu (three-dot icon) on any ROPA, DPIA, TOM, Asset, Vendor, Assessment, Document, Incident, Project, Legitimate Interest, Data Subject Request, or Retention/Deletion record. When a compliance officer opens Manage Access on one of those records and selects your audience, the record becomes visible (and optionally editable) to all users in that audience — but only for the modules where you have granted the corresponding access.
After completing the creation workflow, your natural next step is to open the records you want to share and attach this audience via Manage Access. Until you do that, creating the audience has no practical effect on what users can see.
The Audiences list (the page you came from) shows all configured audiences. From there you can click any audience to open its edit view, where the same four-tab layout is available for making changes at any time.
Tip: Changes to an audience take effect immediately. If you add a user to an existing audience, that person gains access to all records the audience has been granted on, straight away — no re-publishing or approval step is needed.
Tips & common pitfalls
Heads up: The tabs are locked until you save the General tab. Many first-time users click "Add Users" or "Add Permissions" right away and nothing happens. You must save a name on the General tab first. After that, DPMS automatically moves you to Add Companies — you do not need to navigate manually.
Tip: Permissions are per company, not per audience. If your audience has three companies, you must configure permissions for each one separately. Selecting a company in the dropdown does not copy settings from another company; each starts unchecked.
- The Add Companies list may appear empty. This does not indicate an error — it usually means your organisation has not yet configured any consulted companies. Consulted companies are set up in the Companies section of DPMS Settings, separately from this screen.
- Saving on Add Permissions ends the creation session. Unlike the earlier tabs (which advance you forward), saving on Add Permissions returns you to the Audiences list. If you have more companies to configure, return to the audience from the list and revisit the Add Permissions tab.
- Super Administrators and external users cannot be added. The user table silently filters them out. If you cannot find someone, check their account type in User Management.
- Removing a company from Add Companies does not delete its permissions. If you return to Add Companies and remove a company, the permission records associated with it are not automatically cleared. It is good practice to zero out its permissions on the Add Permissions tab before removing it.
- The back arrow takes you to where you came from. If you arrived at this screen from a Manage Access flow elsewhere in DPMS, clicking the back arrow will return you to that original location — not necessarily to the Audiences list. This is intentional but can be surprising.