
Create a TOM
Creating a TOM (Technical and Organisational Measure)
The TOM creation screen is where your organisation's data protection safeguards take on a formal, structured life inside DPMS. Whether you are a Data Protection Officer documenting a new encryption policy, an Information Security Manager cataloguing access controls, or a Compliance Officer building out your GDPR Article 32 evidence base, this is the screen where each individual measure gets a named record that the rest of the platform can reference. Once a TOM exists here, every other module — risk scenarios, assets, ROPA entries, DPIAs, vendor records, assessments, and tasks — can link to it, making this screen the anchor point for your entire control framework.
How to open it
To create a brand-new TOM:
- Open the left sidebar and navigate to Controls (sometimes labelled Compliance).
- Click TOMs (Technical and Organisational Measures). The TOMs index table opens.
- In the top-right corner of the index, click the Create button.
- A short menu appears — select the option to create a TOM manually (as opposed to downloading one from the shared library).
The blank creation form opens immediately.
To edit an existing TOM, click its row in the index table and then click the edit icon in the record's header. The same screen opens, pre-populated with the saved data.
Heads up: You need the Create TOMs permission to open a blank creation form. Editing requires either the Edit TOMs permission or the Edit Only Assigned TOMs permission (which restricts you to records where you are listed as a Responsible Person). If you land on the screen without the right permission, you will see a full-page error rather than the form.
What you see
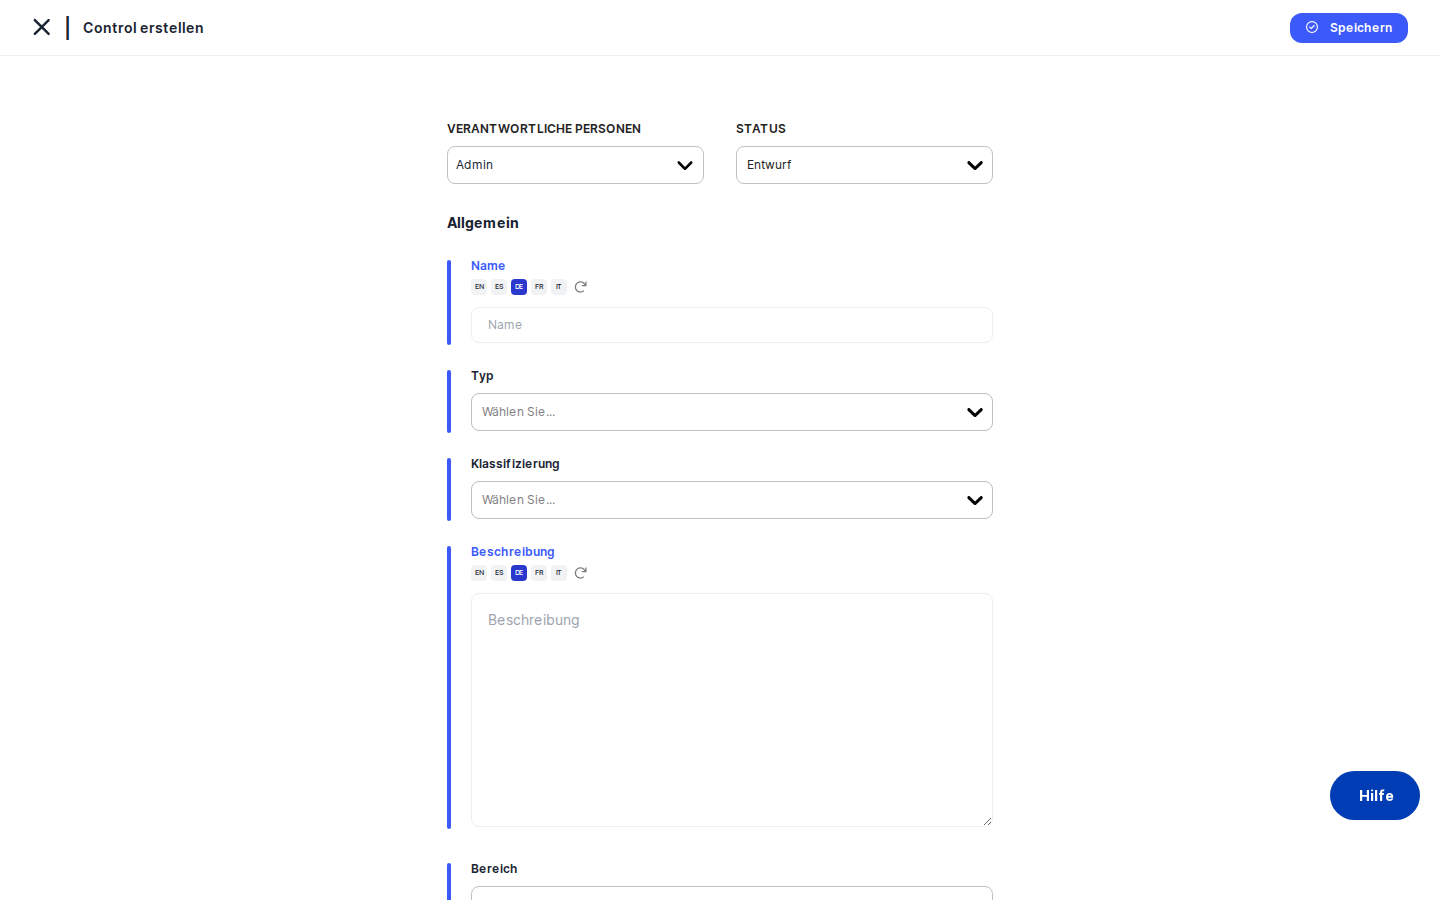
The screen sits inside the standard DPMS shell. At the very top, a page title reads Create TOM (or the TOM's name if you are editing). A left-pointing back arrow sits beside the title.
Below the title, the left side of the content area shows a vertical tab menu — the navigation spine for everything related to this TOM. The tabs are: General, Documents, Tasks, Risk Scenarios, Evidence, Assessments, Asset Scenario, Maturity Gaps, Manage Access, Trigger Workflow, and Overview. The currently active tab is highlighted. If you need more horizontal space for the form, click the small circle icon at the far left edge to collapse the menu; the breadcrumb at the top of the main area still shows which tab you are on.
The main content area to the right shows the form for the active tab. On the General tab — where every new TOM starts — there is a compact action bar across the top containing the Status selector and the Responsible Person selector. Below that, the data fields appear in a clean vertical stack: Name, Type, Classification, Description, Domain, and Standard. A Save button sits in the top-right corner and is present on every tab (with one exception explained later).
Working with this screen
Creating a TOM from scratch
Start on the General tab. This is the only tab you need to complete before the record exists in the system — all other tabs become meaningful after the initial save.
- Set the status and assign a responsible person. In the action bar at the top of the form, open the Status dropdown and choose the appropriate lifecycle state — typically
Draftwhen the measure is being documented for the first time, orActiveif it is already operational. Next, click the Responsible Person selector and pick the individual or individuals accountable for this TOM. Assigning yourself here is especially important if your account has the edit-only-assigned permission, because it gives you editing rights going forward. - Give the TOM a clear name. Click the Name field and type the measure's name — for example, Data Encryption at Rest. This field supports multiple languages: if your organisation operates in more than one language, a translation helper button (a globe icon) appears next to the field. If an AI provider has been set up in IT Settings, clicking it will generate translations automatically. The name you enter here is what every other module in DPMS will display when referencing this TOM, so make it specific and unambiguous.
- Choose a type, domain, and standard. Open the Type dropdown and select the category that best describes the nature of the measure — for example, Technical for an encryption control or Organisational for a data-handling procedure. Then open the Domain dropdown and pick the security or compliance area the TOM belongs to, such as Cryptography or Access Control. Finally, open the Standard dropdown and choose the compliance framework this TOM is designed to satisfy — for example, ISO 27001 or GDPR. None of these three fields are mandatory, but leaving them blank means the TOM will not appear in domain-specific reports or standard-based filters.
- Add classification tags. Click the Classification field to open the multi-select tag picker. Select one or more tags from your organisation's custom taxonomy — for example, GDPR Art. 32 or High Risk. Classification tags are created by your system administrator in Compliance Settings. If the dropdown is empty, ask your admin to set up tags for TOMs first.
- Write a description. Click the Description field and document what the measure actually does — what safeguard is in place, how it works, and what it protects. This is the field auditors most often read, so be thorough. Like the Name field, it supports multilingual input and AI-powered translation.
- Save the record. Click the Save button in the top-right corner. DPMS creates the TOM, immediately makes it available in the TOMs selector dropdowns across all other modules (including any other browser tabs you have open), and redirects you to the new TOM's detail page. If you arrived at the creation form from another record — say, from a ROPA entry's TOM linking tab — you are returned to that parent record instead.
Linking risk scenarios and mapping assets
Once the TOM record exists, you can connect it to the risks it mitigates and the assets it protects.
- Link relevant risk scenarios. In the left-side tab menu, click Risk Scenarios. The panel shows two sub-sections: scenarios already linked and the full library for linking new ones. Search for the scenario you want, select it, and click Save on this tab. This save is independent of the General tab — it only updates the risk scenario links. Linking risk scenarios is what makes the TOM meaningful in maturity and gap reports.
- Map assets to each scenario. After saving your risk scenario links, click the Asset Scenario tab. A table appears with one row per linked risk scenario. For each row, open the Assets multi-select dropdown in the second column and choose the information assets that this TOM protects in the context of that specific scenario. Click Save. This creates a three-way relationship: TOM → Risk Scenario → Asset, giving you a complete implementation picture.
- Review maturity and gaps. Click the Maturity Gaps tab to see an implementation dashboard showing which assets are covered by this TOM and which still have gaps. A gap exists when an asset is in scope for a risk scenario that this TOM addresses, but the TOM has not yet been fully implemented for that asset. Use this view to prioritise implementation work.
Heads up: The Asset Scenario tab only shows rows for risk scenarios that were already linked and saved on the Risk Scenarios tab. If you navigate to Asset Scenario before saving your risk scenario links, the table will be empty. Always save the Risk Scenarios tab first.
Attaching documents, tasks, assessments, and evidence
Each of the remaining content tabs works similarly: select items from the global library, then click Save on that specific tab to persist the links.
- Documents: Click the Documents tab to attach the policy or procedure document that governs this TOM — for example, an Encryption Policy. Search the document library, select the relevant document, and click
Save. - Tasks: Click the Tasks tab to connect remediation or implementation tasks directly to the TOM, keeping operational to-do items anchored to the control they support.
- Assessments: Click the Assessments tab to link compliance assessments — for instance, a GDPR readiness assessment — to show that this control was evaluated.
- Evidence: Click the Evidence tab to attach proof that the control is actually in place. This might be a screenshot, an audit report, or a configuration export.
Tip: Saving is tab-specific — each tab has its ownSavebutton. Filling in the General tab and then switching to Documents without saving will not lose your General data, but clickingSaveon the Documents tab will only save the document links. Make sure to save each tab separately.
Restricting access to sensitive TOMs
If a TOM documents security architecture or monitoring procedures that should not be visible to all compliance staff, you can restrict who can see and edit it.
- Click the Manage Access tab in the left-side menu.
- In the Audiences multi-select, choose one or more audience groups defined in your Compliance Settings. Groups configured with write access can edit the record; groups with read access can only view it.
- If you need to grant access to specific individuals rather than entire groups, use the Users multi-select to add them by name.
- Click Save. DPMS updates the access rules and returns you to the TOM's detail page. From this point, only users in the selected audiences (and system administrators) can find this TOM in the index or open its detail.
Triggering a workflow for formal review
When a TOM needs to go through a formal approval or annual review cycle, you can trigger a workflow directly from the record.
- Click the Trigger Workflow tab. (You need the Assign Workflow to TOMs permission for this tab to be accessible — without it, the tab shows a full error page rather than a disabled state.)
- Select a workflow template from the available options. These templates are configured in the Workflow Settings area by your administrator.
- Submit the trigger. The workflow is created, reviewers are notified, and deadlines are set according to the template.
Once a workflow is running, the Overview tab becomes the workspace for reviewers. Approvers who receive a notification email can click the link to land directly on the Overview tab, review the TOM's details, mark their step as complete, and click Save to advance the workflow to the next approver. When all steps are finished, the workflow is marked complete and the regular Save button is replaced by a Cancel Workflow button (which lets you abort if needed).
Field reference
Field | What it's for | Required? | Notes |
|---|---|---|---|
Status | Lifecycle state of the TOM | No (defaults to Draft) | Custom statuses appear if configured in Compliance Settings |
Responsible Person | Individual(s) accountable for the TOM | Recommended | Determines who receives workflow notifications; required if using edit-only-assigned permissions |
Name | Primary identifier shown across all modules | Yes | Supports multilingual input; AI translation available if configured |
Type | Categorises the measure (Technical, Organisational, Physical, etc.) | No | Displayed in the TOMs index; used for filtering |
Classification | Custom taxonomy tags from Compliance Settings | No | Multiple tags can be applied; tags must be pre-created by an admin |
Description | Free-text explanation of what the measure does | No | Supports rich text and multilingual input; read most often by auditors |
Domain | Security or compliance area (Access Control, Cryptography, etc.) | No | Used for domain-specific gap analysis and reporting |
Standard | Governing compliance framework (ISO 27001, GDPR, SOC 2, etc.) | No | Enables standard-based evidence gathering for audits |
How this connects to the rest of DPMS
The TOM creation screen is the starting point for a control record that flows through the entire platform. Once a TOM is saved, it immediately appears in the TOMs selector dropdowns in every other module — meaning a colleague working on a ROPA entry or a risk scenario in another browser tab will see the new TOM in their dropdown without needing to reload.
Downstream connections include:
- Risk Scenarios: The Risk Scenarios tab on this screen links a TOM to the specific risks it mitigates. Those links are then visible on the Risk Scenario's own detail page under its TOMs section.
- Assets: Via the Asset Scenario tab, you create a three-way relationship between TOM, risk scenario, and asset. This powers the Maturity Gaps view and the asset-level risk scores shown in the Assets module.
- ROPA and DPIAs: Processing activities and impact assessments can reference TOMs to demonstrate that appropriate safeguards are in place — a direct requirement of GDPR Article 32.
- Documents and Assessments: Links created on the Documents and Assessments tabs surface on both sides — the document or assessment also shows this TOM in its own linked-items list.
- Workflows: Triggered workflows send notification emails that link directly back to the Overview tab of this screen, bringing reviewers here to complete their assigned steps.
After finishing the initial General tab setup, the natural next steps are: link relevant risk scenarios, map those scenarios to assets on the Asset Scenario tab, review the Maturity Gaps view, and attach any governing documents or evidence. If the TOM requires formal approval, trigger a workflow before marking it Active.
Tips & common pitfalls
Heads up: Each tab saves independently. Filling in the General tab and then switching to Documents without clickingSavefirst does not discard your General data — but clickingSaveon the Documents tab only saves document links. Always save each tab individually before moving on.
Heads up: The Asset Scenario table will be empty if you have not yet saved your Risk Scenario links. Navigate to the Risk Scenarios tab, link your scenarios, click Save there first, then go to Asset Scenario.- Classification tags must exist before you can use them. If the Classification dropdown is empty, no tags have been created for TOMs in Compliance Settings → Tags. Ask your system administrator to create them before you try to classify TOMs.
- The Trigger Workflow tab shows a full error page if you lack the assign-workflow permission — it does not display a politely disabled state. Users who want to see the current workflow status (not trigger a new one) should instead look at the Overview tab, which is accessible to everyone when reached via a workflow notification link.
- The back button returns you to wherever you came from, not always to the TOMs index. If you opened the creation form from a parent record such as a ROPA entry, saving will take you back to that parent record rather than to the TOMs list. This is intentional — it keeps you in context — but it can be surprising the first time.
- AI-powered translation requires a configured AI provider. The translation buttons next to the Name and Description fields are non-functional if no AI provider (Anthropic, OpenAI, or similar) has been set up in IT Settings. If you are in a multilingual organisation and expect automatic translation to work out of the box, check the IT Settings configuration first.
- Custom statuses only appear if they have been configured. The Status dropdown draws from two sources: standard statuses (Draft, Active, Inactive, Review) and any custom statuses created in Compliance Settings. If an expected custom status — such as Under Review by CISO — does not appear, ask your administrator to set up the custom TOM status group.