
Managing audiences
Audience Management is the central place in DPMS where you decide who gets access to what — before that access is ever applied. An audience is a named group that bundles together one or more partner companies and individual users, paired with a precise read/write permission matrix covering every major record type in the system. Once an audience is saved here, it becomes available in the Manage Access panel on every ROPA, TOM, Asset, DPIA, Vendor, Document, Project, Incident, Data Subject Request, and more. If no audiences exist, those Manage Access dropdowns are empty and you have no way to share records with external partners or scope access for internal users.
This screen is also where you adjust existing audiences — adding a company that joined a project, granting write access to lawyers who now need to annotate policies, or revoking access for a partner whose contract has ended.
How to open it
- In the left-hand sidebar, click IT Settings.
- In the sub-menu that expands, click Audience Management.
The screen is available to anyone with at least view access to audiences. Creating new audiences requires create permission, and editing existing ones requires edit permission. If your role does not include any of these, you will see a 403 Forbidden page instead of the list — contact your DPMS administrator to have the right role assigned.
What you see
The index page shows a standard DPMS table layout. A bold Audience Management heading sits at the top of the content area, with a blue Create button to its right (visible only if you have create permission). Below the heading is a search bar and a row of status-filter tabs — currently only the All tab is active. The rest of the page is a scrollable table where each row is one audience, identified by its name. As you scroll to the bottom, more rows load automatically if there are many audiences in your system.
Hovering over a row reveals a small set of action icons on the right side. Note that in the current version of DPMS these icons are visual placeholders and do not yet perform live actions — clicking them has no effect.
Working with this screen
Setting up a new audience from scratch
The most common reason to come here is onboarding an external partner. Say a consulting firm — let's call them Acme GmbH — has just been contracted, and you need them to be able to view your ROPAs and Assets. Here is how to do it in four steps.
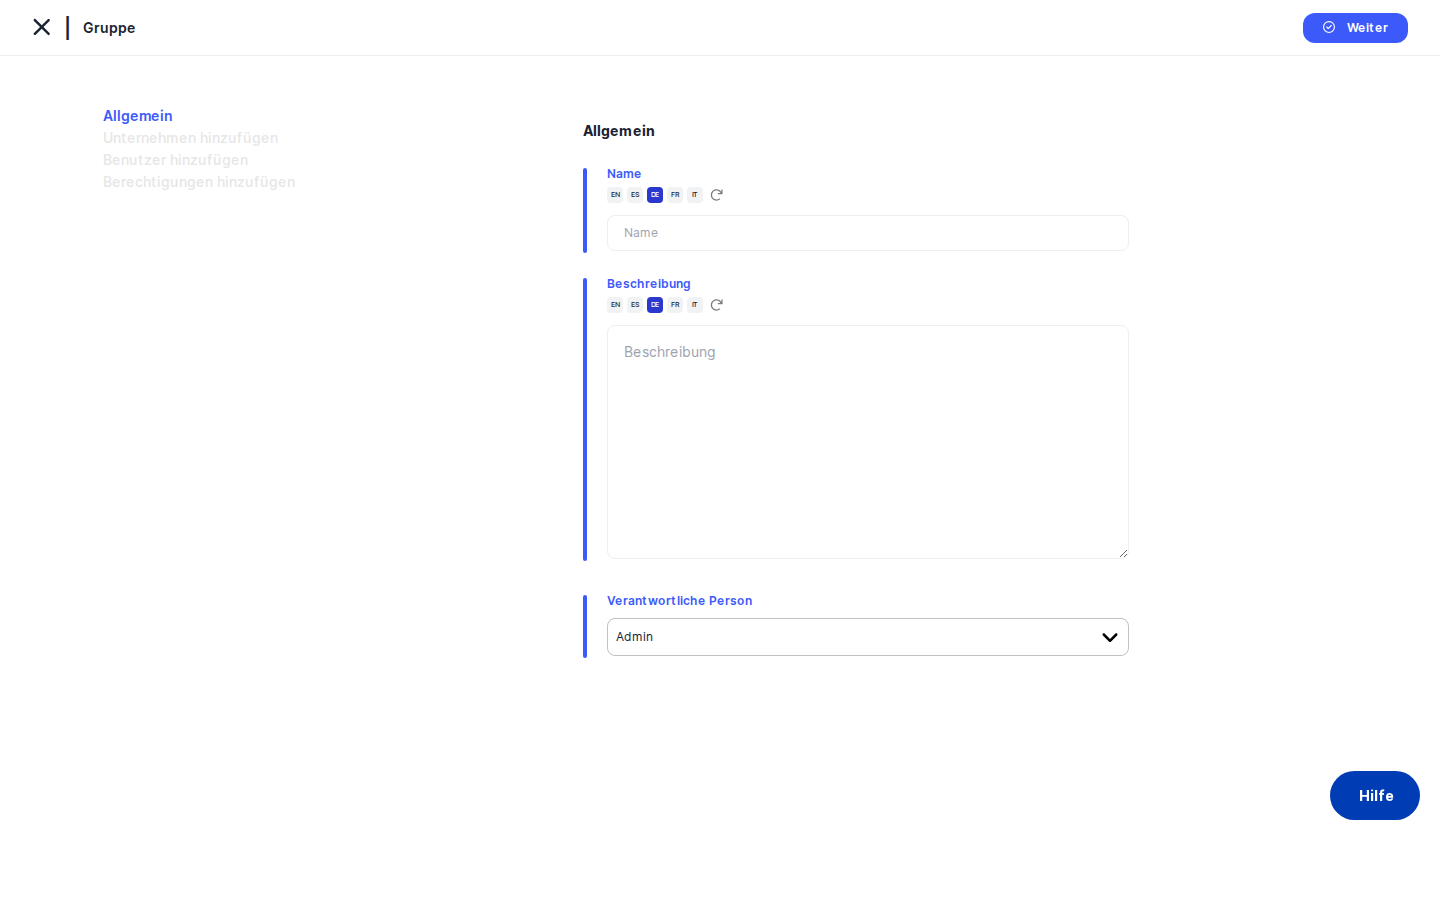
Step 1 — General details. Click Create → Create Audience. The form opens on the General tab. Type a clear, descriptive name in the Name field — something like "External Consultants – Acme GmbH" will be instantly recognisable when your colleagues choose it from Manage Access dropdowns later. Add a Description explaining the audience's purpose (optional, but recommended for audit clarity). The Responsible Person field defaults to you; change it if someone else owns this audience. Click Save. DPMS creates the audience record and automatically moves you to the next tab.
Heads up: Until you save the General tab and a record is created, the other three tabs (Add Companies, Add Users, Add Permissions) are locked. You will see them in the left-side menu but clicking them does nothing. Save General first.
Step 2 — Assign companies. The form now shows the Add Companies tab. Click inside the Assigned Companies dropdown to see all the partner companies currently connected to your DPMS through the sharing feature. Select Acme GmbH (or whichever companies belong to this audience). You can assign multiple companies to a single audience. Click Save; DPMS moves you to Add Users.
Step 3 — Add individual users (optional). The Add Users tab shows a table of internal users. If there are specific named individuals — for example, a named account manager at your own organisation — who should be part of this audience, tick their rows. External-platform users and super-administrators are excluded from this list automatically. Click Save.
Step 4 — Configure permissions. The Add Permissions tab is where the real governance work happens. You will see a Assigned Companies dropdown (now populated with the companies you saved in Step 2) and a checkboxes table with two columns — Read Access and Write Access — and one row per element type: ROPA, TOMs, Assets, DPIA, Assessments, Legitimate Interest, Documents, Project, Incidents, and Data Subject Requests.
Select Acme GmbH in the dropdown. Tick Read Access for ROPA and Assets. Use the Select All checkbox at the top of a column to grant blanket access if appropriate. If you have multiple companies in this audience, use the dropdown to switch to each one and configure their permissions individually — unsaved changes are lost when you switch, so click Save for each company before moving to the next. After configuring the last company, click Save. DPMS returns you to the audiences index, and the new audience is immediately available in Manage Access panels throughout the system — no browser refresh needed.
Editing an existing audience
Click any row in the table to open its edit form (requires edit permission). The form opens on the General tab, but you can jump directly to whichever tab you need by clicking it in the left-side menu. Unlike a brand-new audience, all four tabs are unlocked when editing an existing record.
A typical scenario: the Legal Partners audience needs write access to Documents so external lawyers can annotate policy files.
- Click Legal Partners in the table.
- Click Add Permissions in the left tab menu — no need to save General again.
- In the
Assigned Companiesdropdown, select the relevant law firm. - Find the Documents row and tick
Write Access. - Click
Save.
The permission update takes effect immediately across all DPMS records where this audience has been assigned via Manage Access.
Revoking a company's access
When a partner relationship ends, you should remove that company from any audiences it belongs to.
- Open the audience from the table.
- Go to the Add Companies tab.
- In the
Assigned Companiesmulti-select, click the × next to the company you want to remove. - Click
Save.
The company is removed from the audience. Any permissions previously configured for it on the Add Permissions tab are retained in the database but become inactive because the company is no longer listed. If you ever re-add the same company later, you will need to reconfigure its permissions from scratch — they do not automatically restore.
Reviewing what an audience can access
Auditors often need to confirm the exact scope of a given audience before signing off on a compliance report.
- Click the audience in the table.
- Go to Add Permissions.
- Use the
Assigned Companiesdropdown to step through each company assigned to this audience. - For each company, read off the ticked checkboxes in the Read Access and Write Access columns.
There is no single consolidated summary view — each company must be checked individually. If you need a snapshot for your records, consider noting down the matrix manually or exporting it through your standard audit process.
Field reference
Name — The display name of the audience. This is what appears in Manage Access dropdowns across DPMS, so make it descriptive and unambiguous. Required before the form can be saved.
Description — A free-text explanation of the audience's purpose. Not required, but strongly recommended to help colleagues and auditors understand why the group exists.
Responsible Person — The person accountable for managing this audience. Defaults to the currently logged-in user. Can be one or more people. Used for accountability tracking and reporting — it does not grant that person any additional system permissions.
Assigned Companies (Add Companies tab) — The external partner companies who are members of this audience. Only companies already connected to your DPMS organisation through the sharing/consulting feature appear in this list. Required if you want the audience to have any practical effect on external access.
Assigned Companies (Add Permissions tab) — A single-select dropdown showing only companies you have already saved on the Add Companies tab. Use this to choose which company's permissions you are currently editing.
Read Access / Write Access checkboxes — Per element type, per company. Read Access lets members of that company view records of that type when the audience is assigned to them. Write Access additionally lets them create and edit those records. Permissions are granted at the company level and apply to all users from that company who are members of the audience.
How this connects to the rest of DPMS
Every Manage Access workflow across DPMS — for ROPAs, TOMs, Assets, DPIAs, Assessments, Legitimate Interest, Documents, Projects, Incidents, Data Subject Requests, Vendors, Data Collection Points, and Meetings & Activities — reads its audience options from the list you build here. If an audience does not exist here, it will never appear in any Manage Access dropdown anywhere in the system.
Each time you save any tab in this form, DPMS automatically refreshes the global audience cache used by all those dropdowns. This means your changes are live immediately — colleagues working in other browser tabs will see the updated audience options without needing to reload.
After finishing here, your next step is typically to open the relevant records (e.g. a specific ROPA or a set of vendor entries) and use the Manage Access panel on each to assign the newly configured audience. Only once an audience is assigned to a record does the permission matrix take effect for that record.
Tips & common pitfalls
Heads up: The Add Companies, Add Users, and Add Permissions tabs are blocked for brand-new audiences until you save the General tab. Many users click Create Audience and immediately try to jump to Add Permissions — it will not respond. Save General first.Tip: After saving the Add Companies tab, always navigate to Add Permissions in the same session to configure the permission matrix for each company. A company that has been assigned but has no permissions ticked will have no visible access to anything — the audience assignment alone is not enough.
- Permissions are company-level, not user-level. Users added on the Add Users tab inherit the permissions of their company. There is no way to give individual users different read/write settings through this screen alone.
- Switching companies on the Add Permissions tab without saving loses your unsaved changes. If you tick checkboxes for Company A and then switch the dropdown to Company B before clicking
Save, Company A's changes are discarded. Save after each company. - Removing a company does not delete its stored permissions. The permission rows remain in the database but are inactive. If you re-add the same company later, you will see all-false checkboxes — not a restoration of the old settings.
- The row-hover icons (ban, envelope, memo, print) in the index table are not yet active. They are visual placeholders. Clicking them does nothing in the current version of DPMS.
- Only consulted companies appear in the Assigned Companies dropdown. If you expect to see a partner company but it is missing from the list, it has not yet been connected through the DPMS sharing/consulting feature. Set that up in the Companies or Sharing settings first.