
Create a ROPA entry
Creating a ROPA Entry
The Record of Processing Activities (ROPA) is the cornerstone of any GDPR compliance programme. This screen is where you bring a new processing activity to life inside DPMS — giving it a name, an owner, a legal context, and enough descriptive detail that auditors, regulators, and your own team can instantly understand what the activity is and why it exists. Whether you are documenting a brand-new HR payroll process, a marketing email campaign, or a third-party data-sharing arrangement, this is your starting point. Once you save the General tab, the entry becomes a connected hub that you can enrich with personal data categories, legal bases, risk scenarios, DPIAs, tasks, and much more.
How to open it
- Click ROPA in the left-hand sidebar.
- On the ROPA overview page, click the Create button.
- The creation form opens directly on the General tab at
/ropa/create.
Heads up: If you do not see a Create button on the ROPA overview page, your account does not have the ROPA create permission. Contact your DPMS administrator to request access.
What you see
The screen is divided into two zones. On the left is a collapsible menu tree that lists every tab available for a ROPA entry — General, Personal Data, Purpose of Processing, Legal Basis, Affected Persons, Internal Access, External Recipients, Assets, Data Collection Points, DPIAs, Risk Scenarios, TOMs, Assessments, Tasks, Retention & Deletion, and Manage Access. During initial creation, only the General tab is active. All the linked-data tabs become available after you save for the first time, because they need the record to have a unique ID before relationships can be stored.
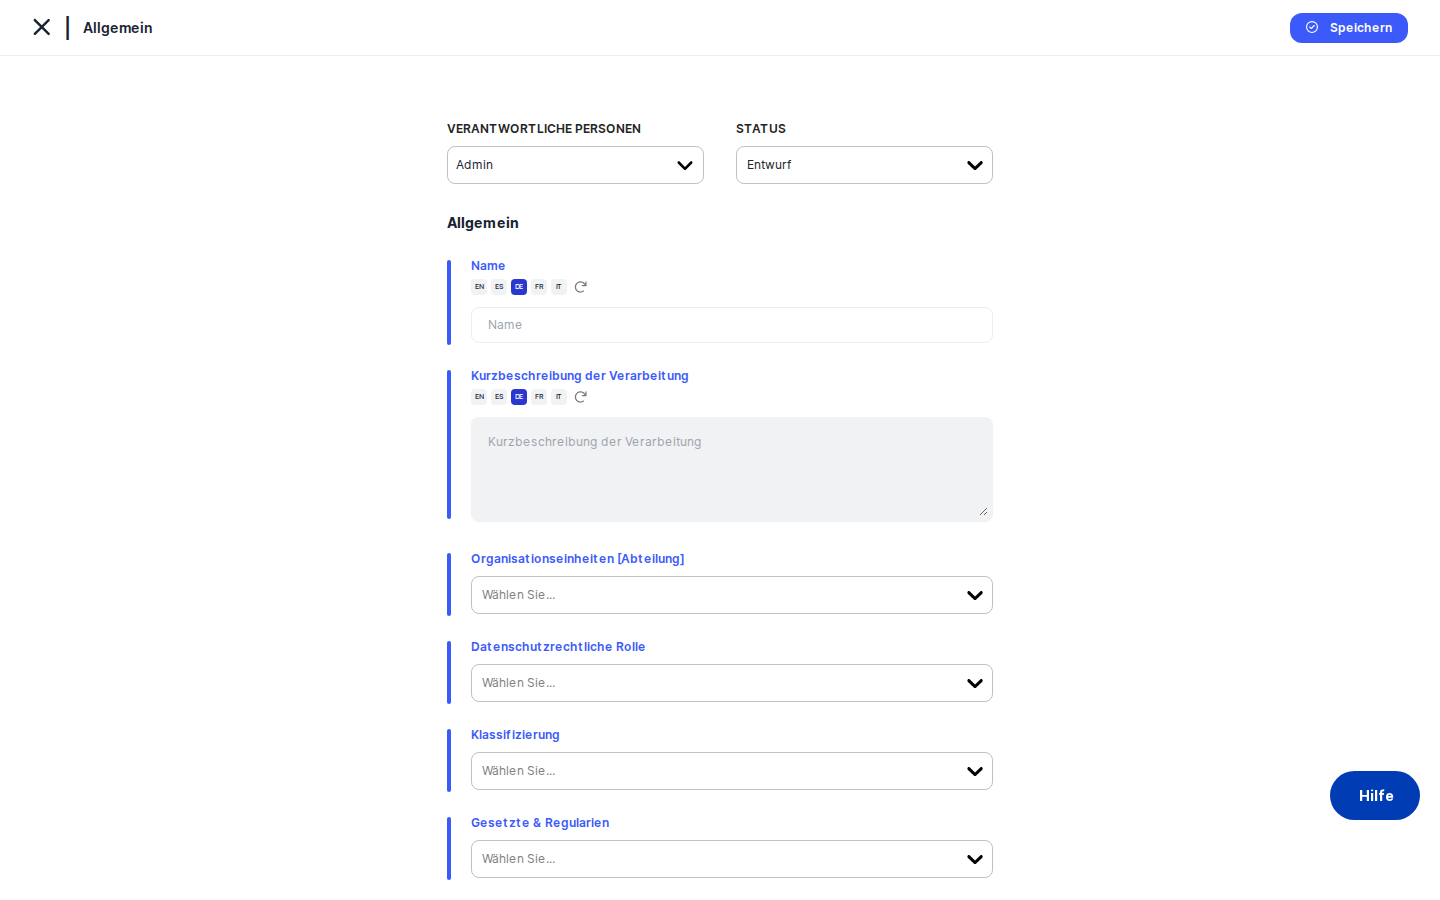
At the top of the right-hand content area you will see a breadcrumb reading ROPA › General. Directly below that is a sticky header containing the status selector and the responsible person field — these stay visible no matter how far you scroll. Below the sticky header is the main form card with all the fields you need to fill in. A blue vertical bar on the left edge of the card visually confirms you are editing the General section.
If your organisation has the AI auto-complete feature enabled and you have the necessary permission, you will also see an AI Generate button near the top of the form. When active fields are loading AI-generated content, the form dims slightly and a typing animation plays to let you know the AI is working.
Working with this screen
Setting up a ROPA entry for the first time
Most new entries follow a straightforward path. Start at the sticky header: confirm that the Status dropdown shows the right lifecycle state for this activity. New records default to Draft, which is appropriate when you are still gathering information. If the activity is already live in your organisation, you may want to switch it to Active right away. Next, use the Responsible Persons picker to assign the DPO or business unit manager who owns this record — you can select more than one person.
Move to the main form and type the name of the processing activity into the Name field — for example, "Employee Payroll Processing" or "Customer Newsletter Distribution". This is a required field and it is what will appear in the ROPA overview table, so make it descriptive and consistent with your naming conventions. The field supports multiple languages if your organisation operates across regions.
Fill in the Brief Description of Processing with a clear summary of what the activity involves — what data is collected, why, how it is used, and any other context an auditor would need. This is the most important descriptive field in the record and it is also the primary input the AI uses if you later trigger auto-completion.
Select the relevant department from the Organisational Units dropdown. This links the activity to an accountable part of your organisation and feeds into the filter columns on the ROPA overview table. If your organisation uses departments as a sub-level, the label will read Organisational Units [Department] and both pieces of information are saved together.
From the ROPA Type dropdown, choose the legal role your organisation plays — typically Controller, Processor, or Joint Controller. If you choose Processor, a new Vendor Controllers field appears immediately below, where you can link the client or partner who is the controller on whose behalf you are processing. If that vendor does not yet exist in DPMS, type their name and select the Create option that appears — DPMS will create the vendor record on the fly and add it to your selection.
Use the Regulations dropdown to select which data protection laws apply — for example, GDPR, CCPA, or LGPD. This step is important: the regulations you select here control which legal basis options, special categories, and recipient sub-regulations will be available on the linked-data tabs. Select all laws that genuinely apply to this activity.
Optionally, assign Classification tags to help your team filter and group processing activities on the overview page. Use the Risk Target dropdown to set your organisation's acceptable risk level for this activity; it defaults to Medium. Finally, fill in the Need to Process field if your governance framework requires an internal business justification alongside the formal legal basis.
When everything looks right, click Save at the bottom of the form. DPMS validates your entries, sends the record to the database, and redirects you to the full detail view of the newly created entry — where all the linked-data tabs are now active and ready to use.
Using AI to draft a ROPA entry quickly
If your organisation has the AI auto-complete feature switched on, you can let DPMS generate a first draft of the record from just a few seed inputs. This is especially useful when you are building out a large register and want to move faster on well-understood processing activities.
Open the creation form and type the name of the processing activity into the Name field — for example, "Marketing Email Campaign". Then select the applicable regulation or regulations from the Regulations dropdown. These two fields are the minimum the AI needs to get started.
Now click the AI Generate button. A loading animation begins and over the next several seconds DPMS fills in the Brief Description of Processing with a draft text, suggests an Organisational Unit, and proposes a set of linked elements such as Affected Persons categories, Personal Data types, and a Purpose of Processing. Each field fills in with a typing animation so you can follow along.
Once the AI finishes, review every generated field carefully. Correct the Organisational Unit to match your actual hierarchy, adjust the description to reflect the specifics of your activity, and add or remove any suggested linked elements that do not apply. When you are satisfied, click Save. The record is created and you land on the detail view, where AI-generated linked elements are already queued for your review.
Tip: The full-form AI Generate button is only available during initial creation. Once you save the record for the first time, it disappears. For AI assistance on individual fields in the detail view, use the per-field AI buttons on each linked-data tab.
Heads up: If you click AI Generate before typing a name, a red warning appears on the Name field asking you to enter a name first. The AI cannot generate meaningful content without at least a processing activity name to work from.
Switching the legal role to Processor and linking a controller
If your organisation processes personal data on behalf of a client or partner — for example, running a CRM system for a customer — you need to document this as a Processor entry and link the controller.
After entering the name and description, open the ROPA Type dropdown and select Processor. The form immediately displays a new Vendor Controllers field below the ROPA Type selector. Search for the controlling organisation by name. If they are already in your DPMS vendor records, their name will appear in the dropdown and you can select it. If they are not yet in the system, type their full name and click the Create option. DPMS creates a minimal vendor record, adds it to your selection, and makes it available across the entire Vendor module from that point on.
Complete the remaining fields and click Save to create the Processor ROPA entry with the controller link in place.
Resolving a regulation conflict before saving
If you are returning to edit an existing ROPA entry that already has a linked Legal Basis — for example, "Legitimate Interest" linked under GDPR — and you remove GDPR from the Regulations selector, DPMS will alert you when you try to save.
Instead of saving, a conflict alert appears showing which Legal Basis entry is tied to the regulation you just removed. You have two options: re-add GDPR to the Regulations selector to restore consistency, or go to the Legal Basis tab in the detail view and remove the conflicting Legal Basis entry. Once the conflict is resolved, click Save again and the record will save successfully.
Field reference
- Name — The human-readable name of the processing activity. Required. Supports multiple languages. This is the primary identifier shown across DPMS. Leave it blank and the AI Generate button will show a warning and refuse to run.
- Brief Description of Processing — A plain-language summary of the activity: what data is involved, the purpose, and how it is used. This is the field most used by the AI auto-complete feature and the one auditors read first. There is no hard character limit, but keep it concise enough to read at a glance.
- Organisational Units — The department or business unit responsible for this activity. If your organisation has departments configured, the label will include the department level. Selecting a unit feeds into the ROPA overview table's organisational column.
- ROPA Type — The legal role your organisation plays: Controller, Processor, Joint Controller, or any combination. Selecting Processor reveals the Vendor Controllers field.
- Vendor Controllers — Visible only when Processor is selected in ROPA Type. The external organisation(s) acting as the controller on whose behalf you process. Supports inline creation of new vendor records.
- Classification — One or more custom tags for grouping and filtering activities in the overview table. Tags are configured by your compliance team under Settings.
- Regulations — The data protection laws that apply to this activity. Controls which Legal Basis, Special Category, and recipient sub-regulation options are available on linked-data tabs. Removing a regulation after linking a Legal Basis under that regulation will block saving until the conflict is resolved.
- Risk Target — The organisation's acceptable risk level for this activity (Very Low, Low, Medium, High, Very High). Defaults to Medium. Compared against the calculated risk score from linked risk scenarios.
- Need to Process — An internal business justification for the activity, separate from the formal legal basis. Required by some governance frameworks for audit purposes.
How this connects to the rest of DPMS
The ROPA entry you create here is the central node in a network of linked compliance objects. Once saved, you can connect it to personal data categories, legal bases, purposes of processing, affected persons, assets, external recipients, data collection points, DPIAs, risk scenarios, TOMs, assessments, tasks, and retention and deletion schedules — all from the linked-data tabs on the detail view.
From a broader workflow perspective: the ROPA overview table only shows entries that have been saved, so nothing is visible to your team until you complete and save the General tab. The DPIA module requires a saved ROPA entry as its parent — you cannot create a DPIA without first having a ROPA to link it to. Risk dashboards draw their target risk comparison from the Risk Target value you set here. AI-assisted linked-element generation on the detail tabs uses the Brief Description of Processing and Regulations you saved here as its context. Assessments used as data maps link back to a ROPA entry, and that linkage originates from the detail view reached after this first save.
After saving, your next steps are typically: open the Legal Basis tab to document the formal legal grounds for processing; open the Personal Data tab to specify what categories of data are involved; and open the Purpose of Processing tab to formalise why the data is processed. If the activity involves high risk, consider opening the DPIAs tab to initiate a Data Protection Impact Assessment.
Tips & common pitfalls
Heads up: You cannot access the Personal Data, Legal Basis, or any other linked-data tab until you have clicked Save on the General tab. The tabs only become active once the record has a database ID. If you see grayed-out tabs, save first.
Tip: When creating a Processor entry, select Processor from ROPA Type before looking for the Vendor Controllers field. The field only appears in context — it is not visible until Processor is selected.
- Removing a regulation after linking a Legal Basis will block saving. The conflict validation runs at save time, not when you deselect the regulation. If the save is blocked by a conflict alert, either restore the regulation or remove the conflicting Legal Basis first.
- The AI Generate button disappears after the first save. Full-form AI generation is only available during initial creation. Use the per-field AI buttons on each tab in the detail view for assistance after the record is created.
- The default Risk Target is Medium, not empty. If your governance policy requires a deliberate choice here rather than accepting a default, review this field before saving. It will not draw your attention automatically.
- Child/shared ROPA entries have most fields locked. If this record was shared from a parent organisation (for example, a group-level compliance function), most fields will appear disabled. You can only edit the Responsible Persons and Organisational Unit. The content itself must be changed by the parent organisation.
- Inline vendor creation is permanent. When you type a new vendor name in the Vendor Controllers field and select Create, DPMS immediately creates a real vendor record. If you later decide not to save the ROPA, the vendor record still exists. Clean it up from the Vendor module if needed.