
Create a new vendor
Creating a New Vendor in DPMS
The vendor register is one of the most important pillars of any GDPR-compliant organisation. Every time your company shares personal data with an external party — a cloud provider, a payroll processor, a marketing agency, a legal firm — you are legally required to document that relationship. The Create a New Vendor screen is where that documentation begins. DPOs, compliance officers, privacy managers, and IT administrators use it daily to open new vendor records and to keep existing ones up to date. Once a vendor record exists, it becomes the central hub for risk assessments, linked documents, data transfer records, technical and organisational measures, and due-diligence workflows — all in one place.
How to open it
- In the left-hand navigation bar, click Vendors to open the vendor register.
- On the vendor index page, click the Create button in the top-right corner.
- From the short dropdown that appears, select the option to create a new vendor manually.
The form opens at /vendor/create and lands on the General tab.
Permission note: You need at least one of the following roles to see the form: permission to create vendors, permission to edit any vendor, or permission to edit vendors assigned to you. If your account does not include any of these, you will see a "Forbidden" page instead of the form.
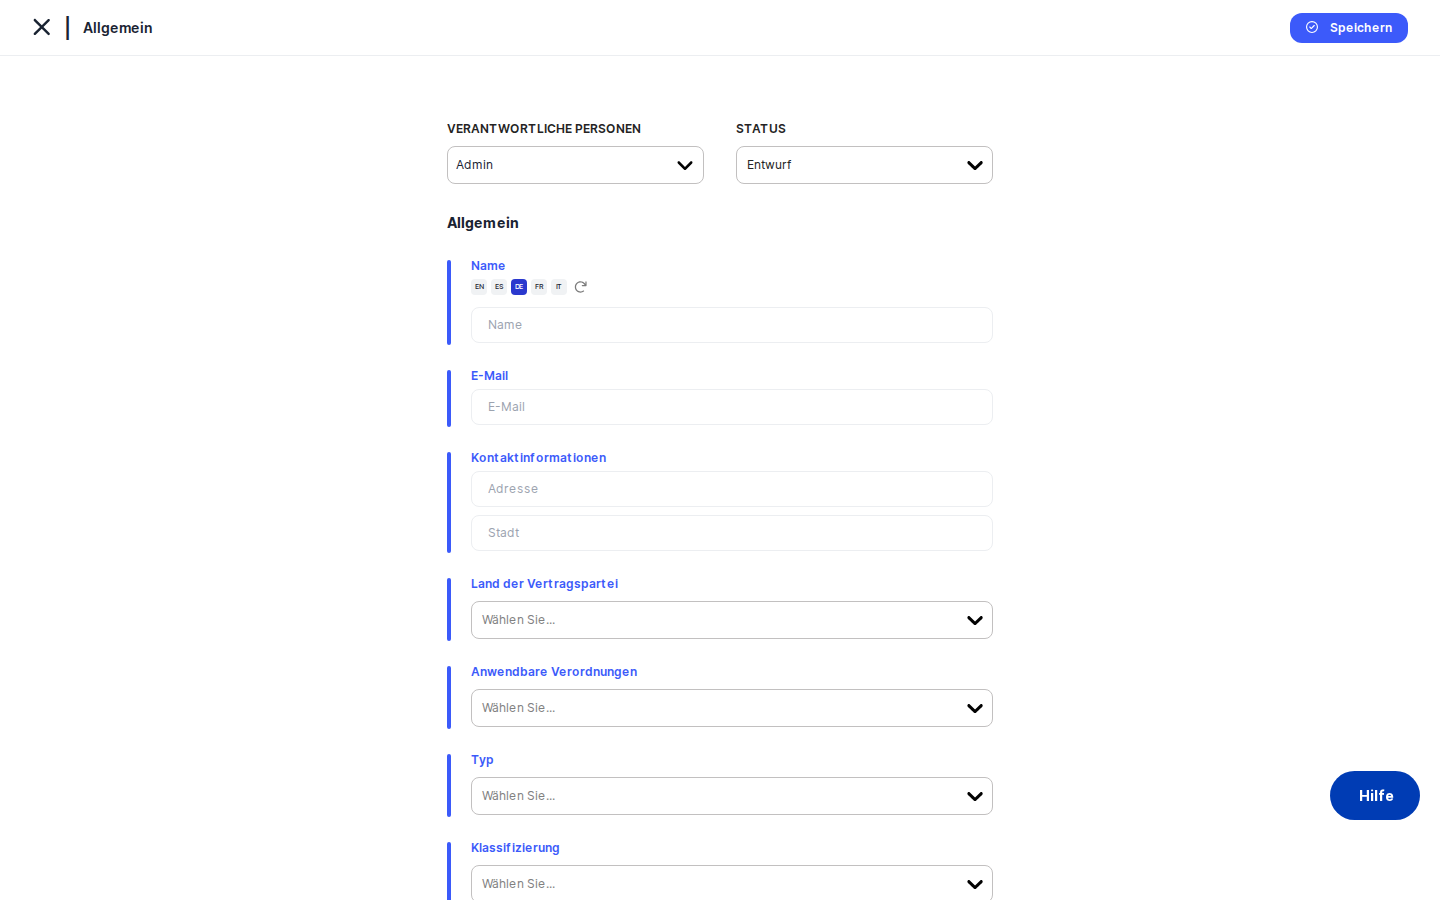
What you see
The screen is divided into two areas. On the left is a vertical tab menu listing every section of the vendor record — General, Criticality, Assets, Assessments, Tasks, Documents, Manage Access, TOMs, Trigger Workflow, and a family of risk-related tabs. The active tab is highlighted with a thin blue bar on its left edge.
On the right is the content area. When you first arrive, it shows the General tab — a form card with a blue accent bar on its left edge. At the very top of the form card sits the action bar (responsible person selector and status dropdown). Below that, all the main fields are stacked in a single column. A breadcrumb at the top of the panel shows your current location. At the bottom of the content area you will always find the Save button and a Back button.
On a brand-new vendor (one that has not been saved yet), only the General tab is fully interactive. Tabs that require a saved record — such as the Transfers sub-tabs and linked-object tabs — are visible in the sidebar but become accessible only after you save for the first time.
Working with this screen
Setting up a vendor record for the first time
The most common task here is opening a fresh vendor record. Let's say your procurement team has just signed a contract with a new email-marketing platform.
Start by typing the vendor's official legal name in the Name field at the top of the form. Because DPMS supports multiple languages, the name field can store translations — if your organisation uses the AI-translation feature, you can generate them automatically. Give the name your best attention: it appears in breadcrumbs, in the vendor index list, and in every record that links to this vendor throughout DPMS.
Next, enter the vendor's primary contact email in the Email field. Then fill in the Address and City fields under Contact Information — these two fields sit together under the same label and record the vendor's registered office address.
Move down to Country of Contracting Party and select the country where the legal entity you are contracting with is established. This is critical for data-transfer compliance: if the country is outside the European Economic Area, DPMS will use this information when you later record the legal basis for any personal data transfers.
In the Regulations dropdown, select any applicable regulatory frameworks — for example, GDPR, CCPA, or nFADP — that govern your relationship with this vendor. These tags link the vendor to your organisation's configured compliance framework and drive filtering in reports.
Use the Type field to classify the vendor: Processor, Sub-processor, Controller, or any custom types your organisation has defined. You can select more than one type at the same time. This classification is important because GDPR treats controllers and processors differently, and your vendor index will be filterable by type.
The Classification dropdown applies free-form tags such as "Critical Supplier" or "Cloud Provider." You can create new tags on the fly if none of the existing ones fit. Tags drive filtering in the vendor index and can trigger different due-diligence workflows.
Write a plain-language Description of what the vendor does and why you engage them. Add a Reason for Sharing to document the legal or business justification for sharing personal data — this text can surface in audits and data subject access request responses.
If the vendor has appointed legal representatives in specific jurisdictions (for example, an EU representative under GDPR Article 27), use the Representatives section. Select a country from the dropdown and type the representative's address. As soon as you select a country, a new empty row appears below so you can add more without clicking an extra button.
If the vendor has a designated DPO, set the DPO Contact dropdown to Yes. Three extra fields appear: the DPO's name, email, and phone number. Fill these in so your team can contact the vendor's DPO directly when needed.
Finally, if this vendor contract has a defined expiry date, switch on the Contract Duration toggle. A date picker appears — select the contract end date. DPMS will use this date to send advance alerts before the contract lapses, giving your team time to manage renewals.
When everything looks right, click Save at the bottom of the page. DPMS sends the data to the server, creates the vendor record, and redirects you to the newly created vendor's detail page, where you can continue filling in the Criticality, Transfers, and linked Assessment tabs.
Recording international data transfers and their legal basis
After creating a vendor record for an external party that receives personal data from your organisation, you need to record the legal basis that justifies the transfer. This is a two-step process.
Open the vendor's edit form and navigate to the area that handles transfers. The tab menu on the left switches to a special two-tab mode showing only Vendor Selection and Legal Basis for Transfers.
On the Vendor Selection tab, confirm or add the specific vendor records that represent the transfer destinations. Each entry here represents one data-transfer relationship.
Switch to the Legal Basis for Transfers tab. You will see each linked transfer vendor listed with a dropdown beside it. Select the appropriate legal mechanism from the dropdown — for example, Standard Contractual Clauses (SCCs), an Adequacy Decision, or Binding Corporate Rules. Click Save. The legal basis is now recorded and will appear in transfer impact assessment reports generated elsewhere in DPMS.
Heads up: The Legal Basis for Transfers tab only becomes accessible after you have saved at least one transfer on the Vendor Selection tab. If the tab appears disabled, go back and save a transfer first.
Assigning criticality scores to a vendor
Once a vendor record exists, someone in your team — often an IT administrator or risk manager — needs to assess how critical the vendor is to your organisation. Open the vendor's edit form and click the Criticality tab in the left-hand sidebar.
The tab shows three dropdowns: Material Impact (what happens to your business if this vendor goes offline or fails), Criticality of Service (how essential this specific service is), and Overall Criticality (your combined judgement). Each defaults to Medium. Adjust the values to reflect reality — for example, a mission-critical payment processor might warrant High for all three. Click Save. The criticality scores now appear on the vendor's detail page and feed into the vendor index, making it easy to sort and filter your vendor landscape by risk level.
Linking documents, assessments, and tasks
A vendor record is most valuable when it is connected to the rest of your compliance work. After creating the vendor, you can use the tabs in the sidebar to build those connections:
- IT Security Assessments and Data Protection Assessments — link existing assessments that cover this vendor, or navigate here from an assessment to add the vendor as a subject.
- Documents — attach policies, contracts, data processing agreements, or any other compliance documents that govern this vendor relationship.
- Tasks — link remediation or review tasks so that everything related to this vendor is visible in one place.
Each of these tabs has its own Save button. Changes on one tab are independent of changes on another.
Triggering a due-diligence workflow
If your organisation uses DPMS workflows to manage structured due-diligence reviews, you can initiate one directly from the vendor record. Open the vendor's edit form and click the Trigger Workflow tab (visible only if you have the workflow assignment permission for vendors).
The tab shows the workflow templates configured for the vendor module. Select the appropriate template — for example, "Annual Vendor Review" — and trigger it. Once saved, the vendor's detail page will show the active workflow in the Required Actions and Overview sections, and the assigned reviewers will receive notifications to complete their steps.
Field reference
Name — The vendor's official legal name. Supports multiple languages. Appears throughout DPMS wherever this vendor is referenced. Leaving it blank will result in an unnamed entry in the vendor index — always fill this in.
Email — Primary contact email address. Maximum 255 characters. Optional, but recommended. Must be a valid email format.
Contact Information — Address — Street address of the vendor's principal place of business. Optional.
Contact Information — City — City component of the vendor's address. Optional. Appears directly below the Address field.
Country of Contracting Party — The country where the legal entity you are contracting with is registered. Searchable dropdown with ISO country codes. Essential for transfer impact assessments. Optional at save time, but you will need it before recording a legal basis for transfers.
Regulations — One or more applicable regulatory frameworks (e.g. GDPR, CCPA, nFADP). Options are configured in your organisation's compliance settings. Optional, but drives compliance reporting and filtering.
Type — The legal classification of the vendor (e.g. Processor, Controller, Sub-processor). Multi-select. Optional, but critical for accurate GDPR documentation.
Classification — Free-form tags for filtering and workflow purposes (e.g. "Critical Supplier"). New tags can be created on the fly. Optional.
Description — Free-text description of the vendor and the services they provide. Supports multiple languages and rich-text formatting. Optional, but strongly recommended for audit clarity.
Reason for Sharing — Written justification for sharing personal data with this vendor. Supports multiple languages. Optional, but useful for audits and DSAR responses.
Representatives — Country — Country in which the vendor has a legal representative. Select a country to add a row; select another to add a second row.
Representatives — Address — Physical address of the representative in that jurisdiction. Both the country and the address fields must be filled for a representative to be saved reliably.
DPO Contact — Yes/No toggle. When set to Yes, reveals three sub-fields. When set back to No and saved, the sub-field values are permanently cleared from the record.
DPO Name / Email / Phone — Visible only when DPO Contact is Yes. Standard text inputs. Email has a 255-character maximum.
Contract Duration — Toggle switch. When off, the record stores no expiry date ("No Expiry"). When on, a date picker appears. The date is stored and used to drive contract-expiry alerts. If enabled without choosing a date, today's date is used — always verify the date after switching the toggle on.
How this connects to the rest of DPMS
The vendor record you create here is a prerequisite for almost all downstream compliance work involving that third party.
What leads into this screen:
- The Vendor index (
/vendor) — the Create button brings you here. - The Vendor detail page — clicking Edit on any section of an existing vendor opens this form pre-filled and focused on the relevant tab.
- Assessment and DPIA data mapping flows — when you create a vendor from within a DPIA or assessment, the Back button and post-save redirect return you to that assessment rather than the vendor index.
What this screen leads into:
- On successful creation, DPMS redirects you to the new Vendor detail page, where linked assessments, documents, tasks, and risk tabs become available.
- Vendors created here become selectable as data recipients in Records of Processing Activities (ROPA). Without a vendor record, a ROPA entry cannot name its third-party recipient.
- The legal basis for transfers recorded on the Legal Basis for Transfers tab is referenced in transfer impact assessment reports.
- Risk scenarios, TOMs, and treatment plans configured through the risk tabs feed into organisation-wide risk dashboards and compliance reports.
- The Trigger Workflow tab is the entry point for vendor-specific due-diligence workflows.
Tips & common pitfalls
Heads up: Each tab has its own Save button. Changes on the General tab are not automatically saved when you switch to the Criticality tab. Always click Save before switching tabs, or your work will be lost.
Tip: The transfers flow is a two-step process. You must save the General tab first to create the record, then add at least one transfer on the Vendor Selection tab and save again before the Legal Basis for Transfers tab becomes accessible.
- Representatives require both fields. If you fill in a country but leave the address blank (or vice versa), that representative row will appear in the UI but will not be saved to the record. Fill in both country and address for every representative you want to persist.
- DPO contact sub-fields are cleared when you set DPO Contact back to No. If you enter a DPO name, email, and phone, then switch the toggle back to No and click Save, those values are permanently erased — even if the fields still appear filled in before you save. Only save with the toggle set to No when you are sure the DPO details are no longer needed.
- Contract Duration defaults to today if you don't pick a date. Always open the date picker and confirm the intended expiry date immediately after switching the toggle on.
- The Type field is multi-select. You can — and often should — assign more than one type to a vendor. For example, a vendor may act as both a Processor for one service and a Controller for another aspect of your relationship.
Tip: If you start filling in a vendor form, navigate away without saving, and then return to the creation form in the same browser session, the fields may still contain your previous entries. If this happens unexpectedly, refresh the page to start with a blank form.