
Edit a legitimate interest assessment
Editing a Legitimate Interest Assessment
The Edit a Legitimate Interest Assessment screen is where your organisation documents the full three-part analysis required under GDPR Article 6(1)(f) — the "legitimate interests" legal basis. If you rely on legitimate interests to process personal data, regulators expect a structured, written record showing that you have tested the purpose, the necessity, and the balance between your interests and the rights of the people whose data you process. This screen is that record. DPOs, privacy analysts, and compliance managers use it to create, complete, and update those assessments; auditors and legal counsel use it to inspect them.
How to open it
Navigate to Legitimate Interest in the left sidebar. Click any existing record in the list to open its detail view. From there, click the pencil (edit) icon on the section you want to work on — the screen will open directly on the corresponding tab. You can also click through from a linked ROPA record that uses "legitimate interests" as its legal basis.
Who can access it? You need one of the following access levels to edit records: full edit rights, the ability to edit records you are assigned to as a responsible person, or the create-new-record right. Users with read-only access can view the screen but cannot save changes. Users with no legitimate-interest access at all are redirected to a "forbidden" page.
What you see
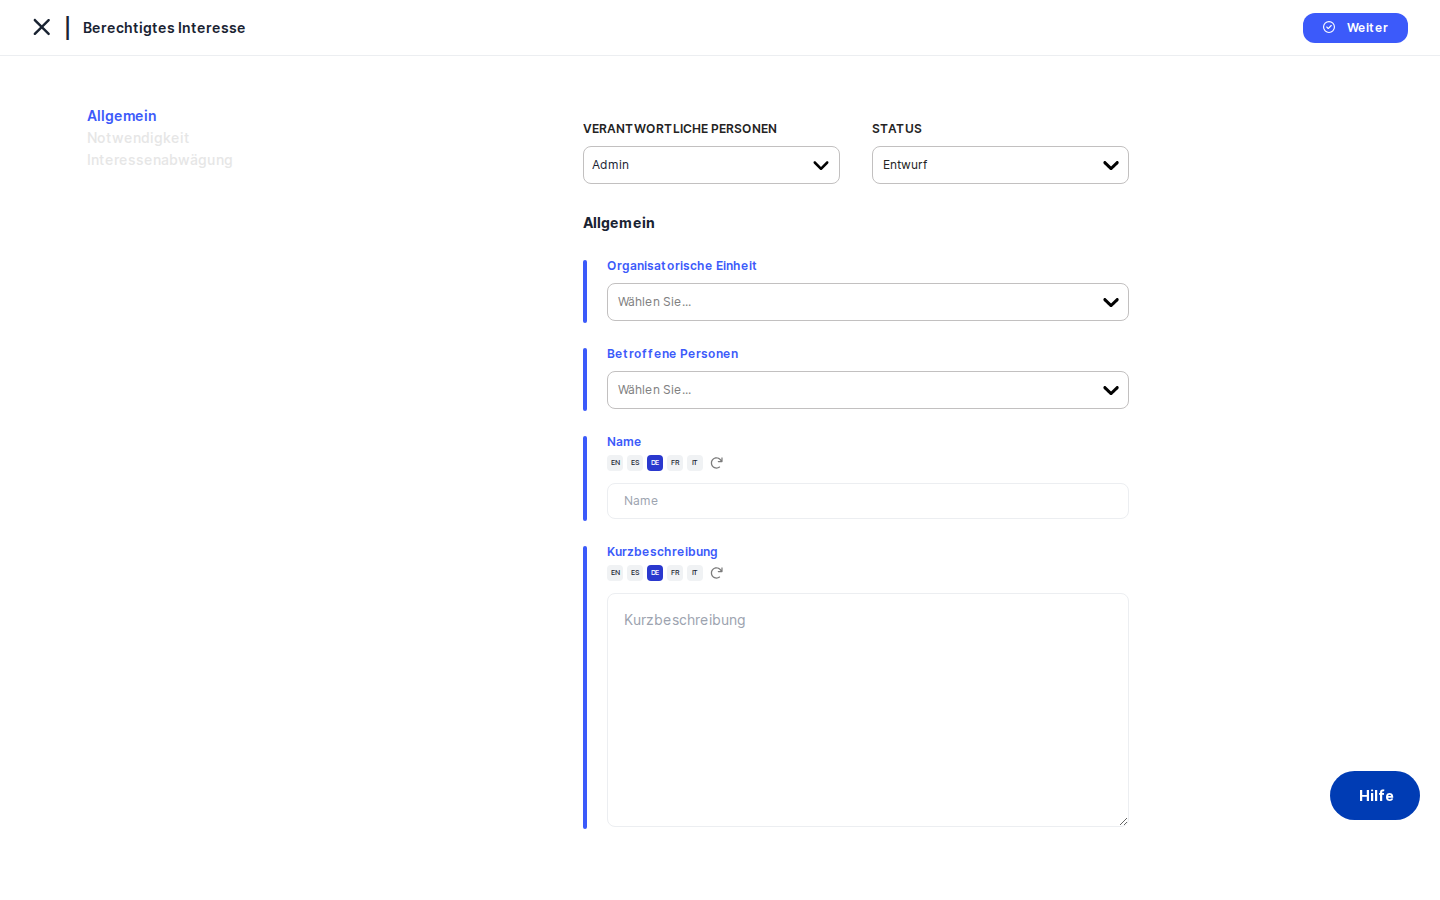
The screen uses a two-column layout. On the left is a narrow tab menu listing the available sections — General, Necessity, and Balancing of Interests for the three-part analysis, plus Tasks, Assessments, and Manage Access for related items. The highlighted tab shows where you are. On the right is the active form area, which changes completely depending on which tab you select.
At the very top of the page, above the form, is a back arrow that returns you to wherever you came from — usually the Legitimate Interest list or the detail view of the record you were editing. Next to it is the title of the current section.
The three analysis tabs (General, Necessity, Balancing of Interests) each show a vertical stack of labelled input fields. The General tab also shows an action bar at the top with the status selector, responsible person selector, and the Save button. The Tasks and Assessments tabs replace the form fields entirely with a linked-records table.
Heads up: When creating a brand-new record, only the General tab is clickable. The Necessity, Balancing of Interests, Tasks, Assessments, and Manage Access tabs are all greyed out until you fill in the General tab and click Save for the first time.Working with this screen
Creating a new assessment from scratch
When you arrive at a new, blank record, you land on the General tab. Start here and work your way through the three tabs in order — the system is designed to guide you through the analysis step by step.
- Fill in the General tab. At minimum you must enter a
Namefor the record — for example, "Marketing Newsletter – Legitimate Interest Assessment." Use theOrganizational Unitdropdown to link the assessment to the right department (Marketing, HR, etc.). Use theAffected Personstag selector to flag which groups of data subjects are involved, such as "Customers" or "Employees." Write a brief overview in theShort Descriptionfield to explain what processing activity this assessment covers. Finally, use the status selector at the top to set the workflow status —Draftis the natural starting point for a new record. When you have theResponsible Person(s)field set to the right owner, clickSave. - What happens after saving the General tab. DPMS creates the record and automatically takes you to the Necessity tab. All the other tabs are now unlocked. The record now has an ID and can be linked to tasks, assessments, or ROPA records.
- Complete the Necessity tab. This tab contains four analysis questions that form the second stage of the legitimate interest test. Answer each one in the corresponding text field:
- Will the processing achieve the desired goals? — Explain how the processing supports the stated purpose.
- Can the purpose be achieved without processing personal data? — Describe whether any non-data or data-minimised alternative was considered and why it was rejected.
- Is the processing proportional to the purpose? — Justify that the scope and volume of data are not excessive.
- Are there less intrusive means available? — Document any privacy-friendlier alternatives you evaluated.
When finished, clickSave. DPMS saves the answers and moves you automatically to the Balancing of Interests tab. - Complete the Balancing of Interests tab. This is the most detailed section — the third stage of the test. Fill in all the fields that are relevant to your situation (see the Field reference section below for detail on each one). When done, click
Save. For existing records, saving this tab keeps you on the same tab so you can review your work. The assessment is now fully documented.
Updating part of an existing assessment
When legal counsel reviews a completed assessment and requests changes — for example, to the likelihood and severity analysis — you do not need to re-enter the entire record. Navigate to the assessment's detail view, click the edit pencil on the section that needs updating, and DPMS drops you directly onto the relevant tab with all existing answers pre-filled.
- Open the Legitimate Interest list, find the record, and click into its detail view.
- Click the edit icon on the section card you want to update — for example, the Balancing of Interests card. You land directly on the
Balancing of Intereststab with the current saved values shown in each field. - Edit only the fields that need to change. All other fields remain untouched.
- Click
Save. DPMS sends only this tab's data to the backend and shows a success notification. Use the back arrow to return to the detail view and confirm the updated text is visible.
Tip: Each of the three analysis tabs saves independently. Saving the Necessity tab does not save changes you may have made to the General tab in the same session, and vice versa. Always click Save before switching tabs.Linking tasks and assessments to a record
Once an LIA is complete, you will often want to attach action items or formal evaluations to it. For example, if the legal team raises a concern about third-party data sources, you might link a task called "Review third-party data source contract" to track that work.
- Open the assessment's edit view and click the Tasks tab in the left menu (or Assessments for formal evaluations).
- The tab shows a table of all currently linked records. If none have been linked yet, the table is empty.
- Use the link/add button within the tab to search for and select existing tasks or assessments. Once you select a record, DPMS links it to the LIA and confirms with a success notification.
- The linked task now appears in the main Tasks module as well, where it can be assigned, tracked, and completed independently — its connection to this LIA is preserved.
To remove a link, use the unlink action in the same table. This does not delete the task or assessment; it only removes the association.
Controlling who can see a specific record
If a particular LIA is sensitive and should only be visible to certain users — for example, granting the Legal team read access to a single record without giving them access to all LIAs — use the Manage Access tab.
- Click
Manage Accessin the left tab menu (this tab is only visible to users with edit rights). - Use the selectors to choose the user groups or individuals who should have read or write access to this specific record.
- Click
Save. DPMS applies the access settings and returns you to the detail view.
Note that this tab controls record-level access. Organisation-wide permissions are managed separately in the system settings.
Working with multi-language fields
Every narrative field on this screen (Name, Short Description, and all the analysis text areas) supports multiple languages. If your organisation operates in more than one language and has configured multiple languages in IT Settings, you can enter the assessment content in each language separately.
Click the language/translation icon next to any field to open the translation panel. Enter the text for the additional language and save. When the record is displayed to a user whose default language is different from the one you typed in, they will see the version in their language. If no translation has been saved for their language, the field may appear blank — this is expected behaviour. Use the translation icon to add the missing language version.
Field reference
General tab
Name— The display name for this LIA record. This appears in lists, reports, and anywhere the record is referenced. Required. Supports multiple languages. Example: "Marketing Newsletter Targeting – LIA."Short Description— A free-text summary of the processing activity being assessed. Not required, but strongly recommended — it helps reviewers understand the context without opening the linked ROPA. Supports multiple languages.Organizational Unit— The department or business unit responsible for this processing activity. Select from the organisation's existing unit list. Optional, but useful for filtering and reporting.Affected Persons— One or more tags describing the categories of data subjects involved. Examples: "Customers," "Employees," "Minors." Tags are configured in Compliance Settings. Optional.- Status selector — The current workflow status:
Draft,Active,Inactive,Review, or any custom statuses your organisation has set up. Selecting a status here only takes effect when you clickSave. - Responsible Person(s) — The user or users accountable for this LIA. Multiple people can be assigned. Appears in list views and reports.
Necessity tab
All four fields on this tab are free-text, multi-line, and support multiple languages. None are individually required by DPMS validation, but they must contain substantive analysis to be useful for compliance purposes.
- "Will the processing achieve the desired goals?" — How does the processing actually deliver the stated purpose?
- "Can the purpose be achieved without processing personal data?" — Alternatives analysis: is there a way to achieve the same outcome with no processing or less data?
- "Is the processing proportional to the purpose?" — Proportionality: is the scope and volume of data processing justified?
- "Are there less intrusive means available?" — What less privacy-invasive alternatives were considered and rejected?
Balancing of Interests tab
Persons need special protection— A single-line text field (not a text area). Identifies whether any affected data subjects belong to groups needing heightened protection, such as children, people with disabilities, or employees in a power-imbalance relationship.Data processing context: Personal or Professional— A dropdown. SelectPersonalif the processing relates to individuals in a private context (consumers, website visitors). SelectProfessionalif it relates to them in a work or business role. People typically have lower privacy expectations in professional contexts, which affects the balance.Relationship to persons— Free-text. Describe the nature of the relationship between your organisation and the data subjects — existing customer, employment relationship, no prior relationship, etc.Data directly collected— Free-text. Was the data collected directly from the data subjects, or was it obtained from a third party? The answer affects data subjects' reasonable expectations.What did the third party disclose about the person?— Free-text. If data came from a third party, describe what was disclosed, under what circumstances, and what the data subjects might reasonably have expected at the time.Effects of processing on data subjects— Free-text. What concrete effects does the processing have or could it have on individuals? Consider financial consequences, reputational harm, denial of services, or emotional impact.Likelihood and severity of effects— Free-text. How likely are the effects to occur, and how serious would they be? This gives a risk-weighted view of the impact on individuals.Personal DataandSpecial Categories(read-only) — These fields are populated automatically from any ROPA records linked to this LIA. You cannot edit them here. If they are empty, it means no ROPA has been linked yet. To add data here, link a ROPA record from the ROPA module.
How this connects to the rest of DPMS
The LIA sits at the intersection of several DPMS modules:
- ROPA module: If a Record of Processing Activity uses "legitimate interests" as its legal basis, the LIA provides the substantiating evidence. The
Affected Personstags andOrganizational Unityou set here will also surface in ROPA-linked views. Conversely, the Personal Data and Special Categories fields on the Balancing of Interests tab pull their values automatically from any linked ROPA — you maintain the data in ROPA, and it appears here for the analysis. - Tasks module: Tasks linked from the Tasks tab appear in the main Tasks list. They can be assigned deadlines, priorities, and responsible people, and tracked to completion independently. The LIA–task connection is preserved throughout.
- Assessments module: Linked assessments let you record formal evaluation processes — questionnaires, audits, or review cycles — against the processing activity covered by this LIA.
- Compliance dashboards: The
Statusfield feeds into any organisation-wide dashboards or status overviews that aggregate LIA records by workflow state (Draft, Active, Under Review, etc.). - Activity Log: Every save is recorded in the activity log, creating an audit trail of who changed what and when. The activity log is accessible from the detail view.
After finishing an LIA, the logical next steps are: link it to the relevant ROPA record (from the ROPA module), link any outstanding remediation tasks, and update the status from Draft to Active once the analysis has been reviewed and approved.
Tips & common pitfalls
Heads up: All tabs except General are locked until you save the record for the first time. This catches out many users who try to click straight to the Necessity tab on a new record. The fix is simple: fill in theNamefield on the General tab and clickSave.
Tip: Each tab saves independently. If you edit the Necessity tab and then click over to the General tab without saving, your Necessity changes will be lost. Always click Save before navigating away from a tab you have edited.- Personal Data and Special Categories are read-only on this screen. These fields in the Balancing of Interests section come from a linked ROPA record. If you need to update those values, open the linked ROPA record and make the change there. It will automatically flow back here.
- Saving the General tab on an existing record redirects you to the Necessity tab. This is by design — the system guides new users through the three-part test in order. If you are simply making a small change to the General tab and are surprised to land on Necessity after saving, this is the expected behaviour. Click back to General or use the tab menu to continue where you need.
- The "edit only assigned" permission only covers records where you are listed as a responsible person. If you have been given this permission but are not listed as a responsible person on a particular record, you will see the edit screen but the save will fail. Ask an administrator to add you as a responsible person on the General tab, or request the full edit permission.
- Multi-language fields show the value for your default language. If a field was filled in by someone using a different language and no translation has been added for your language, the field will appear blank even though data has been saved. Use the translation icon beside the field to enter a value in your language.
- Linking many tasks at once: If you need to link a large number of tasks, use the bulk-select option in the Tasks tab. The system will apply the linking operation to all filtered results, not just the ones visually selected on screen.