
Create a task
Creating a Task in DPMS
The Create a Task screen is your starting point for capturing, delegating, and tracking any piece of compliance-related work inside DPMS. Data Protection Officers, compliance coordinators, IT administrators, and risk managers all use it on a daily basis — whenever a gap is identified, a remediation action is needed, or a recurring compliance activity must be assigned to a colleague. Unlike a simple to-do note, a DPMS task is a structured record that links to your Records of Processing Activities, assessments, policies, documents, and much more. Everything that makes a task powerful — its RASCI matrix, linked evidence, workflow triggers, and access restrictions — only becomes available once you have saved the task for the first time.
How to open it
Navigate to Tasks in the main sidebar. On the Tasks index page, click the Create button in the top-right dropdown menu. DPMS will take you directly to the blank creation form at /tasks/create.
You can also arrive here from another module: for example, when you click +Add Task from within an assessment's linked-tasks tab, the same form opens — but with a back-link that will return you to the assessment after saving, not to the Tasks index.
Heads up: You need either the Create Tasks or the Edit Tasks permission to reach this screen. If you have neither, DPMS shows a "Forbidden" page and the Create menu item on the Tasks index is hidden entirely.
What you see
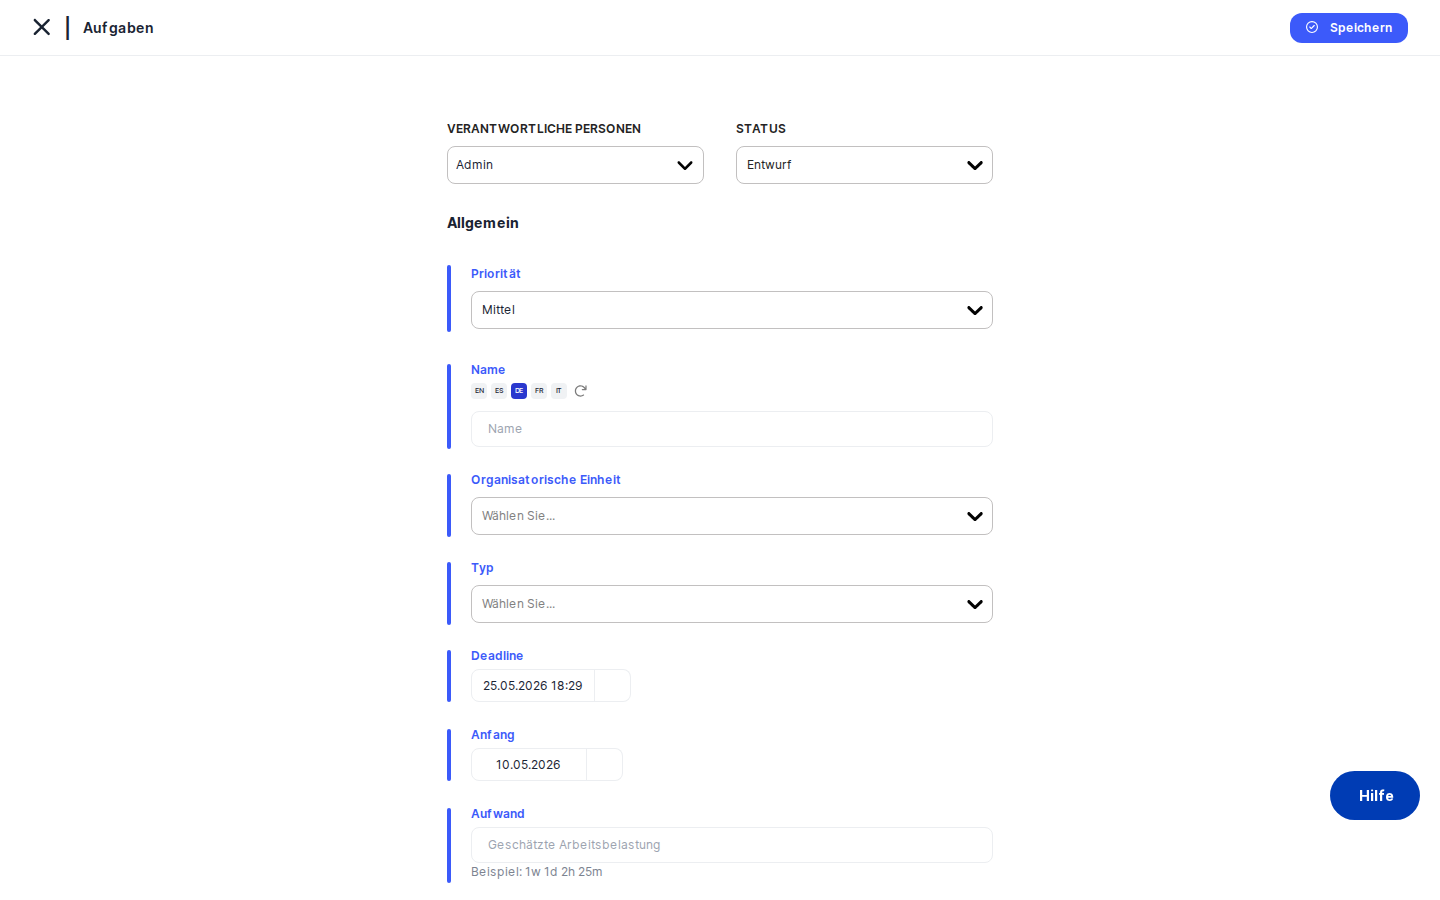
When the form opens, the page is split into two areas. On the left is a vertical side-navigation menu listing all the tabs a task can have: General, RASCI, Assessments, Documents, Manage Access, and Trigger Workflow. During initial creation, all tabs except General are greyed out and unclickable — they unlock the moment you save the task for the first time. A small toggle on the far left edge of the screen lets you collapse or expand this menu; DPMS remembers your last preference.
The main area on the right is the General form, marked by a blue accent bar along its left edge. At the very top of this form sits a bar with three quick-access controls: Responsible Person, Status, and Priority. Below those, the individual detail fields appear in a vertical stack. A Save button and a back-arrow at the top left complete the layout.
Working with this screen
Setting up your task for the first time
Before you can use any of the advanced tabs, you need to save a basic task record. Here is how to do that in a few steps.
- Give the task a name. Click into the Name field and type a clear, recognisable title — for example, "Q3 Privacy Audit Review". If your company has multiple active languages, you will see a small AI translation button alongside the field; clicking it automatically translates the name into all your configured languages, saving you time. Although the name field is not technically mandatory, leaving it blank creates a nameless task that is nearly impossible to identify later.
- Set responsibility, status, and priority. In the bar at the top of the form, use the Responsible Person selector to pick one or more colleagues who will own this task — you can select multiple people at once. Their avatars will appear in the Tasks index once saved. Next, use the Status drop-down to set the starting state (Draft is the default, but you might choose In Progress if work has already begun). Finally, use the Priority drop-down to choose Low, Medium, or High. The priority shows as a coloured circle in the index, making urgent tasks easy to spot at a glance.
- Fill in the supporting fields. Scroll down to complete the remaining fields:
- Organizational Unit — link the task to a specific department or team so it appears correctly in reporting and filtering.
- Type — pick one or more classification tags (e.g. Legal, Technical, HR) from the multi-select dropdown. These tags must be configured in Compliance Settings first; if the list is empty, ask your compliance admin to add task-type tags there.
- Deadline — click the calendar to set a due date and time. This value populates the "Deadline" column in the Tasks index and triggers overdue highlighting when the date passes.
- Start Date — optionally set when work should begin, so responsible persons know when to start as well as when to finish.
- Estimated Effort — type the expected work time using the format
1w 2d 3h 30m(week, day, hour, minute). You do not need all four parts —2d 4hor just30mare both valid — but every number must be followed immediately by its unit letter. If the format is wrong, DPMS will block saving and show an error. Leave the field blank if you do not want to estimate effort. - Description — add free-form context, instructions, or links so the assigned person can start work without needing further clarification.
- Click
Save. DPMS validates your entries, saves the task to the database, and redirects you to the task's detail view. If you arrived from another element (e.g. an assessment), you are taken back there instead. Either way, the task now exists and all the locked tabs are immediately available for further configuration.
Assigning RASCI roles to an existing task
Once a task has been saved, you can define who is Responsible, Accountable, Supporting, Consulted, and Informed using the RASCI tab. This tab is only accessible in edit mode — it is intentionally not shown during initial creation.
Navigate to the task in the Tasks index, open its detail view, and click RASCI in the left side menu. You will see a table with a person-selector in the first column and five checkboxes per row — one for each RASCI role.
Click the person-selector in the first row and search for the colleague you want to assign. Tick the appropriate role checkbox (or multiple checkboxes if the same person covers more than one role). To add more people, simply fill in additional rows. When you are done, click Save — DPMS updates the task record and the changes are immediately reflected on the task's read-only detail view. Any row where you have not selected a person is silently ignored on save.
Linking assessments and documents to a task
After the initial save, use the Assessments tab to connect existing assessments and the Documents tab to link policies or other documents. These tabs both work the same way: select the items you want to link from the provided picker and click Save. The linked items then appear in the task's detail view and help auditors trace the compliance context behind the task.
Note that clicking Save on these tabs does not redirect you anywhere — if the save succeeds silently, that is normal behaviour. The task stays open on the current tab.
Restricting who can see a sensitive task
If a task relates to sensitive matters — such as an HR investigation or a privileged legal review — you can hide it from most users after the initial save.
Click Manage Access in the left side menu. You will see two fields: Audiences (pre-defined groups from Compliance Settings > Group Management) and Users (individual DPMS accounts). Select the groups and individuals who should have access, then click Save. From that point on, only the selected people — plus anyone with platform-wide administrator rights — can see the task. Users not on the list will not find it in their Tasks index or in any linked-element tables.
Triggering a workflow on a task
If your organisation uses automated workflows for approval or escalation, the Trigger Workflow tab (unlocked after the first save) lets you attach a workflow template to this task and start it. This tab requires the additional Assign Workflow to Tasks permission. Select the template from the provided list and click Save; DPMS launches the workflow and any required-action steps will be routed to the designated people automatically.
Field reference
- Name — The task's display title. Supports multiple languages if your company is configured for them. Not technically required, but a task without a name is very hard to manage.
- Responsible Person — One or more people who own the task. Visible in the Tasks index. Can be changed after saving.
- Status — The current workflow state. Includes built-in statuses (Draft, Active, In Progress, Completed) and any custom statuses configured in Compliance Settings > Statuses. Defaults to the system default status.
- Priority — Low, Medium (default), or High. Shown as a coloured dot in the index.
- Organizational Unit — The department or team that owns this task. Drives reporting and filtering. Leave blank if not applicable.
- Type — One or more classification tags of type Task from Compliance Settings. Used for filtering in the Tasks index.
- Deadline — Date and time by which the task must be completed. Stored as a timestamp. Optional — leave blank for open-ended tasks.
- Start Date — The expected start date (date only, no time). Optional.
- Estimated Effort — Duration in the format
1w 2d 3h 30m(based on 8-hour days, 5-day weeks). Stored internally as minutes. Blank is allowed; invalid formats block saving. - Description — Free-form text or rich-text instructions. Supports multiple languages.
How this connects to the rest of DPMS
The task you create here becomes a live record that other parts of DPMS read and write. The Tasks index (/tasks) shows every task you have access to, pulling the Name, Priority, Type, Responsible Person, Status, Deadline, and Estimated Effort columns directly from what you saved on this form.
When you link a task from within an Assessment, ROPA, or Policy, those elements display the task in their linked-items tables — providing a traceable chain from the compliance element to the remediation action. Auditors reviewing an assessment can follow the link directly to the task and check its status, RASCI assignments, and any linked documents.
The Manage Access tab controls task visibility across the platform. If you leave it empty, every user with the Tasks read permission can see the task. As soon as you add at least one audience or user, visibility becomes restricted.
The Trigger Workflow tab connects this task to your organisation's approval and escalation flows. Without completing this tab, no workflow-based routing will occur for the task.
After saving the General form for the first time, a standard next step is to visit the RASCI tab to assign accountability and then the Manage Access tab if confidentiality is required.
Tips & common pitfalls
Heads up: All tabs except General are locked until you click Save on the General form. If you try to click the RASCI or Assessments tab on a brand-new task and nothing happens, you simply need to save the General tab first — even with minimal information.Heads up: The Estimated Effort field expects a specific format. Entering8or8halone will not work. You must pair every number with its unit:8h,2d 4h, or1w 2d 3h 30m. An incorrect format will block saving and show an error toast.
- The RASCI tab is an edit-only tab. It does not appear during initial creation. This is by design. Save the General form first, then navigate to the RASCI tab to assign roles.
- Saving secondary tabs (Documents, Assessments, RASCI, Manage Access) does not redirect you. A silent, successful save keeps you on the same tab. Do not interpret the lack of navigation as an error.
- If you create a task from within another element (e.g. an Assessment), saving returns you to that element — not to the task's detail view. The task has still been created and you can find it in the Tasks index. To configure RASCI or Manage Access, navigate to the task from the index afterward.
- Custom statuses only appear if they have been configured. If you are missing a status in the drop-down, ask your compliance admin to add a tag of type
task_statusunder Compliance Settings > Statuses. - Workload is stored in minutes. If you type
1wand later return to edit, DPMS converts back from minutes. In rare cases the displayed value may differ slightly from what you typed — this is cosmetic and does not affect the stored data.