
Report a new incident
Report a New Incident
When something goes wrong — a suspected data breach, unauthorised access to personal data, or any event that might require a compliance response — the first thing you need to do is capture it formally in DPMS. The Report a New Incident screen is where that happens. It is the entry point for the entire incident lifecycle: once you save a record here, your whole team can coordinate their response through linked tasks, log entries, supporting documents, assessments, and workflow approvals — all tied to the same incident record.
This screen is used primarily by Data Protection Officers, compliance officers, IT administrators, and risk managers. You will come back to it not just when reporting a new incident, but also when editing an existing one, adding a log entry, or managing who has access to a sensitive record.
How to open it
- In the left-hand sidebar, click Incidents.
- On the Incidents index page, click the Create button in the top action bar. A small animated menu appears — select the creation option.
- You will land on the Create Incident form.
You need at least the Create Incidents or Edit Incidents permission to see and use this form. If you only have read access, the form will not be available. Users without any Incidents permission at all will not see the Incidents section in the sidebar.
What you see
The screen opens with a clean, single-column layout. At the very top, a breadcrumb area shows the title "Create Incident" alongside a back arrow on the left that takes you back to the incidents list (or whichever page you came from).
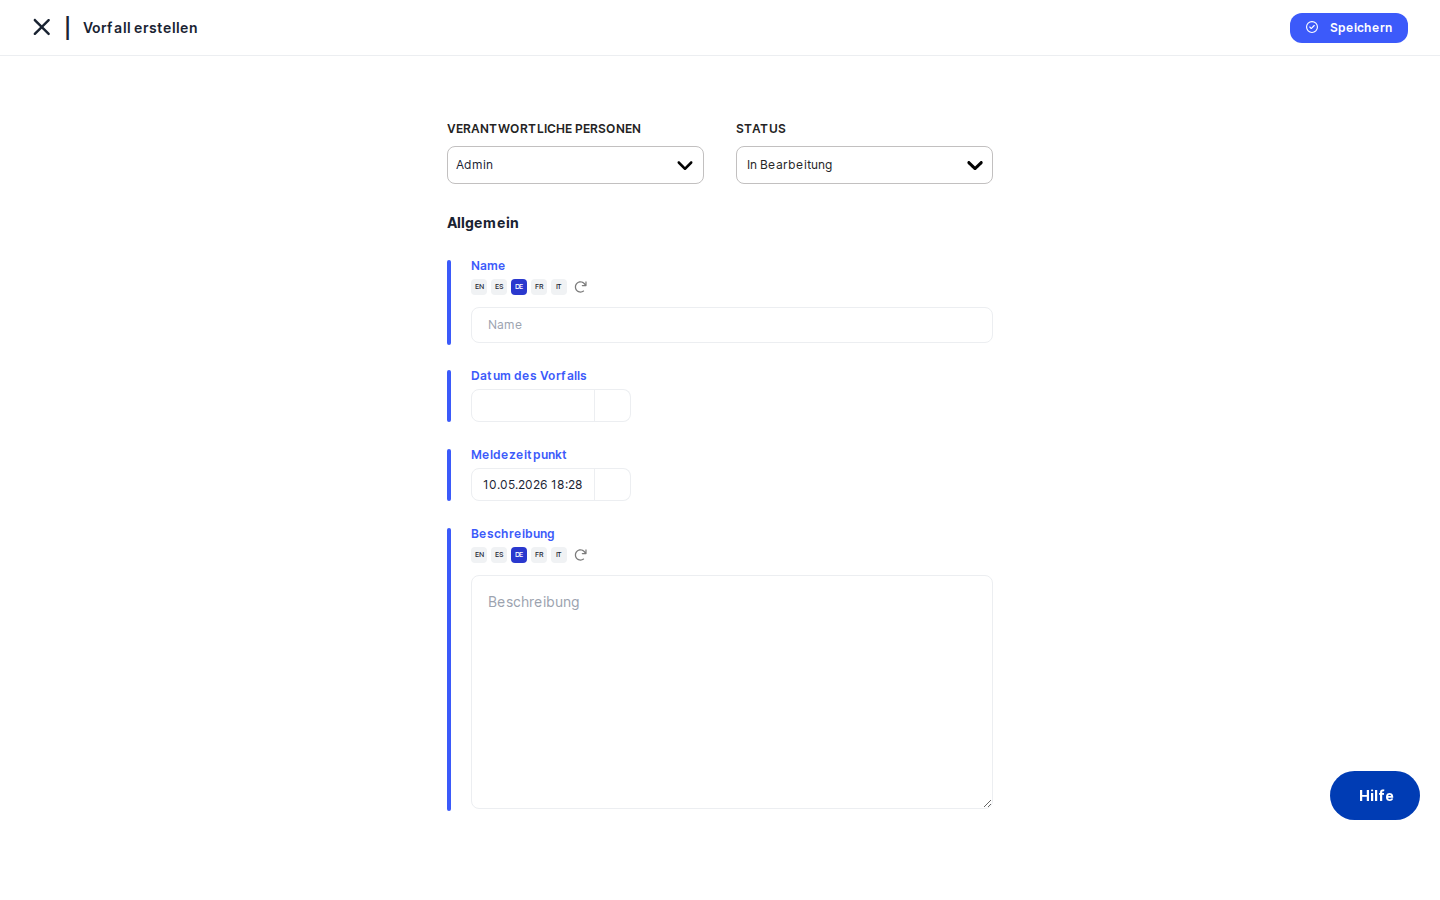
The top of the main content area contains an action bar with three controls: a status dropdown, a responsible person selector, and a contextual help icon. Below that, a thin blue dividing line separates the action bar from the four core input fields, which appear stacked in order: Name, Incident Date, Reporting Date, and Description. Date fields have a small calendar icon; the Name and Description fields each have a translation icon beside them that lets you auto-translate the text you enter into other languages your organisation uses.
At the bottom of the form sits the Save button, which commits the record to the database.
Working with this screen
Reporting a new incident for the first time
Imagine a staff member has just told you about a suspected breach in a vendor-managed payroll system. Here is how to capture it:
- Open the form using the steps above. The title reads "Create Incident."
- Set the status. Click the
Statusdropdown in the action bar at the top. For a freshly reported incident, leave it set to Processing — this is the default and tells your colleagues the incident is actively being investigated. - Assign responsible persons. Click the
Responsible Personselector in the same action bar. A people picker opens where you can search by name and select one or more colleagues — for example, yourself as DPO and the IT security manager. The people you choose here matter: colleagues who only have "edit own assigned" permission will only be able to edit this incident if they appear in this list. - Give the incident a name. Click into the
Namefield and type a clear, short title — for example, "Payroll system breach — HR vendor." If your organisation uses multiple languages, you can click the translation icon beside the field and DPMS will automatically fill in the name in your other supported languages. - Set the Incident Date. Click the calendar icon beside the
Incident Datefield. A date and time picker opens. Select the date and approximate time when the incident actually occurred. This field starts empty — DPMS does not guess at when the incident happened. Leaving it blank is allowed, but it will appear empty in your incidents list and may complicate regulatory reporting (GDPR's 72-hour notification window is measured from the incident date). - Check the Reporting Date. DPMS has already filled in the
Reporting Datewith today's date and time — specifically, the moment you opened this form. This is deliberate: it records when the incident was formally brought to your attention. If you actually became aware of it yesterday but are only entering it now, adjust this field to reflect reality. - Write the description. Click into the
Descriptionfield and provide a full account of what happened — what data categories may be involved, who was affected, how the incident was discovered, and any immediate steps already taken. This narrative is the foundation for regulatory reporting and internal investigation. Like the Name field, you can auto-translate it using the icon beside the field. - Save. Click
Saveat the bottom. DPMS creates the incident record and immediately redirects you to the incident's detail page, where you can begin adding log entries, linking tasks, attaching documents, and more.
Editing an existing incident's core details
If you need to correct or update the name, dates, description, status, or responsible persons on an incident that already exists, navigate to that incident's detail page and choose the edit option (via the options menu or the Edit button). The form reopens with the title "Edit General" and all current values pre-loaded. Make your changes and click Save. DPMS saves the updates in place and keeps you on the same record.
Heads up: If you change the status to Resolved, the entire incident record becomes read-only everywhere — including the Log, Documents, Tasks, Assessments, and Workflow tabs on the detail page. Plan this carefully. You can reverse it by editing the status back to a non-resolved value.
Adding a log entry to track ongoing developments
As your investigation progresses, you will want to record key milestones — for example, "Day 3: Confirmed 150 customer records were exposed" or "Day 5: Notified the supervisory authority." Each of these is a log entry, a timestamped note attached to the incident.
To add one, go to the incident's detail page, open the options menu, and select Add Log Entry. This opens the log entry sub-form within the edit screen. You will see three fields:
- Name — a short title for this log entry.
- Date — pre-filled with the current moment, but adjustable.
- Description — the full narrative for this entry.
Fill in all three, then click Save. The entry is added to the incident's chronological log and immediately visible to everyone with access to this incident.
Tip: The log entry sub-form shows only one entry at a time. To see all log entries as a list, visit the incident's detail page and navigate to the Log tab there — not the edit form.
Linking documents, tasks, and assessments
Once the incident is saved, you can attach supporting materials to it. From the incident's detail page, use the edit form (or the tabs on the detail view) to:
- Link documents — attach existing policies, breach notification templates, or procedure documents from your Policies and Documents module. Click the
Documentstab in the edit form, search for the relevant documents, select them, and save. - Link tasks — connect response to-do items (such as "Notify affected data subjects" or "Patch the vulnerability") to the incident. Click the
Taskstab, select the relevant tasks, and save. - Link assessments — if the incident reveals that a DPIA or other assessment is needed, click the
Assessmentstab to associate it.
Each of these tabs follows the same pattern: search, select, and save. Once saved, the linked items appear in the corresponding tabs on the incident's detail page, giving your whole team a clear picture of what is in progress.
Heads up: If the incident's status is Resolved, all of these tabs become read-only. Checkboxes disappear, action buttons are disabled, and you cannot add or remove linked items.
Triggering a compliance workflow
If your organisation uses approval or review workflows — for example, routing the incident for sign-off before submitting a supervisory authority report — the Trigger Workflow option is available to users with the dedicated workflow assignment permission. Access it from the incident's detail page via the options menu.
On the Trigger Workflow screen, you select the appropriate workflow template, configure any required settings, and save. DPMS initiates the workflow, notifying the designated reviewers. You and your team can then track progress in the Workflow Overview tab on the incident's edit form. If a workflow needs to be abandoned, a Cancel Workflow button appears on that tab as long as the workflow is still active.
Managing who can see a sensitive incident
For particularly sensitive incidents, you may want to restrict who can read or edit the record. From the incident's detail page, open the options menu and select the access management option. The Manage Access form lets you assign specific user groups or audiences to the incident. Save your changes and DPMS applies the restrictions immediately.
Field reference
- Name — The short title that identifies the incident in lists and reports. Keep it descriptive enough to be meaningful at a glance (e.g. "Unauthorised access — customer database"). Supports multilingual input. Required for meaningful record-keeping, though the form does not block saving without it.
- Incident Date — When the incident actually occurred. Starts empty — DPMS does not pre-fill this. Select a date and time using the calendar picker. Leaving it blank is technically allowed but will leave a gap in your regulatory documentation. Under GDPR, you need to know when an incident took place to calculate notification deadlines.
- Reporting Date — When the incident was formally reported to the compliance team or DPO. Automatically pre-filled with the current date and time when you open the form. This reflects the moment the form was opened as the reporting event. Always review this before saving — if you became aware yesterday and are entering it today, update this field accordingly.
- Description — A free-text narrative of the incident: what happened, what data may be involved, who was affected, and any immediate actions taken. Supports rich text and multilingual input. This is the most important field for regulatory reporting and investigation purposes.
- Status — Indicates the current state of the incident. Defaults to Processing for new incidents. Custom statuses configured by your organisation may also appear here. Setting status to Resolved makes the entire incident read-only.
- Responsible Persons — One or more named users accountable for managing this incident. Determines who receives workflow notifications and who can edit the record under restricted permissions.
How this connects to the rest of DPMS
The incident record you create here is the anchor for all subsequent compliance activities related to this event. Nothing else can be properly attached or tracked until the incident exists in the system.
Once saved, the incident appears in the Incidents index (/incidents), where your team can filter, search, and monitor all open incidents. From the incident's detail page, every linked element — log entries, tasks, documents, assessments, and workflow steps — lives in its own tab, giving you a single place to coordinate the full response.
The status you set here has a direct downstream effect: as long as the incident is in Processing (or any non-resolved status), all tabs remain editable. The moment you set it to Resolved, the detail view locks down completely. The responsible persons you assign here control who receives workflow notifications and who can edit the record if their permission level is restricted to "own assigned" incidents only.
After saving a new incident, your typical next steps are:
- Add an initial log entry to document what you know so far.
- Link any relevant tasks (remediation actions, notification obligations).
- Attach supporting documents (breach notification templates, data flow diagrams).
- Consider triggering a review workflow if sign-off is required.
Tips & common pitfalls
Heads up: The Reporting Date auto-fills with "now" — the moment you open the form. This is intentional, but it may not be accurate. If a staff member reported this to you verbally two hours ago and you are only now entering it, update the Reporting Date before saving.
Tip: The Incident Date starts empty. Do not forget to fill it in. Without it, the incidents list shows a blank date for this record, and your regulatory timeline documentation will have a gap. The 72-hour GDPR notification window depends on knowing when the incident occurred.
- Resolving an incident locks everything. Once you set the status to Resolved, the entire incident becomes read-only: no new log entries, no linking or unlinking of documents or tasks, no workflow changes. If you need to make further edits, change the status back to a non-resolved value first.
- Log entries are added one at a time. The Log tab in the edit form is a form for a single entry, not a list. To see all entries in chronological order, go to the incident's detail page and open the Log tab there.
- Workflow permission is separate from edit permission. Having full edit access does not automatically grant you the ability to trigger a workflow. If the Trigger Workflow option is missing or inaccessible, ask your DPMS administrator to check your workflow-related permissions in Compliance Settings.
Tip: The form remembers unsaved data if you navigate away and return. If you open a new incident form and see data from a previous session, navigate away completely and return fresh to start with a blank form.