
Edit a task
Edit a Task
The Edit a Task screen is where compliance work gets done. Whether you are a DPO tracking the progress of a DPIA-related action, a team lead reassigning an overdue task, or an IT admin linking a policy document to an open control gap, this is the screen you will return to again and again. It sits at the centre of the DPMS operational workflow: a task already exists, it has a deadline, someone owns it — and now you need to update it, enrich it, or move it forward.
How to open it
The most common route is through the task list:
- Click Tasks in the left-hand navigation sidebar.
- Find the task you want to update and click its row to open the detail view.
- Click the pencil icon in the header, or select Edit from the three-dot options menu in the top right.
You can also arrive here directly from any other DPMS module that shows a linked-task list — for example, from a ROPA detail screen or an Assessment detail screen, clicking a task row opens this edit form immediately.
Heads up: You need edit permission for tasks to reach this screen. If you only have read permission, the system will show a "Forbidden" page instead of the edit form. Users with the "edit only assigned tasks" permission can open and save tasks they are personally assigned to.
What you see
The screen sits inside the standard DPMS layout. At the very top, a breadcrumb bar reads Tasks › [Task Name] › [Current Tab Name] — clicking the Tasks link takes you back to the task list. To the left of the task name, small left and right chevron arrows let you step to the previous or next task in your current filtered list without going back to the index.
On the right side of the header area is an action bar containing the responsible person selector, the status dropdown, the priority selector, and — further right — a three-dot options menu. A small clock icon in the top-right corner opens the Activity Log drawer.
The left side of the content area holds a vertical tab menu listing all sections of the task: General, Logs, RASCI, Linked Elements, Documents, Assessments, and Workflows. You can collapse this menu to a narrow strip by clicking the blue circle at its far left edge, giving more room to the form on the right.
The right side shows whichever tab is currently selected. Every tab ends with a Save button that commits only that tab's changes. If you have not yet saved the task for the first time (you are creating it), only the General tab is active — all other tabs become available once the task has an ID.
Working with this screen
Updating the core details of a task
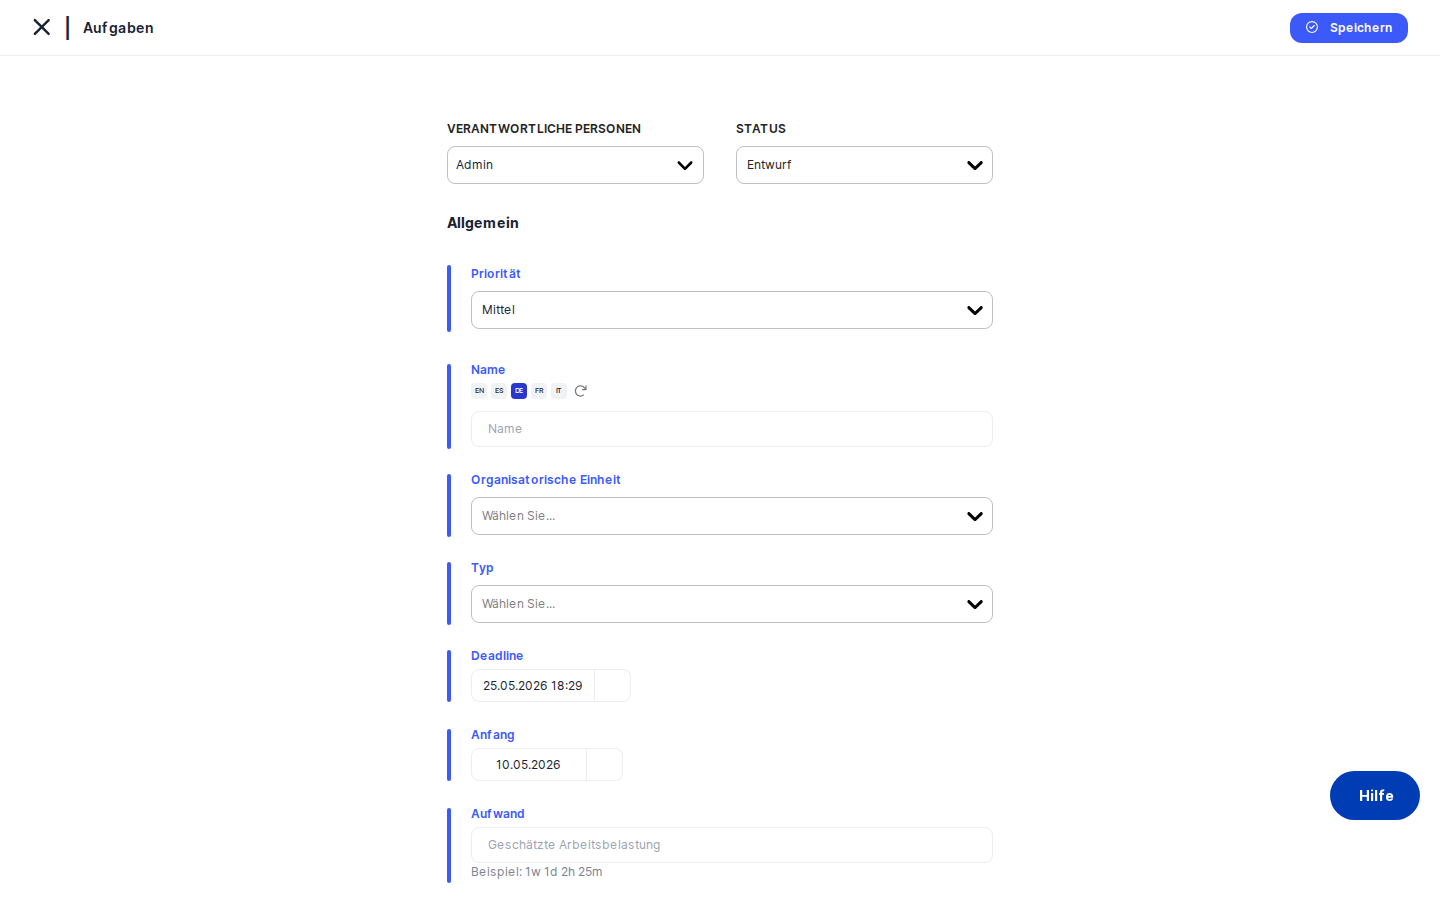
When you need to change a task's name, dates, description, priority, or status, the General tab is where you start.
- In the header action bar at the top of the screen, you can change the Status (e.g. from In Progress to Completed) and Priority (Low, Medium, or High) directly without opening the full form — these changes save immediately via a lightweight patch as soon as you select a new value.
- For everything else — the name, organisational unit, type tags, deadline, start date, estimated effort, and description — click the
Generaltab in the left-hand tab menu. The form loads with the current values pre-filled. - Update the fields you need (see the Field reference section below for guidance on each one), then click
Saveat the bottom of the form.
Once saved, DPMS redirects you back to the task detail view, where the breadcrumb confirms the updated status and the fields reflect your changes.
Tip: You can also change the responsible person directly in the header action bar. Clicking the person selector opens a multi-select dropdown — you can assign multiple people to a single task. This change saves immediately and updates who receives assignment notifications.
Assigning RASCI accountability roles
The RASCI framework lets your organisation formally record who is Responsible for doing the work, who is Accountable for the outcome, who provides Support, who needs to be Consulted, and who should be kept Informed.
- Click the
RASCItab in the left-hand menu. (This tab is only clickable after the task has been saved at least once.) - You will see a table with columns for each role letter. Click the person dropdown in the first row and search for the person you want to assign.
- Once a person appears in the row, tick the appropriate role checkboxes — for example, tick Responsible for the analyst doing the work and Accountable for the DPO who owns the outcome.
- To add more people, add another row, select the next person, and assign their roles.
- Click
Save. The system removes any rows where no person was selected, then sends the full RASCI table to the backend. A success notification appears.
The completed RASCI assignments are immediately visible on the task detail view as a read-only summary table.
Restricting who can see a sensitive task
By default, tasks follow the standard access rules of your organisation. If you need to limit visibility to a specific team or individual — for example, a task related to ongoing litigation that only the Legal team should see — use the Manage Access tab.
- Click the three-dot options menu (⋯) in the top-right corner of the screen and select Manage Access. This opens the Manage Access tab directly.
- In the Audiences dropdown, search for and select the audience group(s) who should have access (e.g. "Legal Department"). Audience groups are defined by your administrator in Compliance Settings.
- If you also need to grant access to a specific individual who is not part of any audience group (such as an external counsel), use the Users dropdown to add them by name.
- Click
Save. From this point, only the selected audiences and named users can see this task anywhere in DPMS — in lists, search results, and linked-object tables on other screens.
Heads up: Assigning an Organisational Unit on the General tab is not the same as restricting access. Setting an organisational unit classifies the task for reporting and filtering; it does not hide the task from other users. Only Manage Access controls actual visibility.
Linking documents, assessments, and other compliance objects
Tasks rarely exist in isolation. Linking a task to the documents and assessments that triggered it — or that provide guidance for completing it — creates a navigable audit trail across your DPMS.
To link a policy document:
- Click the
Documentstab in the left-hand menu. - In the edit form, a search field and link button appear. Search for the document by name (e.g. "Data Retention Policy 2024"), select it, and click
Save. DPMS sends a request to update the linked documents list on this task.
To link an assessment:
- Click the
Assessmentstab. - Search for the assessment (e.g. "DPIA — Data Retention"), select it, and click
Save.
Once linked, the task appears in the Tasks section of the document's or assessment's own detail screen, and the document or assessment appears here on the task. The connection is bidirectional.
Tip: Each tab (Documents, Assessments, Linked Elements) has its own Save button. Saving on the Documents tab does not save any unsaved changes you may have made on the General tab. Work through your tabs, saving each one separately.Working with logs
The Logs tab shows a chronological list of notes or updates that have been added to this task over time — each entry records a date, a name, a description, a status, and who created it.
- Click the
Logstab to see all existing log entries. - To add a new log entry, use the create button (available in the edit form). This opens a small log creation form. Fill in the details and save. The new log is automatically linked back to this task.
- To delete an individual log entry, use the delete action that appears on each row.
Managing workflow actions
If your organisation uses DPMS workflows to route tasks through approval or review processes, the Workflows tab is where you interact with them.
- The Overview sub-tab shows all active and past workflows for this task in a table — their current state, who is involved, and whether they are in progress, completed, or cancelled.
- The Required Action sub-tab surfaces any workflow step that is specifically waiting for you to act — for example, approving or rejecting a submission.
- If you have workflow assignment permission, an additional Trigger Workflow option lets you start a new workflow process on this task, which will send notifications and create required action items for the relevant people.
To cancel a workflow that was started in error, navigate to the Overview sub-tab, where a Cancel Workflow button appears if the workflow is currently active.
Field reference
The following fields appear on the General tab form. All other tab forms are described in the sections above.
- Name — The task's display name. Enter a short, clear description of the work (e.g. Review consent records for Marketing newsletter). Leaving this blank produces a task with no name, which is difficult to identify in lists.
- Organisational Unit — Associates the task with a specific department or team. Used for filtering and reporting. Select from the pre-loaded list of units.
- Type — One or more classification tags (e.g. Legal, Technical, Training). Helps with filtering tasks in the index. Tags are managed in Compliance Settings.
- Deadline — The date (and optionally time) by which the task must be completed. Click to open a calendar picker. Leave blank if no deadline applies; the deadline column in the task list will show as empty.
- Start Date — The date on which work is expected to begin. Date only, no time component.
- Estimated Effort — The predicted time the task will take. Must be entered in the format
Xw Xd Xh Xm(for example,1w 2d 4h 30m, where 1 day = 8 hours and 1 week = 5 working days). Entering a plain number or freeform text will fail validation and prevent saving — you will see a red error notification. The value is stored internally as total minutes. - Description — A free-text, rich-text area for instructions, context, or links. Supports formatting such as bullet points and line breaks. No required length.
How this connects to the rest of DPMS
What depends on what you set here:
- The Responsible Person(s) you assign here determines who receives task assignment notifications and who the "edit only assigned" permission scope applies to. Change the responsible person and the notification recipients change with it.
- The Status you set here drives which tab the task appears under on the Tasks index (All, Open, In Progress, Completed). Marking a task Completed removes it from active work queues.
- The Audience and User selections in Manage Access control visibility everywhere in DPMS — a task not in a user's audience is invisible to them in lists, searches, and linked-object tables on any other module screen.
- RASCI assignments appear in the task detail view immediately and are visible to all users who can see the task.
- Linked Documents and Assessments are visible from the respective module screens — for example, the linked task shows up in the Tasks section of the Assessment detail screen, giving auditors a direct path from obligation to action item.
Where you go after this screen:
After saving the General tab on a new task, you are redirected to the task detail view. From there, return to the edit form to configure RASCI, documents, assessments, and access. Once the task is fully configured, it will appear in the task lists of everyone in the assigned audiences and will be available for linking from ROPAs, assessments, and other compliance objects across DPMS.
Tips & common pitfalls
Heads up: Tabs are locked until the first save. When creating a task from scratch, only the General tab is available. The RASCI, Documents, Assessments, Manage Access, and Workflows tabs all remain greyed out until you save the General tab and the task gets an ID. This is intentional — the task must exist in the system before it can have linked objects or access-control records.
Heads up: The Estimated Effort field has a strict format. It only accepts values like2w 1d 4h 30m. Entering8,8h, oreight hourswill fail validation, show a red error notification, and block saving. The error appears as a toast notification — there is no inline hint on the field itself, so you only find out when you clickSave.
- Each tab saves independently. The
Savebutton on each tab only saves that tab's fields. Editing the Description on the General tab and the Audiences on the Manage Access tab means you need to save twice — once on each tab. Switching tabs without saving does not lose your work (the form holds it in memory), but navigating away from the page entirely — for example, clickingTasksin the breadcrumb — will discard all unsaved changes across all tabs. - Empty RASCI rows are silently removed on save. If you click the add-person button in the RASCI table but leave the person blank, the system quietly drops that row when you save. No error message appears. This is intentional, but can be confusing if you expected a validation warning.
- Manage Access and Organisational Unit are different concepts. Assigning an organisational unit classifies the task for reporting and filtering — it does not restrict who can see it. Only the Manage Access tab controls actual visibility. If a task is sensitive, set both: assign the organisational unit for reporting, and configure audiences in Manage Access for protection.
- The Activity Log is hidden on shared tasks. If a task has been shared from another organisation or is in Consulted mode, the Activity Log clock icon does not appear — even if you normally have changelog access. This is by design to protect audit trails that belong to a different organisation.
- Concurrent editing is tracked. DPMS uses a unique identifier that changes on every save to detect if two people have the same task open at the same time. If a colleague saves the task between when you opened it and when you click
Save, you may receive a conflict warning. Reload the task to see the latest version before making your changes.