
Edit a custom role
Edit a Custom Role
The Edit Custom Role screen is where IT administrators and Data Protection Officers fine-tune exactly what each custom role is allowed to do inside Priverion DPMS. Because a role is the single mechanism that controls which menus a user sees, which records they can open, and which actions they can take, getting role permissions right is one of the most impactful configuration tasks in the platform. Changes you save here take effect immediately for every user who holds that role.
How to open it
Navigate to IT Settings → Roles in the left-hand sidebar. The Roles list shows every role in your organisation. Click the name of any custom role (roles your organisation created) to open this screen. You need the Edit IT Settings – Roles permission or the Create IT Settings – Roles permission to access the form. If you hold neither, the page is replaced by a 403 error and no part of the form is displayed.
Note: You can also click the name of a built-in system role (such as "Employee" or "Data Protection Manager") to view its permissions — but you cannot change them. System roles are always read-only on this screen.
What you see
The screen keeps the familiar IT Settings sidebar on the left, with Roles highlighted to show where you are. The main content area is structured as a form with two distinct parts.
At the very top of the form is the Role Name field — a text input that supports translations into all the languages your DPMS instance is configured to use.
Below the name, taking up the vast majority of the page, is the Permissions Assignment card. This white card lists every module and entity in DPMS — more than forty in total, ranging from ROPA and TOMs to Assets, Vendors, Risk Scenarios, Assessments, User Management, and every settings section. The modules are displayed as collapsible accordion panels, all collapsed by default. A search bar in the top-right corner of the card lets you filter the list by typing a module name or a specific permission type.
At the very top-right corner of the entire form, the Save button persists all your changes. For system roles, this button is completely absent — there is no way to accidentally modify a built-in role.
Working with this screen
Renaming an existing role
If the role's name no longer matches its actual purpose — for example, after a team reorganisation — click into the Role Name field at the top of the form and update the text. The name supports multiple languages: if automatic translation is enabled in your DPMS instance, the system can propagate the new name into your other configured languages automatically. If you manage translations manually, you can switch between language tabs in the field to enter each translation.
The name change is not saved until you click Save. Once saved, the new name appears immediately in the Roles list and in every dropdown across the platform where users are assigned to this role.
Setting up permissions for the first time (or doing a full review)
When you first look at the Permissions Assignment card, all accordion panels are collapsed and the coloured badges on each panel header show you at a glance which modules already have permissions enabled. A blue badge means some permissions are active; a red badge means none are active for that module.
To configure a specific module:
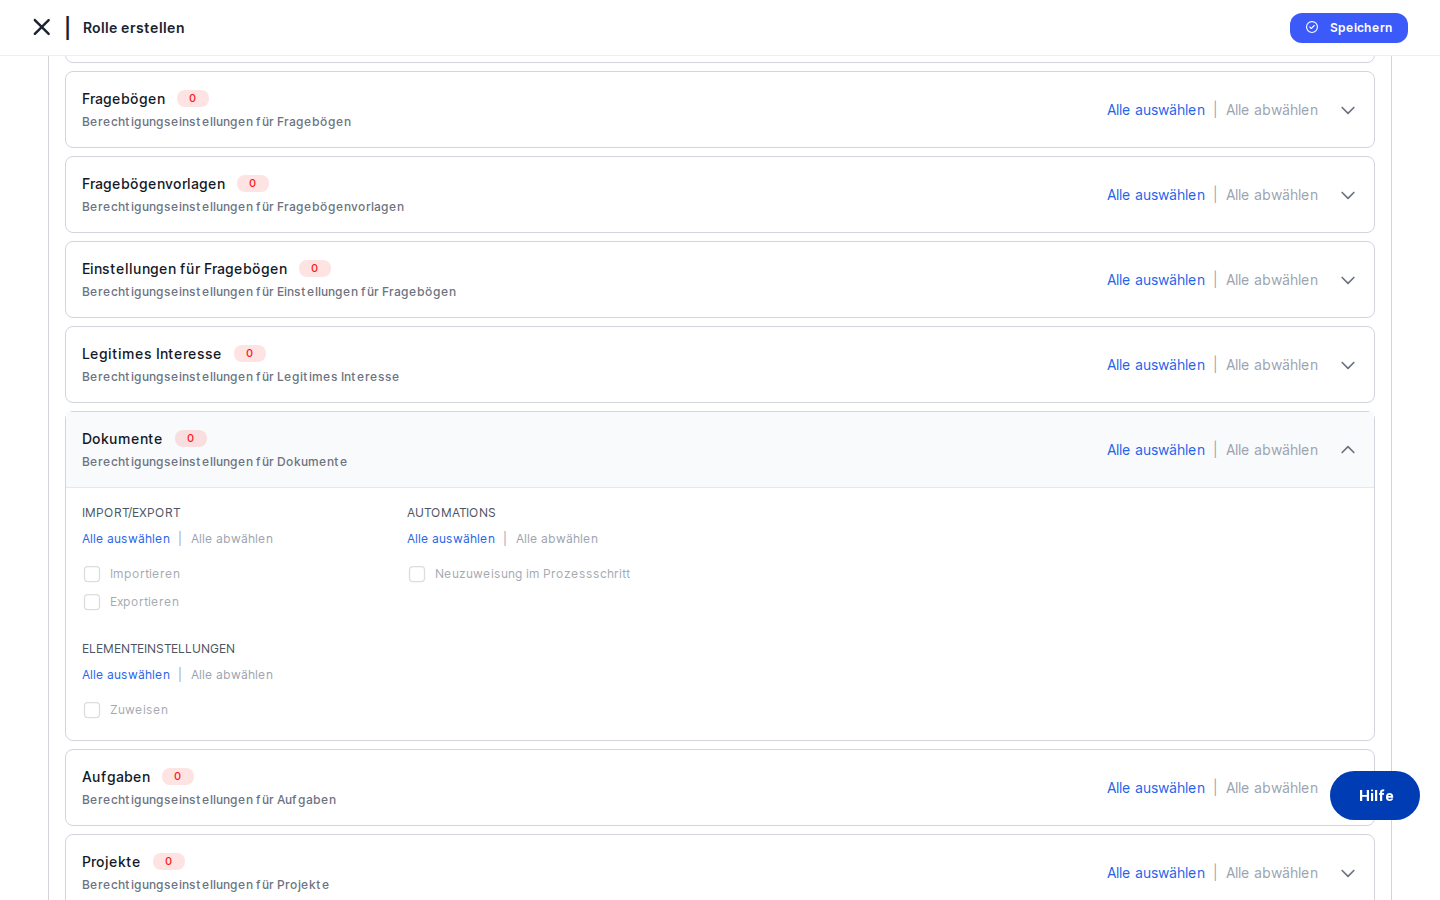
- Click the panel header for the module you want to configure (for example, ROPA). The panel expands to reveal a four-column grid: Main Actions (Read, Create, Edit, Delete, Duplicate, and others), Sharing (Push Changes, Pull Changes, and more), Import/Export together with Element Settings, and Automations together with Risk Management.
- Tick the individual checkboxes for the permissions you want to grant. Each checkbox is a blue-filled square when active and a grey outline when inactive. If a checkbox is greyed out and your cursor shows a "not allowed" symbol, that permission has an unmet prerequisite — you must enable its parent permission first (see Tips below for the full dependency rules).
- Alternatively, use the
Select Alllink in the panel header to enable every available permission for that module in one click, orDeselect Allto remove them all. Inside an expanded panel, each permission group (Main Actions, Sharing, etc.) also has its ownSelect All | Deselect Allrow so you can act on one group without touching the others. - Watch the badge on the panel header — it updates instantly as you tick boxes, giving you a live count of how many permissions are enabled.
Repeat for every module this role needs, then click Save when you are done.
Finding a specific permission quickly
When you are dealing with more than forty modules, scrolling is impractical. Type a term into the Search bar at the top of the Permissions Assignment card. The list filters in real time to show only panels whose name, or whose permission labels, match your search. For example, typing Export shows every module that has an Export permission. Typing ROPA shows only the ROPA panel.
Once you have made your changes in the filtered view, clear the search bar before saving — the search hides panels but does not deactivate their permissions, and you may want to review the complete permission set before committing.
Granting broad access quickly (e.g. setting up an admin role)
If you are building a role that should have wide access across many modules, use the Select All link in each panel header rather than ticking every box individually. Select All respects the dependency rules automatically — it enables permissions in the correct order so that prerequisites are always satisfied before dependent permissions are activated.
For example, if you click Select All on the ROPA panel, the system enables Read first, then Edit, then Export, then Push Changes — in the correct dependency order — rather than activating them in a random sequence that might leave some greyed out.
Reducing permissions after a team change
When a team's responsibilities shrink — for example, a data entry role that should no longer be able to delete records or push changes to partner organisations — open the relevant panel, find the permission you want to remove, and untick its checkbox.
Be aware of cascade effects: if you untick a parent permission such as Read, the system automatically removes all permissions that depend on it (Edit, Export, Delete, Import, AI Functionality, Push Changes, and more) in a single action. If you only want to narrow the scope — for example, switching from full Read access to Read Only Assigned — enable Read (only assigned) before removing Read, to avoid an unintended cascade.
Once you are satisfied with the changes, click Save. The updated permission profile takes effect immediately for all users who carry this role.
Viewing a system role without editing it
If you want to understand what a built-in Priverion role can do, click its name in the Roles list. The same screen opens, but every checkbox is greyed out, the Save button is absent, and a small Priverion logo next to the role name in the list identifies it as a system role. You can expand any panel and use the search bar to inspect the configuration — you just cannot change it. If you need a different permission profile, create a new custom role instead.
Field reference
- Role Name — The human-readable label for this role. Enter it in your primary language; DPMS stores a translation for each configured language. This name appears in the Roles list, in user assignment dropdowns, and wherever the role is referenced across the platform. The field is never left empty — every role must have a name. Changes only take effect when you click
Save. - Permissions Assignment (accordion panels) — One panel per DPMS module. Each panel shows the entity name, a colour-coded count badge, and
Select All | Deselect Allquick-action links. Expand a panel to see individual checkboxes grouped by permission category. A role must have at least one permission enabled across all panels before it can be saved. - Individual checkboxes (per module, per permission type) — The available permission types are: Create, Read, Edit, Read (only assigned), Edit (only assigned), Delete, Duplicate, Import, Export, Publishing, Push Changes, Load from Organisations, Pull Changes, Unlink, Change Request, Assign Workflow, Reassign in Step, AI Functionality, and Risk Edit Deadline. Not every module has every permission type — only those relevant to the module appear.
How this connects to the rest of DPMS
The role you configure here is the direct control point for everything a user can see and do in DPMS. Specifically:
- Menu visibility: If a role does not have Read permission for a module, the menu item for that module is hidden entirely for users with that role. There is no partial visibility — either the menu appears or it does not.
- Action availability: If a role lacks Export for a module, the export button is greyed out on the list page for that module. If a role lacks Delete, the delete option does not appear. This applies to every action permission across the platform.
- AI features: The AI Functionality permission, when enabled for a module, allows users to use AI-assisted autofill and suggestion features on forms within that module. Without it, AI helper buttons in forms are disabled for those users.
- Sharing and collaboration: The Push Changes, Pull Changes, Load from Organisations, and Publishing permissions control whether users can participate in Priverion's inter-organisation sharing network. Without these, sharing controls are hidden or disabled.
- Approval workflows: The Assign Workflow and Reassign in Step permissions control whether users can start or manage approval and review cycles. Without them, users cannot trigger workflow-based reviews on any element.
- Record of Compliance (ROC): This is the only module with a cross-entity prerequisite — the role must have Read access to both TOMs and Assets and Risk Scenario before any ROC permissions become available.
After finishing your role configuration, the next logical step is to assign the role to the relevant users in IT Settings → User Management, so the permissions take effect for the right people.
Tips & common pitfalls
Heads up: Enabling a permission automatically enables its prerequisites. If you tick Export, the system silently also enables Read (because Export requires Read). If you tick Push Changes, both Read and Edit are enabled alongside it. This is by design and saves time — but always review the full panel after using Select All or enabling a complex permission to confirm the result matches your intention.Heads up: Disabling a parent permission removes all its children in one action. If you untick Read for a module, every permission that depends on Read — Edit, Export, Import, Delete, Duplicate, AI Functionality, Push Changes, and more — is automatically unchecked at the same time. If you only intended to narrow the read scope, enable Read (only assigned) first before removing the full Read permission.
- The ROC module has a three-way prerequisite. The Record of Compliance checkboxes remain greyed out until the role has Read access to all three of the following modules: TOMs, Assets, and Risk Scenario. This is the only place in DPMS where one module's availability depends on permissions in three other modules simultaneously.
- System roles are always read-only. If you open a built-in Priverion role, all checkboxes are disabled and there is no
Savebutton. You cannot modify system role permissions. If a system role does not fit your needs, create a new custom role from scratch and configure it to match your requirements. - You cannot save a role with no permissions at all. If every checkbox across every module is unticked and you click
Save, DPMS will show an error notification and abort the save. At least one permission must be enabled somewhere. - The search bar filters the view — it does not change permissions. If you search for "ROPA" and then click
Deselect Allon the ROPA panel, only ROPA permissions are affected. All other modules retain their current permissions even though they are hidden from the filtered view. Always clear the search before your final review so you can see the complete picture. - Save is the only action that persists changes. Every checkbox toggle,
Select Allclick, and name edit is held in memory until you clickSave. If you navigate away using the back arrow without saving, all unsaved changes are lost. There is no auto-save and no draft state.