
Manual workflow runs
Manual Workflow Runs
The Manual Workflow Runs screen is your real-time control room for everything happening inside DPMS's workflow engine. From here you can see which automated processes are currently running, intervene when something goes wrong, and — crucially — fire a time-based workflow on demand without waiting for its scheduled trigger. DPOs, compliance managers, IT administrators, and risk managers use this screen both for day-to-day oversight and for testing newly published workflows before they go live.
How to open it
- In the main left-hand navigation, click Workflow to expand the section.
- On the left edge of the canvas area, a set of small black navigation buttons appears. Click the button labelled Manual.
- The screen loads at
/workflow/manual.
Heads up: This screen is only visible to users who have been granted the workflow management permission. If you do not see the Workflow section at all in the left-hand navigation, ask your system administrator to check your access rights.
What you see
The Manual Workflow Runs screen shares the same visual shell as the rest of the Workflow module. A 60-pixel-tall header bar stretches across the top of the screen. It contains, from left to right, the workflow logo, the name of the currently loaded workflow (editable inline), a small badge showing your company name, a status dropdown, a notification toggle, and a Save button. When the right conditions are met, a Trigger button also appears on the far right of that header.
Beneath the header, the left edge of the screen holds two stacked panels. The upper panel is the Workflow Navigation Menu — a column of small black buttons that let you jump between the different pages of the Workflow module (Editor, Queue, Constants, Email Templates, and this Manual page). Below that sits the Workflow Editor Menu, where you can expand categories of node types (such as Trigger, Service, Function, and Manual Trigger) to add steps to the workflow canvas.
The large central area is the LiteGraph canvas — an interactive visual workspace where the workflow's steps appear as rectangular blocks connected by coloured lines. This is where you build and review the structure of your workflow.
Working with this screen
Manually triggering a scheduled workflow for testing
This is the most common reason compliance officers come to this screen. Suppose you have just published a weekly DSR deadline reminder workflow and want to confirm it works correctly — right now, without waiting until next Monday.
First, open the workflow in the Editor by clicking the Editor button in the Workflow Navigation Menu on the left. Check the Status Selector dropdown in the header: it must show active. A workflow must be saved with active status — not just set to active in the dropdown — before the Trigger button appears. If the status was already active and you saved it, you will see the Trigger button on the far right of the header.
Click Trigger. The button label immediately changes to Triggering... and becomes unclickable for a moment while DPMS communicates with the backend. Once the request completes, the button returns to its normal state. To confirm the workflow actually ran, navigate to the Workflow Queue (use the Queue button in the Workflow Navigation Menu): a new execution record should appear there within seconds.
Tip: TheTriggerbutton only appears when two things are both true: (1) the workflow contains at least one time-based trigger node (such as a weekly schedule or a "DSR remaining days" trigger), and (2) the workflow's status has been saved asactivein the database. Changing the status dropdown toactivebut not yet clickingSaveis not enough — the button will not appear until after the save completes.
Stopping a runaway or erroneous workflow
If a workflow has been triggered — either automatically or manually — and is causing unintended changes to your compliance records, you can halt it immediately.
Navigate to the Workflow Queue (or to the execution list visible on this screen). Find the execution row where the Status column shows the run is currently in progress. In that row, you will see a black Stop Workflow button. Click it. The button briefly shows a spinning icon while the stop request is processed — do not click again. Within seconds, the execution is halted, the row's status updates, and the Stop Workflow button disappears from that row (because the run is no longer in progress).
Heads up: There is no confirmation dialog. The moment you click Stop Workflow, the execution is immediately halted on the backend. If you click it by mistake, the run cannot be resumed. You would need to trigger the workflow again from scratch.After stopping a workflow, open it in the Editor to investigate what went wrong before re-running it.
Setting up a new workflow from scratch and saving it as a draft
If you need to build a new workflow — for example, a manually triggered compliance report — start by clicking the Editor navigation button on the left.
The canvas opens with the default name "Blank Workflow" showing in the header. Click the name field and type your desired name (for example, "Quarterly Compliance Report"), then press Enter to confirm. The name is not yet saved to the server — it is held in memory until you click Save.
Next, add nodes using the Workflow Editor Menu on the left. Click a category button (for example, Manual Trigger) to expand a submenu. The submenu shows a search field and a scrollable list of available nodes. Type in the search field to filter by name. Click a node in the list to place it on the canvas. Repeat this for other node types you need (for instance, a Send Email node from the Service category). To connect two nodes, drag from the output slot on one node to the input slot on another.
When you are satisfied with the initial structure, check that the Status Selector in the header reads draft — this is the correct status for a workflow that has not yet been fully tested. Click Save. The button shows Saving... briefly, then turns green with Saved for three seconds before returning to its normal black state. The browser URL updates to include the new workflow's ID, confirming it has been stored in the database.
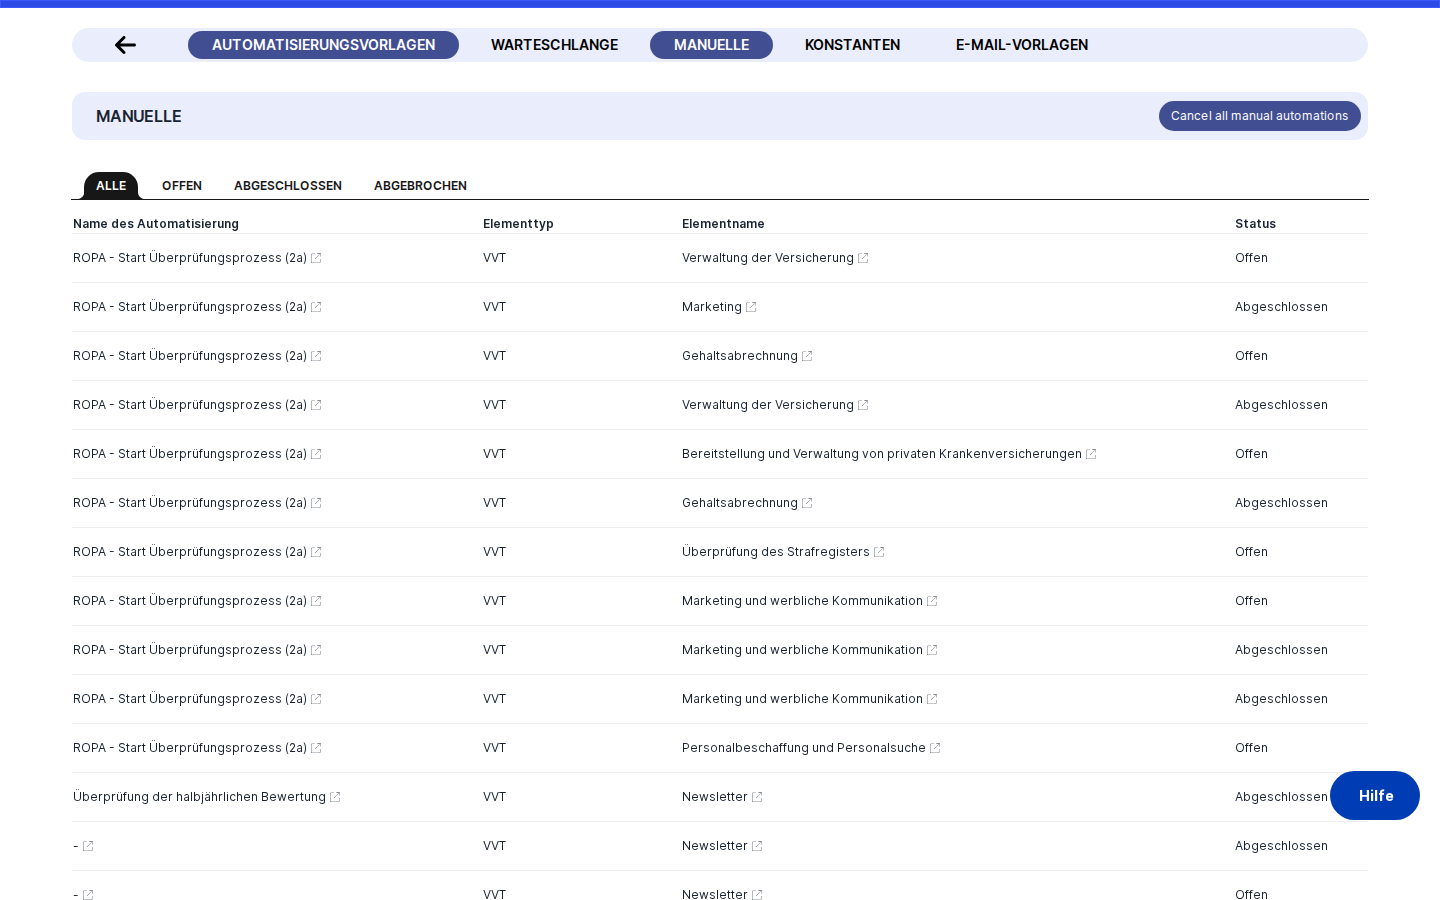
Reviewing which DPMS records were affected by a workflow run
When a workflow runs, it may update statuses, create tasks, or send notifications for specific DPMS records (such as a ROPA entry, a vendor, or an assessment). In the execution list, each row contains inline links — shown with a small external-link icon — that take you directly to the affected record.
Click the linked name in the row to open the detail page for that DPMS element in the current tab. This lets you verify, for example, that a vendor record's status was updated correctly, or that a task was created on the right ROPA entry. If the record was deleted since the workflow ran, following the link will result in a "not found" state on the target page.
Field reference
Workflow Name field — The editable name shown in the header. Click it to type a new name and press Enter to confirm, or Escape to cancel. If you clear the field and press Enter without typing anything, the change is ignored. Names are stored per language; if your DPMS instance is multilingual, editing this field in your current language resets translations in other languages. The name is only saved to the server when you click Save.
Status Selector — A compact dropdown with three options:
draft— The workflow is under development. It will not respond to real-world trigger events. It can be saved even if it contains configuration errors.active— The workflow is live. It will fire automatically when its trigger condition is met, and theTriggerbutton will appear in the header (for time-based workflows). Active workflows cannot be saved if they contain validation errors — fix the flagged node first.inactive— The workflow is paused. It will not fire, but it is not deleted.
Notification toggle — Controls whether this workflow sends automated notification emails when it runs. Turn it off during testing to avoid sending emails to real recipients. The setting is saved when you click Save.
Save button — Persists all current changes (name, status, notification setting, and the full canvas layout) to the server. The button shows Saving... during the request, then briefly shows Saved (green) on success or Not Saved (red) on failure.
Trigger button — Only visible when the workflow contains a time-based trigger node and has been saved with active status. Clicking it manually fires the workflow immediately, as though its scheduled trigger had just occurred.
Stop Workflow button — Appears in an execution row only while that execution is actively running (status is "open"). Clicking it immediately halts the execution on the backend with no confirmation step.
How this connects to the rest of DPMS
The Workflow module is the automation backbone of DPMS. Workflows coordinate the reminders, status updates, approvals, and review processes that run across your entire compliance record set. The Manual Workflow Runs screen is the operational layer that makes this automation visible and controllable.
From this screen you can navigate directly to all other parts of the Workflow module using the left-side navigation buttons: the Workflow Editor (to build or edit workflows), the Workflow Queue (to see the full historical log of all executions), Workflow Constants (shared configuration values that your workflow nodes can reference), and Email Templates (the message templates that "Send Email" nodes use).
Several other parts of DPMS feed data into the workflow canvas:
- Workflow Constants — If no constants have been defined, any workflow nodes that rely on constant values will have empty dropdowns in their configuration.
- Email Templates — Nodes that send emails require at least one email template to exist. If none are configured, those nodes cannot be completed.
- Users, Roles, and Audiences — Nodes that assign tasks or send targeted notifications pull their recipient lists from your DPMS user and audience management. These must be populated for those node options to appear.
- Statuses — Nodes that filter or update the status of ROPA entries, vendors, assessments, tasks, or other elements rely on the statuses configured in your DPMS settings.
After manually triggering a workflow from this screen, the resulting execution record will appear in the Workflow Queue, which is the definitive log of all workflow runs across your organisation.
Tips & common pitfalls
Tip: Always save the workflow withactivestatus before expecting theTriggerbutton to appear. Changing the status selector in the dropdown alone is not enough — the status must be written to the database by clickingSave.
Heads up: If you are working on an active workflow and introduce a configuration error (for example, leaving a required field on a node empty), DPMS will block saving withactivestatus and highlight the problematic node in red on the canvas. Switch the status todraft, save to preserve your progress, fix the error, then switch back toactiveand save again.
- The
Stop Workflowbutton has no undo. Once clicked, the execution is immediately halted. If you triggered the workflow unintentionally, simply trigger it again once you are ready. - Inline element links in execution rows can become stale. If a DPMS record (such as a vendor or ROPA entry) was deleted after a workflow ran, following the link from the execution row will result in a "not found" page. The execution history record itself remains intact.
- Workflow names are language-specific. If your system supports multiple languages and the workflow name has been translated, editing the name field in the header will clear the translations in other languages. The system flags the name as needing re-translation. Avoid using the inline name editor if preserving existing translations is important.
- Node usage order is stored per browser. The Workflow Editor Menu sorts node types by how frequently you use them, based on data stored in your browser. If you switch to a different computer or clear your browser data, nodes revert to their default order.
- Validate the canvas before activating. Draft workflows can be saved with errors, but switching to
activestatus will fail at save time if any node is misconfigured. Use the draft phase to test your structure, then activate only when everything is confirmed.