
Workflow constants
Workflow Constants
Workflow constants are the building blocks of reusable automation. Instead of typing the same email address, numeric threshold, or date into every workflow that needs it, you store that value once — here — and every workflow across your DPMS installation can read it by name. When the value changes, you update it in one place and every workflow picks up the new value automatically. This screen is for anyone who designs, maintains, or audits automated workflows: compliance officers, DPOs, IT administrators, and risk managers who want consistent, maintainable automation without fragile, hard-coded data.
How to open it
- In the main sidebar, navigate to the Workflows section.
- Look for the horizontal navigation bar at the top of the Workflows area.
- Click the Constants tab.
You land directly on the constants list at /workflow/constant.
Heads up: Creating and editing constants requires the workflow creation permission. If you only have read access, you can still see the full list — useful for audits and reviews — but the Create button will not appear.
What you see
The screen is split into two visual layers. Across the very top runs the black header bar shared by every section of the Workflows module — Queue, Editor, Email Templates, and Constants all sit under it. The horizontal tab strip inside that bar lets you jump between sections without leaving the module.
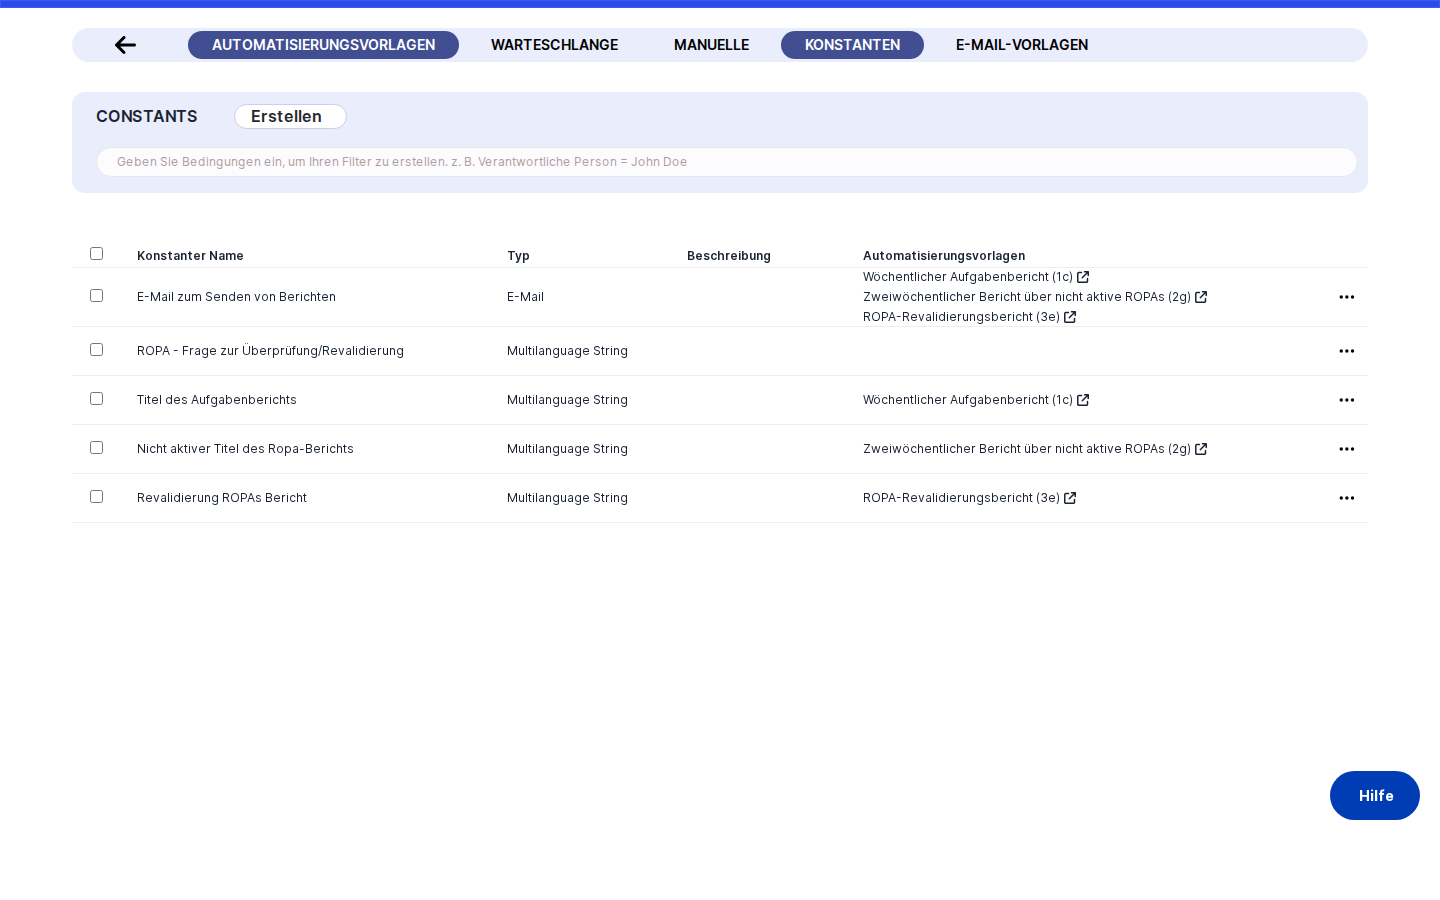
Below the header, the main content area shows a flat, scrollable data table listing all workflow constants defined for your company. There are no category tabs or filters above the table — every constant appears in a single unified list regardless of its data type. The page title reads Constants.
Each row represents one constant and shows four columns: the constant's name, its type (Text, Integer, Email, Secret, and so on), an optional description, and a Workflows column that lists every workflow currently wired up to that constant as clickable links. At the far right of every row there is a delete button. The table loads more rows automatically as you scroll down — no manual pagination needed.
Working with this screen
Creating your first constant
Say your compliance team wants every automated notification workflow to send alerts to the same DPO email address. Rather than typing that address into each workflow individually, you create a constant once.
- Click the Create button at the top right of the constants list. A small dropdown appears with a single option: Create Constants. Click it.
- You are taken to the creation form. Type a clear, meaningful name into the Constant Name field — something like "DPO Email Address" — so anyone building a workflow later knows exactly what they are picking.
- Open the Type dropdown and select Email. The form immediately shows an email-style input for the value.
- Type the DPO's email address into the Constant Value field.
- Optionally, add a Description explaining what this constant is used for — for example, "Routes all automated compliance alerts to the current DPO." This description appears in the constants list and helps colleagues understand the constant at a glance.
- Click Save. DPMS stores the constant and returns you to the list, where the new entry appears with an empty Workflows column (no workflows reference it yet — that happens when a workflow designer opens the Workflow Editor and wires a node to this constant).
Tip: Always choose the correct Type before filling in the value. If you change the type after entering a value, the form clears the value automatically — by design, because a value stored as a date cannot be meaningfully reused as text. Select the type first, then type the value.
Updating a constant that is already in use
Suppose your risk team has decided to shorten the overdue threshold for Data Subject Requests from 28 days to 21 days. This number is stored as an Integer constant called "DSR Overdue Threshold" and is referenced by three active workflows.
- Find the constant in the list — you can scroll or let the infinite scroll load more entries.
- Click anywhere on the row (except the delete button). You are taken to the edit form, showing the current value "28" in the Integer field.
- Change the value to "21".
- Click Save.
Because this constant is already linked to workflows, DPMS does not save immediately. Instead, a notification appears listing the names of all affected workflows as clickable links — each opens the Workflow Editor in a new browser tab so you can inspect the full workflow graph before committing. Review the list to make sure no unexpected workflows are affected.
- Once you are satisfied, click the confirm button inside the notification. The value is saved, and all three workflows will use "21" the next time they run.
Heads up: This confirmation step is not optional and cannot be skipped. If you dismiss the notification without confirming, nothing is saved. You must explicitly click confirm to proceed.
Setting up a ROPA-scoped constant
When your organisation needs a workflow to automatically target a specific subset of Records of Processing Activities — say, all records owned by the Legal team — you create a ROPA-type constant instead of hardcoding individual record IDs.
- Click Create Constants and give the constant a descriptive name, such as "Legal Team ROPAs".
- In the Type dropdown, select ROPA. The value field transforms into two linked selectors.
- In the Users multi-select, choose the members of the Legal team. This acts as a filter — only ROPA records where these people are listed as responsible persons will appear in the next selector. Selecting users here automatically clears any ROPA records you may have chosen previously.
- In the ROPA records selector below, search for and select the relevant processing activity records. The list is already pre-filtered by the users you selected. You can type to narrow the results further.
- Click Save.
Tip: Always set the Users filter first, then pick the ROPA records. If you add or remove users later, your ROPA selection is cleared and you will need to re-select.
Storing a secret credential for external integrations
Some workflow nodes need to authenticate to external services — for example, making an HTTP call to a ticketing system. Sensitive credentials like API keys should be stored as Secret-type constants so they are never displayed in plain text anywhere in the UI.
- Click Create Constants, name the constant clearly (for example, "Ticketing System API Key"), and select Secret as the type.
- Paste or type the API key into the masked value field. The value displays as dots — it is never shown in plain text.
- Click Save.
Heads up: Once a Secret constant is saved, there is no "reveal" button. If you need to verify or rotate the key, you must type the new value in full and save again. Keep a record of secret constant values in your team's password manager — do not rely solely on DPMS for this.
Reviewing which workflows use a constant (auditor view)
An auditor or read-only compliance reviewer can navigate to this screen without any write permissions and use it to understand the scope of workflow configurations.
Look at the Workflows column for any constant in the list. Each workflow name shown there is a clickable link (marked with an external-link icon) that opens the full Workflow Editor for that workflow in a new browser tab. You can trace exactly which node inside the workflow consumes the constant value, confirm the configuration is as expected, and return to the constants list — all without changing anything.
If the Workflows column for a constant is empty, no saved workflow currently references it. Note, however, that a constant might still be selected inside a workflow that has not been saved yet, so treat an empty Workflows column as a minimum indication of usage rather than a definitive "unused" status.
Deleting a constant you no longer need
- Before deleting, check the Workflows column for that row. If any workflow names appear there, those workflows will lose their configured value if you proceed — the Workflows column is your warning system.
- If the Workflows column is empty (or you have already updated the affected workflows to use a different constant), click the delete button at the right edge of the row.
- Confirm the deletion in the prompt that appears.
The constant is removed from the list and will no longer appear in workflow node dropdowns.
Field reference
- Constant Name — A human-readable label for the constant, such as "Review Threshold Days" or "DPO Email Address". Supports multiple languages via the translation button next to the field. Changing the name in one language marks it as needing re-translation in others. Not technically enforced as required, but a nameless constant is nearly impossible to identify in a workflow dropdown — always provide a name.
- Type — The data format of the constant's value. Determines which input control appears for the value and how workflow nodes interpret the data. Options are:
- Text — Free-form single-line text. Default if nothing is selected.
- Integer — Whole numbers only (no decimals).
- Decimal — Numbers with up to two decimal places.
- Email — Validated as a properly formatted email address.
- Multilanguage — Text that can have a different value per active language in your DPMS installation.
- Date — A calendar date without time, entered via a date picker.
- Date and Time — A calendar date with time.
- Secret — Masked input; the value is never shown in plain text after saving.
- ROPA — Links the constant to one or more Records of Processing Activity, optionally filtered by responsible persons.
- Changing the type after entering a value clears the value. Select the correct type first.
- Constant Value — The actual data the constant holds. The input control changes depending on the Type selected. For Secret, the value is permanently masked. For ROPA, two sub-fields appear: Users (filters the ROPA list) and ROPA records (the actual records to include). Technically optional at save time, but a constant with no value will pass a null or empty result to any workflow node that reads it.
- Description — An optional, multi-line, multilanguage explanation of the constant's purpose. Appears in the Description column of the constants list. Not required, but highly recommended for any constant that will be used by more than one person or workflow.
How this connects to the rest of DPMS
Constants are the foundation layer of the workflow automation system. Before you build any workflow in the Workflow Editor that needs a shared value — a notification address, a threshold, a date, a credential — you define that value here first. The Editor reads the full constants list when it loads, making every constant you have defined available as a selectable input inside workflow node configuration panels.
Once you save a constant here, it is immediately available the next time any workflow designer opens the Editor. The Workflow Queue also interacts with constants indirectly: when an operator investigates a failed or misbehaving workflow instance in the queue, they may trace the problem to a misconfigured constant value and navigate here to correct it.
After creating or updating constants, return to the Workflow Editor to wire the new values into the appropriate workflow nodes, or ask the workflow designer on your team to do so. A constant that is not referenced by any workflow node has no effect — it exists in the list but does not influence any running automation.
Tips & common pitfalls
Tip: Pick the correct Type before you type the value. Changing the type after entering a value silently clears that value — the form resets it by design.
Heads up: Secret constants cannot be read back once saved. There is no "show password" toggle. Always keep a copy of sensitive values in a team password manager.
- The confirmation toast is mandatory. When you edit a constant already used by workflows and click
Save, the actual save does not happen until you clickConfirmin the notification that appears. Closing or ignoring the notification cancels the save entirely. - An empty Workflows column is not a guarantee of "unused". It shows workflows that have been saved with a reference to this constant. A workflow node configured to use this constant but not yet saved will not appear there. Treat it as a lower bound, not a complete audit trail.
- ROPA constants reset their record selection when you change the Users filter. Set the responsible-person filter first, then pick the ROPA records. Adding or removing users after you have chosen records clears your selection.
- In-progress form data persists within your browser session. If you start creating a constant, navigate away without saving, and come back to the create form in the same session, your previous entries may still be there. This is intentional and protects you from accidental data loss — but if you want a clean slate, simply clear the fields manually.
- Multilanguage names and descriptions matter for international teams. If your DPMS is configured for multiple languages, use the translation button next to the Name and Description fields to enter values in each language. A constant whose name only exists in English will appear blank in the workflow node dropdown for users working in German or French.