
Create a retention or deletion rule
Creating a Retention or Deletion Rule
The Retentions & Deletions module is where your organisation turns legal obligations into structured, auditable records. Every data protection law from GDPR Article 5(1)(e) to sector-specific retention legislation requires you to demonstrate that personal data is held only for as long as necessary — and no longer. This screen is where you create each individual rule: you define the duration, the legal basis, when the clock starts, and whether the rule describes a period to keep data or a period to delete it. DPOs, compliance managers, legal counsels, and IT administrators all use this screen as a first step when building out a retention schedule. Without rules here, many other parts of DPMS — including processing activity records, assets, and workflow automation — cannot be linked to a documented retention basis.
How to open it
Navigate to Retentions & Deletions in the left-hand sidebar. On the index page, click the Create button in the top-right corner. A small dropdown appears:
- Choose the standard option to open the manual creation form.
- If your organisation has the Filerskeeper integration active, a second option appears that lets you import pre-built rules from an external legal database.
Heads up: You need at least one of the following permissions to reach this screen: the ability to create retention/deletion records, edit them, or edit records you have been assigned to. If you do not have any of these, the form is replaced by a "Forbidden" page. Contact your system administrator if you think you should have access.
What you see
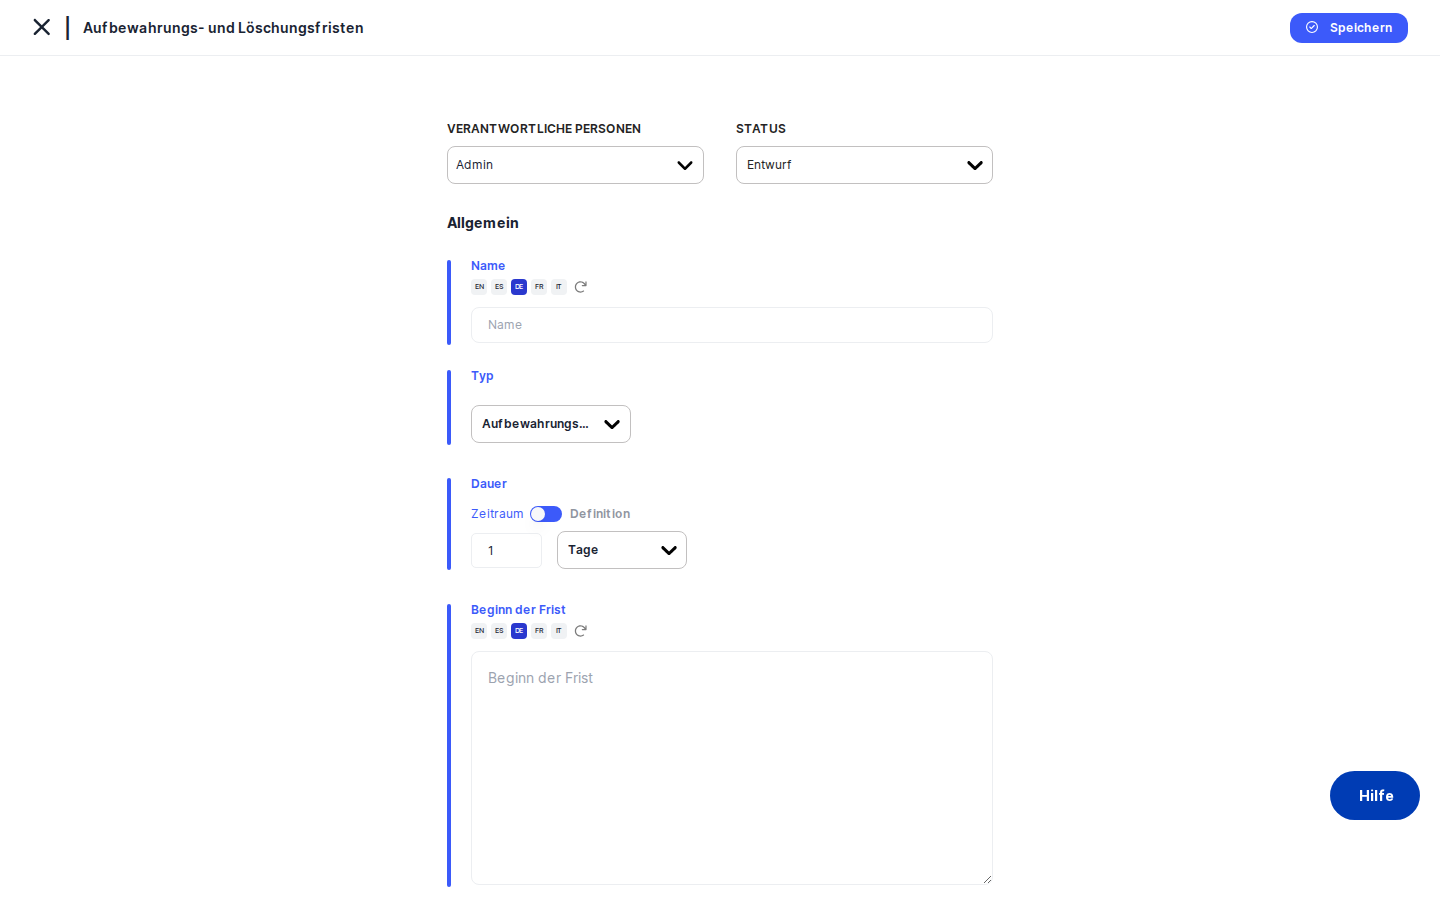
When you open the manual creation form, the outer shell looks the same as every other creation screen in DPMS. At the top left is a back arrow alongside the module title "Retentions & Deletions". At the top right is a blue Save button. The left-hand navigation collapses to icon-only view, giving the form more space.
The main content area is a single white card. A bold General heading anchors the top, followed by a blue horizontal rule — a consistent design pattern across DPMS that visually separates the header controls from the form fields. Directly below that bar, on the left side, are the status selector and the responsible person picker side by side. These apply to the whole record. To the right of them, the form fields run vertically: Name, Period Type, Duration, Period Start, and Legal Reference. Each field has its own small blue-accented label above it.
If you chose the Filerskeeper import path, the layout is different: the status and responsible person controls occupy a narrow left column, while three cascading dropdown filters — Select Country, Select Category, and Select Subcategory — appear on the right. Once you have drilled down to a subcategory, a wide results table fills the lower part of the page, showing the matching legal obligations you can select for import.
Note that the left-side tab menu (General, Assets, Tasks, Assessments, Manage Access, Trigger Workflow, Overview) only becomes visible after you have saved the record and DPMS redirects you to the edit view. On the creation screen itself, you only see the form.
Working with this screen
Creating a rule manually from scratch
This is the most common path. You already know the legal obligation you need to document — perhaps from a review of national employment law or a GDPR compliance audit — and you want to add it to your retention schedule.
- Fill in the Name. Click the
Namefield and type a clear, descriptive title such as "Employee payroll records – 10 years" or "Customer contact data – 3 years". Because DPMS supports multiple languages, you can also provide translations using the translation helper icon next to the field. If your organisation has automatic translation enabled, DPMS will queue the translations for you once you save. A meaningful name is essential: it is what other users and linked records will see when searching or browsing. - Choose the Period Type. Use the
Period Typedropdown to select either Retention or Deletion. A Retention rule means "we must keep this data for X time". A Deletion rule means "we must destroy this data after X time". This distinction matters for compliance reporting and for any workflows you later configure — the classification is used to categorise the rule in all downstream features. - Set the Duration. The
Durationsection has two modes, toggled by a small switch labelled Timeframe and Definition. - In Timeframe mode (the default), enter a whole number in the numeric box — for example,
10— and then choose a unit from the dropdown: Days, Weeks, Months, or Years. Together, these two values form the duration. Leave the amount field blank only if you intentionally want a zero-value duration, because DPMS will fill in a default value automatically rather than showing a validation error. - Switch to Definition mode if the applicable regulation does not specify a countable period. The numeric inputs disappear and are replaced by a dropdown where you choose Unspecified (no period has been set yet), Indefinite (retained without a fixed end date), or Permanent (retained forever, as with certain legal archives). Be careful when switching between the two modes: toggling resets both the number and the time unit to their defaults, so if you have already typed "5 Years" and accidentally click the toggle, you will need to re-enter those values.
- Describe the Period Start. Click the
Period Starttext area and write a description of the event that starts the retention clock — for example, "From the end of the contractual relationship" or "From the date of the last transaction". This field supports multiple languages and automatic translation. Although it is not strictly required by the form, it is strongly recommended: regulators often focus just as much on the trigger event as on the duration itself. - Add the Legal Reference. Click the
Legal Referencetext area and type the specific law, regulation, article, or internal policy that authorises or requires the retention period — for example, "GDPR Art. 5(1)(e)" or "Swiss Code of Obligations, Art. 962". This is the field auditors will look at when verifying that your retention periods are grounded in legitimate obligations rather than arbitrary business preference. Automatic translation applies here too. - Set the Status and assign a responsible person. In the upper section of the form, use the
Statusdropdown to set the record's lifecycle state. A freshly drafted rule would typically start as Draft while it awaits internal approval, then be moved to Active once approved. Use theResponsible personpicker to assign one or more named platform users who are accountable for this rule — for instance, the legal counsel who owns the underlying regulatory obligation. - Save. Click the blue
Savebutton at the top right. DPMS posts the data to the backend, shows a success notification, and redirects you to the new record's detail page. From there the full tab menu is visible, and you can link the rule to assets, tasks, and assessments.
Importing obligations from the Filerskeeper database
If your organisation has the Filerskeeper integration enabled, you can import entire sets of pre-built legal retention obligations rather than typing each one by hand. This is the fastest way to populate a retention schedule from scratch for a new jurisdiction.
- From the Retentions & Deletions index, click Create and choose the Filerskeeper database option. The import screen loads.
- Select a country. The
Select Countrydropdown lists all jurisdictions that your organisation has activated in the Filerskeeper integration settings. Choose the country whose laws you want to import — for example, Germany or Switzerland. The categories dropdown populates automatically once the country is selected. - Select a category. The
Select Categorydropdown fills with legal areas available for your chosen country — for example, Employment Law, Financial Records, or Healthcare. Choose the relevant area. The subcategories dropdown then populates. - Select a subcategory. The
Select Subcategorydropdown narrows your selection further — for example, "Employee Personnel Files" within Employment Law. Once you select a subcategory, DPMS fetches the matching obligations and displays them in the table below. - Review the obligations table. The table shows each obligation's Category, Record Type, From (the start event), Duration, Period Type, and Legal Reference. You can click the link icon in the Legal Reference column to open the source legislation in a new browser tab and verify it. Review each row carefully before selecting it.
- Check the rows you want to import. Tick the checkbox next to each obligation you want to add. Note that there is no "select all" checkbox at the top of the column — you must select each row individually by design, to encourage deliberate review rather than bulk imports without scrutiny.
- Set the status and responsible person using the controls in the upper-left section, just as in the manual path. These values will be applied to every record you import in this batch.
- Click Save. DPMS creates one separate retention/deletion record for each ticked obligation, pre-populating the Name, Duration, Period Start, and Legal Reference fields from the Filerskeeper data. You are then redirected to the index, where all newly created records appear. The legal reference in each imported record will include a clickable link to the source law — this URL is populated automatically from the Filerskeeper data and is not editable from the creation form.
Editing an existing rule's duration
Once a rule has been saved, you can reopen it by navigating to its detail page and editing the General tab. This is useful when a regulation changes or when you realise the original duration was set incorrectly.
Open the record, find the Duration section, and make your changes. If you need to switch from a numeric period to a definitional one — for example, if a regulation now says data can be kept "indefinitely for statistical purposes" — click the Timeframe / Definition toggle to switch modes, then select the appropriate definition value. When you click Save, DPMS updates the record and the detail page refreshes with the new duration.
Setting up a workflow trigger for a rule
Once a retention rule is saved and you are on its edit screen, click the Trigger Workflow tab in the left-side menu. This tab lets an IT administrator or DPO configure automated workflows that fire based on this rule — for example, triggering a review approval process when a retention period is about to expire. This tab requires a specific workflow assignment permission; if you do not hold it, the tab shows a "Forbidden" message instead of the configuration form.
Field reference
- Name — The human-readable title of the rule. Required. Supports multiple languages and automatic translation. Appears in all DPMS lists, dropdowns, and linked records. Example: "Customer contact data – GDPR – 3 years".
- Period Type — Whether this is a Retention rule (keep data for this duration) or a Deletion rule (destroy data after this duration). Required. Affects how the rule is displayed and how workflow triggers are categorised.
- Duration (amount) — A whole number representing the quantity of the time unit below. Minimum value is 0. If left blank when you save, DPMS silently substitutes a default value — always review this field before saving. Only shown in Timeframe mode.
- Duration (time unit) — The unit paired with the amount above: Days, Weeks, Months, or Years. Only shown in Timeframe mode.
- Duration (definition) — Shown instead of the numeric inputs when the toggle is set to Definition mode. Choose from Unspecified (no period established), Indefinite (no fixed end), or Permanent (retained forever).
- Period Start — A text description of the event that starts the retention or deletion clock. Not required by validation but highly recommended. Supports multiple languages. Example: "From the end of the employment relationship".
- Legal Reference — The law, regulation, article, or internal policy that authorises the retention period. Not required by validation but essential for auditability. Supports multiple languages. When imported from Filerskeeper, this field is pre-populated and the record will include a clickable external link to the source text once saved.
- Status — The lifecycle state of the record. Defaults to the platform's configured default status. Custom statuses can be added under Compliance Settings → Statuses.
- Responsible person — One or more named platform users assigned as accountable for this rule. Multiple assignees are supported.
How this connects to the rest of DPMS
Retention and deletion rules sit at the foundation of your compliance programme. Once a rule exists, other parts of DPMS can reference it:
- Processing activities (ROPAs) can be linked to a retention rule via the Assessments tab of the rule's detail page. Without rules here, ROPAs cannot document their legal retention basis in a structured, searchable way.
- Assets can be linked via the Assets tab, so that risk managers can see which deletion policy governs a given system or data store.
- Tasks can be linked via the Tasks tab for tracking remediation work, such as an annual review of the rule.
- Workflow triggers configured on the Trigger Workflow tab depend on the Period Type you set here — the workflow engine uses this classification to route and categorise automations.
- Dropdown selectors across DPMS — whenever another form asks you to link a retention rule (for example, in a ROPA or assessment), the list it shows is populated from all records in this module. New rules you create here become immediately available in those selectors.
After creating a rule, consider your next steps:
- Link it to the assets and processing activities it governs (via the Assets and Assessments tabs on the record's detail page).
- If you want automated reminders or approval workflows, configure these on the Trigger Workflow tab.
- Assign a task to schedule periodic review of the rule's accuracy.
Tips & common pitfalls
Heads up: If you clear the amount field and click Save, DPMS will not show a validation error. Instead, it silently saves the rule with a default duration value. Always double-check the Duration field before saving, especially after editing.Heads up: Toggling between Timeframe and Definition mode resets both the amount and the time unit to their defaults. If you have already entered "10 Years" and accidentally click the toggle, you must re-enter the values after switching back.
- Filerskeeper must be configured in Integration Settings before the database import option appears in the Create dropdown. If you do not see the option, ask your IT administrator to enable the integration.
- There is no "select all" checkbox in the Filerskeeper obligations table. Each row must be ticked individually. Plan for this when importing from a long list.
- Automatic translation applies to three fields only — Name, Period Start, and Legal Reference. The Period Type and Duration use enumerated values that DPMS translates automatically at display time, so those fields do not need translation input from you.
- Navigating away from the creation form before saving loses all your work. There is no auto-save or draft recovery across sessions. If you leave the page — including by clicking the back arrow — everything you have typed will be cleared.
- Imported Filerskeeper records include a source URL that makes the Legal Reference text a clickable link on the detail page. This URL is set automatically and cannot be edited from the creation form. If the URL is incorrect, you would need to address it after creation by contacting your system administrator.