
Log a new meeting or activity
Log a New Meeting or Activity
The Meetings & Activities module is where your organisation builds its formal audit trail for all compliance-related events — committee meetings, training sessions, incident reviews, management briefings, and more. This creation screen is where that trail begins. By filling in a single structured form you capture who was present, when the event took place, what type of activity it was, and what was discussed or decided. The resulting record is a living object inside DPMS that can be linked to follow-up tasks, supporting documents, and automated workflows, giving auditors and regulators concrete evidence that your data protection governance is active — not just theoretical.
How to open it
- In the left-hand sidebar, click Meetings & Activities.
- On the index (list) page, click the Create button in the top-right area of the screen.
- If a small menu appears, choose the option for a blank, manual record (not an import).
The system navigates to /meetings/activities/create and loads the creation form.
Who can access this screen: You need at least one of the three creation or editing permissions for the Meetings & Activities module. Users who can only read records will see the index list but will find the Create button hidden or inactive. If you land on this URL without the right permissions, DPMS shows a 403 error page instead of the form.
What you see
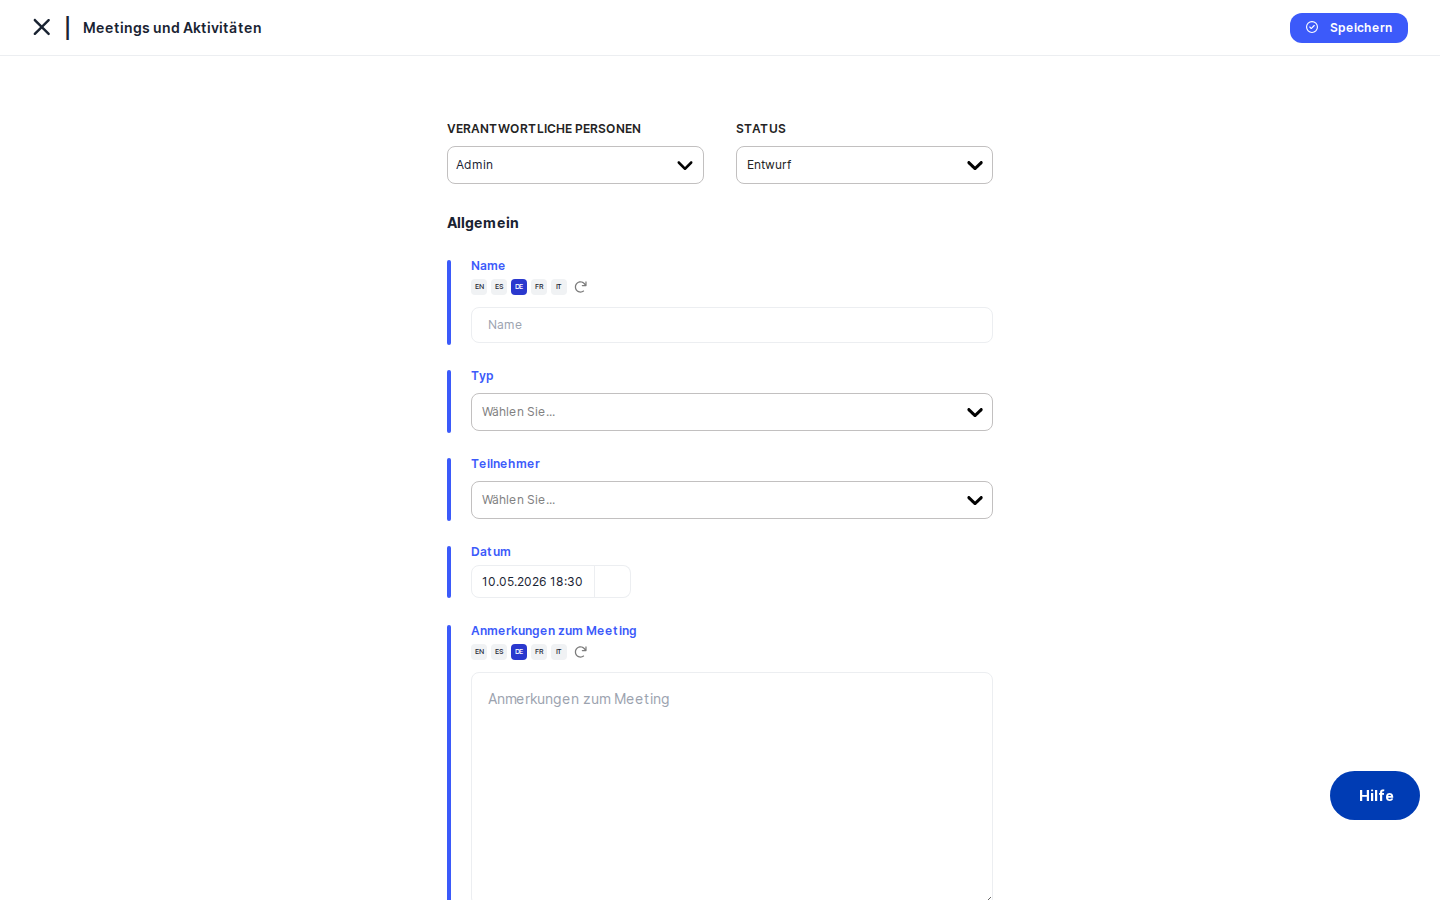
The creation screen has a clean, single-column layout. A thin blue vertical bar along the left edge of the form signals that you are in an active creation session — a visual convention shared across all DPMS creation screens.
At the very top of the form, before the individual fields, sits a persistent action bar. This bar stays visible no matter how far down you scroll and contains three controls: a title label ("General"), a Status dropdown, and a Responsible Person selector. These two controls let you set the record's lifecycle stage and ownership before you even type a name.
Below the action bar, the form fields stack vertically in order: Name, Type, Participants, Date, and Meeting Notes. Every field label appears in blue, making it easy to scan down the form quickly. The Name and Meeting Notes fields each have a small translation button alongside them, reflecting DPMS's multilingual capability.
On the left side of the page, a vertical tab menu — the element navigation — lets you switch between sections of this record without leaving the page. The tabs available when creating a new record are: General, Tasks, Documents, Manage Access, and Trigger Workflow Overview. The General tab is selected by default and is where you will spend most of your time during initial creation.
A breadcrumb at the very top of the page shows your navigation path (for example, "Meetings & Activities › General"), and a back arrow lets you return to wherever you came from.
Working with this screen
Logging a meeting that has already taken place
This is the most common scenario — a DPO or compliance officer has just finished a data protection committee meeting and needs to create the official record.
- Set the status. In the action bar at the top of the form, open the Status dropdown. Because the meeting has already happened, change the status from the default (usually "Draft") to Active or whichever status your organisation uses for completed events. This keeps your index list accurate from the moment you save.
- Assign a responsible person. Click the Responsible Person selector in the same action bar. Search for your name or the DPO's name and select it. This makes clear who owns and maintains the record. You can select more than one person if accountability is shared.
- Give the record a clear name. Click the Name field and type a descriptive title — for example, "Q3 Data Protection Committee Meeting – October 2024". This name will appear in the index list, the breadcrumb, and anywhere the record is referenced across DPMS, so make it specific enough to find later. If your organisation operates in more than one language, use the translation button alongside the field to add the name in other languages as well.
- Select the activity type. Click the Type dropdown and choose the category that best describes this event — for example, "Committee Meeting", "Training", "Audit", or "Incident Review". If the right category does not yet exist, you can type it directly into the dropdown and DPMS will create it as a new tag in your organisation's tag library. A well-populated Type field makes it much easier to filter and report on records by category later on.
- Add participants. Click the Participants field and search for each attendee by name. You can select as many people as needed. This is your compliance evidence that specific people were present — invaluable if a regulator asks who was briefed on a new policy or who attended a training session.
- Set the date and time. Click the Date field and use the picker to choose both the calendar date and the exact time (hours and minutes) of the meeting. Unlike some other DPMS forms, this field does not default to today's date for new records, so make it a habit to fill it in before saving. If you forget, the Date column in the index list will show blank.
- Paste or type the meeting notes. Click the Meeting Notes text area and enter the substance of what was discussed or decided — agenda items, decisions, action points. This is the free-text body of the record, and it is exactly the kind of information that tends to get lost in email threads or Word documents. Like the Name field, Meeting Notes supports multiple languages if your setup requires it.
- Save. Click the
Savebutton at the bottom of the General tab. DPMS sends the record to the server and immediately redirects you to the detail view of the newly created record, where you can see all the information displayed in read mode. If you arrived at the creation form from another module, you will be returned to that originating page instead.
Linking follow-up tasks to a meeting record
After saving the General tab, you may want to tie existing tasks to the meeting — for example, actions that arose from a committee decision.
- In the element navigation on the left, click the Tasks tab. A table of existing tasks in the system appears.
- Find the relevant tasks using the table's search or filters, then select them using the checkboxes.
- Click
Saveon the Tasks tab. DPMS links those tasks to the meeting record. - Return to the detail view and click the Tasks tab to confirm that the links appear correctly.
Heads up: Each tab has its own Save button and its own save action. Filling in the General form and then clicking the Tasks tab does not automatically save your General data first. Always save the General tab before switching to Tasks or Documents to avoid losing your work.Attaching supporting documents
If the meeting reviewed a specific privacy policy or procedure document, you can create an evidence link directly from this screen.
- Click the Documents tab in the element navigation.
- A searchable table of policies and documents in DPMS appears. Find the document that was reviewed or referenced during the meeting.
- Select it using the checkbox and click
Saveon the Documents tab.
The meeting record now carries a direct link to that document, making it easy for auditors to trace the evidence chain: "this is the meeting where we reviewed this policy, and here is the record to prove it."
Logging a meeting with an external participant who is not yet in the system
Sometimes an external data processor representative, an external auditor, or a consultant attended a meeting but is not yet a user in your DPMS instance.
- Fill in the Name, Type, and Date fields as normal.
- Click the Participants field and type the external person's name. Because DPMS supports adding new users inline from this field, you will be offered the option to create a new person.
- Complete the new user's details and add them as a participant.
- Click
Saveon the General tab.
Heads up: Creating a new participant inline does more than add a name to a list — it creates a new user account in DPMS and triggers a background refresh of the User Management list in IT Settings. If the external person should not have login access to your DPMS system, check with your IT administrator about the implications before doing this.
Assigning a workflow for review and sign-off
If your organisation requires that meeting records be formally reviewed or approved before they are marked final, you can trigger an automated workflow directly from this screen.
- Click the Trigger Workflow Overview tab in the element navigation. (If you see a 403 error, you need the "assign workflow" permission for this module — contact your system administrator.)
- The available workflow configurations for meetings and activities appear. Select the appropriate workflow template — for example, "CPO Review and Approval".
- Click
Saveon the Trigger Workflow Overview tab. The workflow is triggered, and the designated reviewer receives a notification to review the record.
Tip: If a workflow is already completed or cancelled on a record, theSavebutton on the Trigger Workflow Overview tab is hidden and aCancel Workflowbutton may appear in its place. This is expected behaviour, not a bug.
Restricting access to a sensitive meeting record
Some meeting records — a disciplinary review, a board-level data breach discussion — should only be visible to specific people, beyond the default module-level permissions.
- Click the Manage Access tab in the element navigation.
- Use the form to assign specific users or audience groups to this record. You can control whether they have read or edit access.
- Save the access settings.
Note that audiences and groups must be configured in Compliance Settings › Group Management before they can be assigned here. If the Manage Access tab appears empty, this configuration step has not yet been completed.
Field reference
- Name — The title of the meeting or activity. This appears in the index list and all linked views. Supports multiple languages. There is no hard-coded maximum length, but keeping it descriptive and concise helps with search and filtering. Strongly recommended.
- Type — A category tag drawn from your organisation's tag library. Classifies the activity for filtering and reporting. Not required, but leaving it blank makes records harder to find and analyse. If the dropdown is empty, no tags have been created yet in the relevant tag category — you can create one inline.
- Participants — One or more attendees or involved people. Supports existing DPMS users and new external users created inline. Not required, but critical for compliance evidence. Adding a new person here creates a user account in the system.
- Date — The date and time the meeting or activity took place. Stored as a precise timestamp (date + hours + minutes). Does not default to today on a new record. Not required, but the index list Date column will be blank if omitted — strongly recommended.
- Meeting Notes — Free-text narrative of what was discussed or decided. Supports multiple languages. Not required, but this is the substantive content of the record and should almost always be completed.
- Status — The lifecycle stage of the record. Defaults to the organisation's configured default (usually "Draft"). Select a more appropriate status before saving if the meeting has already taken place. Custom statuses for this module are configured in Compliance Settings › Statuses.
- Responsible Person — The user or users who own and maintain this record. Distinct from Participants (attendees). Not required, but assigning a responsible person improves accountability. Can be left empty and assigned later.
How this connects to the rest of DPMS
Where you come from: The primary route to this screen is via the Meetings & Activities index list. Any other DPMS module that supports contextual linking to meeting records may also route here, and the back button will return you to the correct originating page.
Where you go after saving: On a successful save, DPMS navigates you to the detail view of the newly created record (/meetings/activities/{id}). From there you can edit any field, add linked items, manage access, or trigger a workflow at any time.
What else is affected:
- User Management — If you add a new external participant inline during creation, a user account is created in IT Settings › User Management immediately after the record is saved. The user list refreshes automatically in the background.
- Compliance Settings › Tags — Any new tag you create inline in the Type dropdown is added to the
meetings_activities_typestag category in Compliance Settings. You can manage all activity type tags from there going forward. - Workflow Settings — The Trigger Workflow Overview tab only shows available workflow templates if workflows have been configured in the Workflow Settings area for the meetings and activities object type. If the tab appears empty, no templates have been set up yet.
- Manage Access / Group Management — The Manage Access tab only works if audiences and groups are pre-configured in Compliance Settings › Group Management.
- Multilingual content — The Name and Meeting Notes fields use the organisation's language settings from IT Settings. If only one language is active, the translation button appears but has limited effect.
Tips & common pitfalls
Heads up: Each tab has its own Save button. Switching from the General tab to the Tasks or Documents tab without saving first means your General form data is not yet persisted. Always complete and save the General tab before linking tasks or documents.Heads up: The Date field does not automatically fill in with today's date on a new record. If you save without setting a date, the Date column in the index list will be blank, which makes records hard to sort and filter. Make filling in the date part of your standard workflow.
- New participants become system users. When you type a name in the Participants field and create a new person inline, you are creating a real user account in DPMS — not just a label. If the person should not have system access, discuss the implications with your IT administrator before adding them this way.
- The Type dropdown is empty until tags are created. If no one has yet added any tags to the meetings_activities_types category in Compliance Settings, the Type dropdown will appear empty. You can create a tag on the spot by typing directly in the dropdown, but it is better practice to pre-populate common activity types in Compliance Settings so that categorisation is consistent from the start.
- Custom statuses are configured separately. If a colleague mentions a status option you cannot see in the dropdown, it may be because your organisation's administrator has recently added custom statuses for the meetings_activities_status category in Compliance Settings. Refreshing the page loads the latest status list.
- The Trigger Workflow Overview tab requires a specific permission. Even users with full editing access to the Meetings & Activities module cannot assign workflows without the separate "assign workflow" permission. If you need this capability, ask your system administrator to grant it.
- Saving from the Tasks or Documents tab does not affect the General form. Each tab's Save button is scoped to that tab's content only. If you make changes to the General form and then save on the Tasks tab, the General changes are not included in that save operation.