
Create a legitimate interest assessment
Creating a Legitimate Interest Assessment
The Legitimate Interest Assessment (LIA) screen is where your organisation formally documents and justifies the use of legitimate interest as a legal basis for processing personal data under GDPR Article 6(1)(f). Rather than simply ticking a box, this screen walks you through the complete three-part test — identifying the interest, proving necessity, and weighing your organisation's interests against the rights of the people whose data you process. The result is an auditable record that you can produce during regulatory inspections, subject access requests, or internal reviews. DPOs, compliance officers, and privacy managers are the primary users of this screen.
How to open it
Navigate to Legitimate Interest in the left-hand sidebar of DPMS, then click the Create button on the index page. You can also go directly to the creation URL. To return to and continue editing an existing assessment, click any row in the Legitimate Interest list and then use the edit controls on the detail page.
Access requirement: You need at least one of the following permissions to use this screen: the ability to create legitimate interest records, to edit them, or to edit only the records assigned to you. If none of these apply to your account, DPMS will show a "403 Forbidden" page instead of the form.
What you see
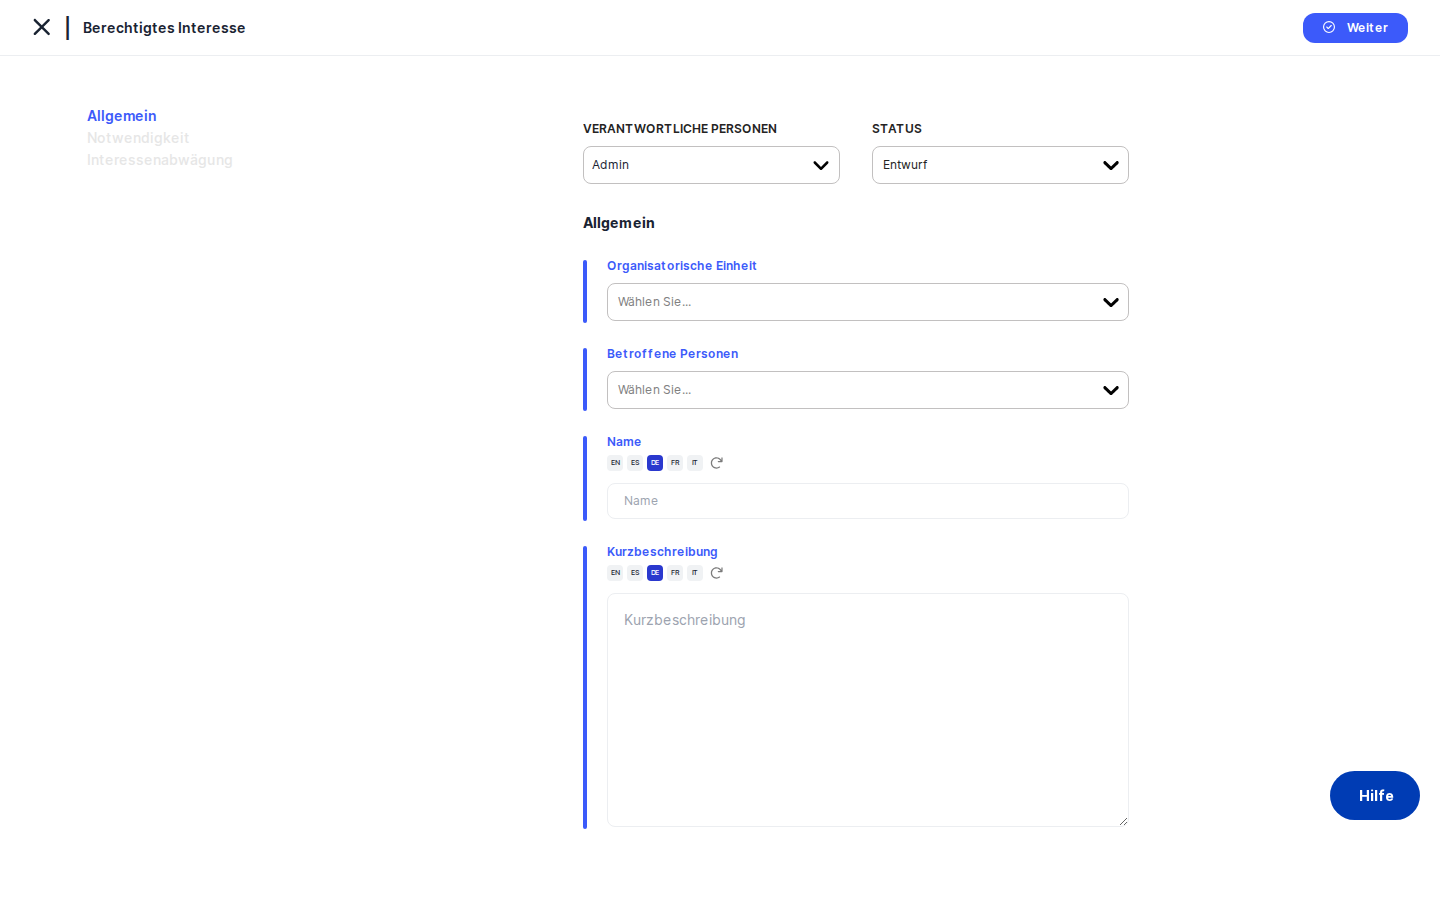
When you land on the creation screen, the layout divides into two zones. On the left is a narrow element menu — a vertical list of tabs: General, Necessity, Balancing of Interests, Tasks, Assessments, and Manage Access. On a brand-new record, all tabs except General appear greyed out. You cannot click them yet — this is intentional. DPMS requires you to give the record a name and save it before the deeper analytical tabs unlock.
On the right is the main form area. A back-arrow link at the top lets you return to the list at any time. Below that, the active tab's fields are displayed inside a card-style panel with a blue vertical highlight bar along its left edge. A small collapse icon on the far left of the menu lets you hide the tab list and give the form more horizontal room.
Once you save the General tab and the record has an ID, all tabs become clickable and you can move freely between them using the left-hand menu.
Working with this screen
Starting a new assessment from scratch
When you arrive on the creation screen, you are on the General tab. This tab captures the identity of the assessment — who owns it, which part of the business it relates to, and what it is called.
Start by checking the Status dropdown at the top of the form card. New records default to Draft, which is usually the right choice at this stage. If your organisation has configured custom statuses under Compliance Settings, those will appear here alongside the system defaults. Leave it as Draft for now and change it once the analysis is complete.
Next, click the Responsible Person(s) selector and add the name of whoever "owns" this assessment — typically yourself, the DPO, or the department head responsible for the processing activity. You can add more than one person. This field is purely an accountability marker; it does not control who can view or edit the record (that is handled separately on the Manage Access tab).
Use the Organisational Unit dropdown to associate the assessment with the correct internal department. This makes the record filterable by business area in the index list. The field is optional, but filling it in pays dividends when you need to produce reports by department.
In the Affected Persons selector, add the categories of data subjects involved — for example, Employees, Customers, or Website Visitors. These are tag-based labels drawn from your system's Compliance Settings. If the tag you need does not exist, you can create it inline. The tags you choose here feed directly into the balance-of-interest analysis on a later tab.
Type a clear, descriptive title in the Name field. This is the primary identifier that will appear in the list and in any linked records across DPMS. If your organisation operates in multiple languages, click the small translation icon next to the field to open the translation panel and add versions in other languages — or use the AI auto-translate button to generate a draft that you can review.
Optionally, write a few sentences in the Short Description text area explaining what the processing activity is and why legitimate interest is being invoked. This context will appear in the read-only detail view and in any exports.
When you are ready, click Save (or Next) at the bottom of the form. DPMS creates the record and immediately redirects you to the Necessity tab, which is now unlocked.
Working through the three-part test
The three-part test unfolds across three tabs. You will be guided through them in order, but you can always navigate back and forth once the record exists.
On the Necessity tab, you will see four text areas. Each one corresponds to a key question that regulators expect you to answer:
- Will processing achieve the goals? — Does the processing actually fulfil the stated purpose?
- Can the purpose be achieved without processing? — If yes, legitimate interest cannot be relied upon.
- Is processing proportional to purpose? — Is the volume and sensitivity of data justified by the need?
- Are there less intrusive means? — Did you consider privacy-friendlier alternatives, and why were they ruled out?
Type your analysis into each field. Every field has a translation icon if you need to provide multilingual versions. None of the fields are technically required for saving, but you should treat them as mandatory for a thorough, defensible assessment. Click Save when done. DPMS saves the record and moves you to the Balancing of Interests tab.
On the Balancing of Interests tab, you document the factors that tip the scales for or against your legitimate interest. Work through the fields from top to bottom:
Use the Persons need special protection text area to note whether any of the data subjects you tagged earlier belong to a vulnerable group — children, employees subject to a power imbalance, people with disabilities, and so on. The presence of vulnerable groups weighs against relying on legitimate interest.
From the Data processing context dropdown, choose either Personal or Professional. This is the only dropdown on this tab — all other fields are free text. Individuals in a professional context (as employees or business contacts) generally have a reduced expectation of privacy compared to private individuals. If the context is mixed or nuanced, choose the closest option and use the Relationship to Persons text area below to add that nuance.
Fill in Relationship to Persons to describe the nature of the relationship between your organisation and the data subjects — for example, employer-employee, service provider-customer, or platform-user.
Use Data directly collected to state whether data came directly from the data subject (who was therefore aware of the collection) or from a third party. If data came from a third party, use the What did the third party disclose? text area to describe exactly what was shared. These two fields work together and feed the transparency analysis.
In Effects of processing on data subjects, describe the potential impact on individuals — positive, neutral, or negative — and how significant it is. Then use Likelihood and severity of effects to estimate how probable those effects are and how serious they would be if they materialised. These two fields are the core of the proportionality analysis.
Once all fields are filled to your satisfaction, click Save. Unlike the previous tabs, this save does not redirect you to another analytical tab — the three-part test is complete. You are now free to link tasks and assessments, or to configure access controls.
Linking tasks and evidence to your assessment
Once the record has been saved, the Tasks and Assessments tabs in the left-hand menu become available.
Click Tasks to open the linked tasks panel. Here you can connect existing tasks from across DPMS to this assessment — for example, a task to implement an opt-out mechanism, to update a privacy notice, or to review a third-party contract. Each linked task row is clickable and takes you directly to the task's detail screen. To link a task, use the link button within the panel and search for the task you want to attach.
Click Assessments to open the linked assessments panel. This lets you attach questionnaire-based assessments — such as vendor questionnaires or risk surveys — to the LIA, providing additional documentary evidence for your balancing test.
Restricting who can see a sensitive assessment
If an assessment involves sensitive HR data, executive decisions, or any information that should only be visible to a subset of your compliance team, use the Manage Access tab.
This tab is only available after the record has been saved for the first time. Once it appears, click it to open the access control form. You can assign specific audience groups or individual users read or write access to this record. Anyone not included in these groups will be unable to see the record, regardless of their module-level permissions.
When you submit the access settings, DPMS saves them and takes you to the detail view of the assessment. From that point on, the record is visible only to the people and groups you have specified.
Adding translations for a multilingual organisation
If your organisation operates across multiple jurisdictions and needs documentation in several languages, every text field on this screen supports multilingual content.
On any tab, click the small translation icon (a globe or flag-like button) next to a text field. A panel opens showing all the languages active in your DPMS installation. You can type translations manually, or click the AI auto-translate button to generate a draft in each language based on the content you have already entered. Review the auto-translated text carefully before accepting it — legal documentation must be precise, and automated translations should always be checked by a qualified reviewer before the record is set to Active.
After an AI translation is applied, a small indicator badge appears next to the field label. This badge is informational only; it does not mean the translation has been approved.
Field reference
Status — The current lifecycle stage of the assessment. Defaults to Draft on new records. Change this to Review when the analysis is ready for a second pair of eyes, and to Active once it has been approved. Custom statuses configured in your Compliance Settings also appear here.
Responsible Person(s) — One or more DPMS users who are accountable for this assessment as a compliance matter. Does not control system-level access — see Manage Access for that. Optional; an empty list does not block saving.
Organisational Unit — The internal department or team this assessment belongs to. Used for filtering and reporting. Optional.
Affected Persons — Tag-based labels identifying the categories of data subjects involved (e.g. Employees, Customers). Drawn from Compliance Settings → Tags → Affected Person. New tags can be created inline. Optional, but strongly recommended as these tags feed the balance-of-interest analysis.
Name — The human-readable title of the assessment. Supports multiple languages via the translation toggle. This is the primary identifier visible in the list and in linked records.
Short Description — A free-text summary of the processing activity and why legitimate interest is being invoked. Optional. If left blank, the detail view displays a dash.
Will processing achieve the goals? — Necessity tab. Free text. Answers whether the processing actually fulfils the stated purpose.
Can the purpose be achieved without processing? — Necessity tab. Free text. If the answer is yes, legitimate interest cannot be used as the legal basis.
Is processing proportional to purpose? — Necessity tab. Free text. Justifies the volume, sensitivity, and scope of processing.
Are there less intrusive means? — Necessity tab. Free text. Documents whether alternatives were considered.
Persons need special protection — Balancing tab. Free text. Notes whether any data subjects belong to a vulnerable group.
Data processing context — Balancing tab. Dropdown with two options: Personal and Professional. There is no "mixed" or "N/A" option; choose the closest match and use the Relationship to Persons field to add nuance if needed.
Relationship to Persons — Balancing tab. Free text. Describes the nature of the relationship between your organisation and the data subjects.
Data directly collected — Balancing tab. Free text. States whether data came directly from the data subject or from a third party.
What did the third party disclose? — Balancing tab. Free text. Required when data was obtained from a third party.
Effects of processing on data subjects — Balancing tab. Free text. Describes the potential impact on individuals.
Likelihood and severity of effects — Balancing tab. Free text. Estimates probability and severity of the identified effects.
How this connects to the rest of DPMS
The Legitimate Interest module sits at the centre of your legal-basis documentation. Once you create and complete an assessment here, it feeds into several other areas of the system:
- ROPA (Record of Processing Activities): If you link a ROPA record to a Legitimate Interest assessment, the ROPA's personal data categories and special category data will appear in the read-only "Balancing of Interest" panel on the LIA detail view. This gives you a joined-up picture without re-entering information. You establish the link from the ROPA side, not from this screen.
- Tasks module: Tasks you link on the Tasks tab appear in the Tasks module with a reference back to this LIA. This lets compliance managers and department heads track follow-up actions without navigating into the Legitimate Interest module.
- Assessments module: Questionnaire-based assessments linked here are also visible from the Assessments module, and the assessment detail page will show the linked legitimate interest record count.
- Compliance Settings: The status options on this screen are configured under Compliance Settings → Statuses → Legitimate Interest Status. The Affected Persons tags are shared across DPMS, including the ROPA module.
After completing this screen, your next steps are typically to change the status to Review, share the record URL with a reviewer, and — once approved — set the status to Active. If the assessment references processing that is already documented in a ROPA, link the two records from the ROPA side so the cross-reference data flows automatically.
Tips & common pitfalls
Heads up: The tabs are locked until you save the General tab. You cannot click Necessity or Balancing of Interests on a brand-new record. Fill in at least the Name field and click Save first.
Heads up: Saving the General tab always redirects you to the Necessity tab, even if you intended to jump to Balancing of Interests. After the first save, use the left-hand menu to navigate directly to any tab.
- Responsible Persons ≠ Manage Access. The Responsible Person field marks accountability. The Manage Access tab controls visibility in the system. A person can be responsible for an assessment without having system access to it, and vice versa.
- The "from linked ROPA" fields on the detail view cannot be edited here. The Personal Data and Special Categories rows visible in the read-only Balancing of Interest section are populated automatically when a ROPA is linked. To populate them, establish the link from the ROPA module.
- Data processing context is a two-option dropdown. There is no "mixed" or "N/A" choice. If the context is genuinely mixed, select the closest option and document the nuance in the Relationship to Persons text area.
- Review AI-translated content before setting the record to Active. The translation badge next to a field means the content was auto-generated — not that it has been reviewed. Legal documentation must be verified by a qualified person before it is treated as final.
- Set up Manage Access immediately after the first save if confidentiality matters. Until you configure access controls, the record may be visible to all users with Legitimate Interest read permission. Don't wait until the analysis is complete to lock it down.
- Custom statuses appear automatically. If your Compliance Settings administrator has added custom statuses for the Legitimate Interest module, they will appear in the Status dropdown alongside the system defaults (Draft, Active, Inactive, Review). Check with your administrator if you expect a status that is not showing.